Adding parameters to dashboards and documents
You must have designer rights to add parameters to dashboards and documents.
You can add parameters to a dashboard or document that will prompt end users to fill in values before they can view the content online. The parameters filter the data, enabling users to view the same dashboard or document with different values to obtain varying results. For example, in an IT-related dashboard that displays components for Incident Category and Incident Priority, you could add a parameter for filtering those components by Incident Owner.
Incorporating parameters into your dashboards and documents is a two-step process—first add one or more parameters, then create one or more variable filter conditions that reference those parameters at the global or individual component level.
Tips for using parameters
•You can add as many parameters as you want per dashboard or document, and you can create one or more global or component-level filters that reference each parameter.
•When creating a new dashboard, the most efficient workflow for adding a parameter and global filter is to name the dashboard, select the layout, add the parameters, then create the variable filter condition(s) for the Default Filter. Do this before dragging and dropping any components onto the layout and saving the content. That way, each added component will have the filters already in place. This workflow applies to documents as well.
Global filters added after saving a dashboard or document only apply to new components that you drag and drop onto the display.
•You can hover your mouse over the ![]() icon in a dashboard, document, or component header to get a quick view of all applied parameters and filters. With dashboards, it's also possible to view the applied parameter value in brackets after the parameter name. To do so, the Xtraction administrator needs to enable the Show Parameter Value option in the Administration > Settings dialog.
icon in a dashboard, document, or component header to get a quick view of all applied parameters and filters. With dashboards, it's also possible to view the applied parameter value in brackets after the parameter name. To do so, the Xtraction administrator needs to enable the Show Parameter Value option in the Administration > Settings dialog.
•Xtraction enables you to export and schedule exports for dashboards and documents that contain parameters. You must save the content before doing so. For details about scheduling exports, see Scheduling exports.
Dashboard parameters
After adding a parameter, you'll need to create one or more global or component filters that reference the parameter.
This procedure assumes you're working with a previously saved dashboard. To add a parameter to a new dashboard, see the section above for tips.
1.Open the Dashboard Designer, then click File > Open to select a dashboard.
2.Click the ![]() icon in the dashboard header (don't confuse this with a component header).
icon in the dashboard header (don't confuse this with a component header).
3.In the Dashboard dialog, click the Parameters tab.
4.Right-click in the blank area and select Add parameter.
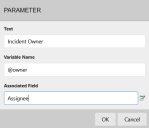
5.In the Parameter dialog, enter the parameter details. For example, in a dashboard that shows both Incident Category and Priority, you could add a parameter that filters the data by Incident Owner.
•Text: The parameter title that will display to end users in the Parameter dialog when they open the dashboard.
•Variable name: A variable to be associated with this parameter. It's recommended that you start your variables with a symbol to easily identify them. You can name variables any way you want, just be consistent with the naming conventions. Variable names are case sensitive.
•Associated field: A field from the data source that will prompt end users to select from a list of potential parameter values (recommended). If no field is associated, users will be presented with an empty text field for entering a value.
Click the ![]() icon. Ensure that the correct data source is selected, then select a field from the list that you want to associate with the variable.
icon. Ensure that the correct data source is selected, then select a field from the list that you want to associate with the variable.
6.Click OK. Repeat for each parameter you're adding to the dashboard.
7.When finished, click OK. You'll notice that the ![]() icon now displays in the dashboard header indicating the inclusion of parameters.
icon now displays in the dashboard header indicating the inclusion of parameters.
8.Click File > Save.
Parameters only work when they're referenced by a filter, so you need to create one or more variable filter conditions that are global to the dashboard (by modifying the Default Filter), or for individual components in the dashboard.
1.Open a previously saved dashboard.
2.In the left navigation pane, click the Default Filter ![]() icon.
icon.
3.In the Edit Filter dialog, right-click in the Conditions area and select Add variable conditions.
4.In the Add Variable Conditions dialog, select the data-source field to filter on, an operation (such as "equals"), and the matching variable (created in the procedure above). Click Add condition. Repeat to add as many filters as needed.
5.Click OK.
6.Filter conditions added to the Default Filter will only work on newly added components, so you need to drag and drop the same components back onto the layout that you want the filter to apply to. (Or update the dashboard with different components.) If you don't want certain components to be filtered, leave them as-is in the layout.
7.Click File > Save.
Now, when an end user opens the dashboard, they'll be presented with the Parameter dialog where they can select a parameter value to filter the viewable data.
You can create one or more filters for individual components in a dashboard. Variable filter conditions added at the component level will integrate with any currently applied parameter values.
1.Open a previously saved dashboard.
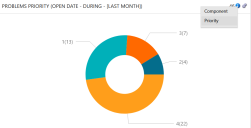
2.Click the ![]() icon in a component header and select the component name.
icon in a component header and select the component name.
3.In the Component Series dialog, click the Filter tab, then right-click in the Conditions area and select Add variable conditions.
4.In the Add Variable Conditions dialog, select a data-source field to filter on, an operation (such as "equals"), and a variable. Click Add condition. Repeat as needed.
5.Click OK, then OK again. The component will automatically update with the newly applied filter(s).
6.Click File > Save.
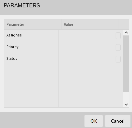
1.Open a dashboard that includes parameters. The Parameter dialog opens.
2.For each parameter, click the button at the end of the row to select from a list of values pulled from the associated field. Click OK.
The dashboard components will update with the selected values. You can change the values by selecting new ones in the Parameter dialog. (To open the Parameter dialog, click the ![]() icon in the dashboard header.)
icon in the dashboard header.)
Document parameters
After adding a parameter, you'll need to create one or more global or component filters that reference the parameter.
For additional guidance, see the Document Parameters video on the Ivanti community website.
The following procedure assumes you're working with a previously saved document. To add a parameter to a new document, see "Tips for using parameters" above.
1.Open the Document Designer, then click File > Open to select a document.
2.Click the ![]() icon in the document header (don't confuse this with the header of an open component).
icon in the document header (don't confuse this with the header of an open component).
3.In the Document dialog, click the Parameters tab.
4.Right-click the blank area and select Add parameter.
5.In the Parameter dialog, enter the parameter details. For example, in a document that shows both Incident Category and Priority, you could add a parameter that filters the data by Incident Owner.
•Text: The parameter title that will display to end users in the Parameters dialog when they open the document.
•Variable name: A variable to be associated with this parameter. It's recommended that you start your variables with a symbol to easily identify them. You can name variables any way you want, just be consistent with the naming conventions. Variable names are case sensitive.
•Associated field: A field from the data source that will prompt end users to select from a list of potential parameter values (recommended). If no field is associated, users will be presented with an empty text field for entering a value.
Click the ![]() icon. Ensure that the correct data source is selected, then select a field from the list that you want to associate with the variable.
icon. Ensure that the correct data source is selected, then select a field from the list that you want to associate with the variable.
6.Click OK. Repeat for each parameter you're adding to the document.
7.When finished, click OK. The ![]() icon will display in the document header indicating the inclusion of parameters.
icon will display in the document header indicating the inclusion of parameters.
8.Click File > Save.
Parameters only work when they're referenced by a filter, so you need to create one or more variable filter conditions that are global to the document (by modifying the Default Filter), or for individual components in the document.
1.Open a previously saved document.
2.In the left navigation pane, click the Default Filter ![]() icon.
icon.
3.In the Edit Filter dialog, right-click in the Conditions area and select Add variable conditions.
4.In the Add Variable Conditions dialog, select the data-source field to filter on, an operation (such as "equals"), and the matching variable (created in the procedure above). Click Add condition. Repeat to add as many filters as needed.
5.Click OK.
6.Filter conditions added to the Default Filter will only work on newly added components, so you need to drag and drop the same components back onto the layout that you want the filter to apply to. (Or update the document with different components.) If you don't want certain components to be filtered, leave them as-is in the layout.
7.Click File > Save.
Now, when an end user brings a component into focus, the component will automatically update with the newly applied filter(s).
You can create one or more filters for individual components in the document.
1.Open a previously saved document.
2.Bring one of the components into focus in the central pane.
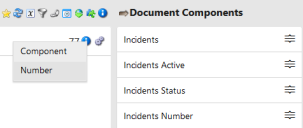
3.Click the ![]() icon in the component header, then select the component name (seen as "Number" in the image below).
icon in the component header, then select the component name (seen as "Number" in the image below).
4.In the Component Series dialog, click the Filter tab, then right-click in the Conditions area and select Add variable conditions.
5.In the Add Variable Conditions dialog, select a data-source field to filter on, an operation (such as "equals"), and a variable. Click Add condition. Repeat as needed.
6.Click OK, then OK again. The component will automatically update with the newly applied filter(s).
7.Click File > Save.
1.Open the document. The Parameters dialog opens.
2.For each parameter, click the button at the end of the row to select from a list of values pulled from the associated field. Click OK.
3.In the Document Components pane, double-click a component to bring it into focus. The component will display with the selected values. You can change the values by selecting new ones in the Parameters dialog. (To open the Parameters dialog, click the ![]() icon in the document header.)
icon in the document header.)
Copying a parameter value into a document URL
You can copy a parameter value directly into the URL of a document. This enables you to share exactly what your target viewers want to see.
1.Complete the procedures above for adding a parameter and filter to a document.
2.Click the ![]() icon and select Copy link with parameters to clipboard.
icon and select Copy link with parameters to clipboard.
3.Open a new tab in your browser and paste the copied link into the URL line.


