Report Designer
You must have designer rights to use this tool.
Note that data policies don't apply to users accessing reports built with the Report Designer. Reports query data sources directly, bypassing all data-policy restrictions.
This topic contains general guidelines for using the Report Designer. For detailed instructions, see the Xtraction Report Designer Guide, located on the Ivanti community website. This guide was written for a previous version of Xtraction but is still applicable for the most recent version of the product.
If you're an advanced user, you can use the Report Designer to create custom reports based on standard SQL statements that run outside of the Xtraction component framework. You determine the content to be included, though the default report format is limited to a tabular presentation within a grid.
You can set up reports with parameters that will prompt a user to enter required values before the report is generated. For example, to generate an incident report for a service desk, you could add parameters that prompt for an assigned group and a specific date range.
The design process can include an attached template that enables you to format the output to meet specific needs. Unlike a document, a report is a singular output without separate components.
1.In the toolbox, click the ![]() icon to open the Report Designer.
icon to open the Report Designer.
2.Click File > New to open the Report dialog.
3.Under the General tab, enter a title for the report, select the data source by clicking the ![]() icon, and select if permissions will be public.
icon, and select if permissions will be public.
4.Open the Notes tab and enter explanatory notes if needed.
5.Click OK.
6.In the left pane, enter and edit native SQL statements to be used for the report. Note that you can't apply data policies directly to SQL because custom reports run outside the Xtraction component framework.
7.In the right pane, right-click to open the SQL input parameters menu: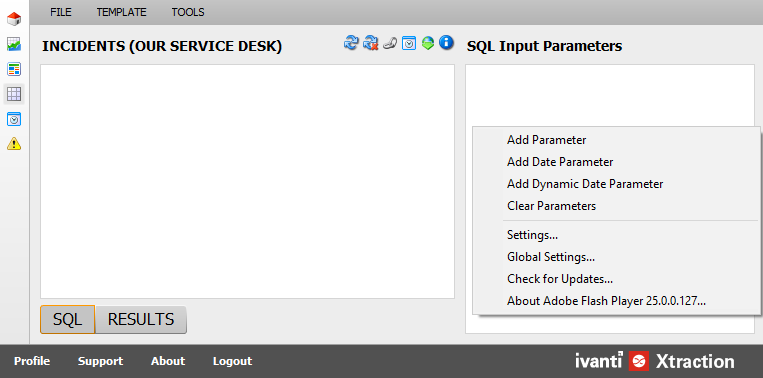
•Add parameter: Creates a parameter that prompts for a text value.
•Add date parameter: Creates a parameter that prompts you to select from a calendar. When you include date-based parameters, several options are available:
•End of day: Update the date entered to the end of the day. For example, 1-JUL-2020 is converted to 1-JUL-2020 23:59:59.
•Convert To UTC/GMT: Convert the date entered to UTC/GMT, which is based on your time zone.
•Convert To UNIX time: Convert the date entered to its UNIX time representation. For example, the 1st Jan 2016 00:00:00 would be expressed as 1451606400, which is the number of seconds since the start of 1970.
•Add dynamic date parameter: Creates a dynamic date parameter that prompts you to select from a list. For example, the list could include Today, Yesterday, Last Week, Last Month, and so on. Two date conversion options are available:
•Convert To UTC/GMT: Convert the date to UTC/GMT, which is based on your time zone.
•Convert To UNIX time: Convert the date to its UNIX time representation. For example, the 1st Jan 2016 00:00:00 would be expressed as 1451606400, which is the number of seconds since the start of 1970.
8.To save your results, click File > Save.
You can export reports to several different file formats. The exported version will show the grid of resulting records from the report query.
1.At the top of the details pane, click the ![]() icon to export the onscreen content.
icon to export the onscreen content.
2.In the Export Report dialog, select the format for the export.
3.If you've formatted the report with a template, select Use template. (See the section below for information on creating a report template.)
4.Click OK to save the report to the folder defined for your browser. Depending on the type of export, you may be prompted to acknowledge the Save or Open action as displayed by your browser.
Creating a report template
To provide custom formatting and structure for a report, you can design a template for the content using a separate template design tool for Xtraction called Report Builder. The current version can be downloaded from the Xtraction downloads page. You must be registered with Ivanti to access this page.
To run Report Builder, download it onto your computer and unzip it. The tool doesn't currently have an installer, so simply unzip the file to a folder and run ReportBuilder.exe from that folder.
After creating a report in Report Designer, you'll need to complete these general steps to apply a template to the content:
•Export the report content to the Report Builder tool. (This step is part of the next procedure to create a template.)
•Create a template in the tool for the report content.
•Upload the template back into Xtraction and apply to the report content.
If you plan on using the Report Builder's sort feature on numeric fields (accessed via the Group and Sort button), you will need a specific version (15.2) of the Report Builder app. Contact Ivanti support for help downloading this version.
1.In the Report Designer, click Template > Export Report Builder Data Source. This action produces a file based on your report content; you'll be asked to save it to your local file system.
2.Next, run the Report Builder tool as explained above.
3. Click File > New to create a new template.
4.In the Properties dialog > Data section, locate the XML data path.
5.Set the XML data path to the location of the data-source file exported above.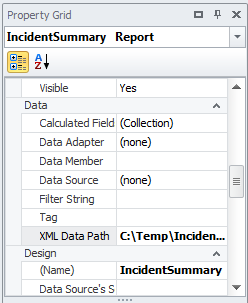
6.The Field List displays all fields from the custom report.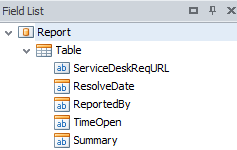
7.As you design the template, you can drag items from the Field List into the design area of the tool.
8.When the report template is fully designed, click Save to save the output to a folder.
Once you create the report template, you need to upload it back into Xtraction.
1.In Xtraction, open the report on which to use the template.
2.On the menu bar, click Template > Upload Template.
3.Your browser opens a window enabling you to locate the template in your folders.
4.Double-click the document and click Upload. Xtraction acknowledges this process by confirming the upload.
5.On the menu bar, click File > Save to save the template with the report content.
The Template menu also enables you to download a template, provided that one already exists.
You can't view a report in Xtraction that's formatted with a template; you must first export the report to view it. For details, see the procedure above to export a report.