Open topic with navigation
Configuring required initial settings
Now that you've completed the installation of LANDesk Asset Lifecycle Manager, and activated the server with a valid LANDesk Software license, you need to configure some initial settings before you can launch the administrator (Design) console and start using the application.
Read this section to learn about:
Required initial settings
The following settings must be defined before you can log on to the Design console:
- Messaging: Define SMTP mail server information and a valid e-mail address in order to send notifications during process workflows.
- Users/Groups: Define user and group information (for an Active Directory domain) in order to identify users that can be assigned or associated with assets.
Configuring initial settings
LANDesk Asset Lifecycle Manager setup creates a new program group in the Windows Start menu called LANDesk Service Management. This program group contains shortcuts to the Administrator Console, the Configuration Options tool, and the License Activation utility.
To configure initial settings
- At the server, click Start > All Programs > LANDesk Service Management > Configuration Options.
- At the login screen, make sure the server name or (or server IP address) is correct, and then click Login to sign in as the current user. You can also click Sign is as a different user, enter the user name and password, and then click Login.
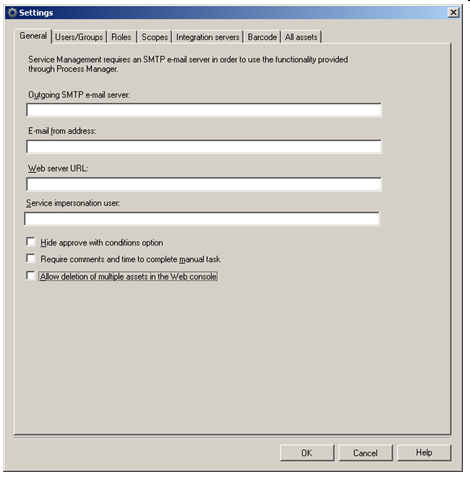
- The first time the console is launched, the Settings dialog appears. (NOTE: This dialog can be accessed later from the console; click Tools > Settings.)
- Click the General tab. Use the options on this tab to configure workflow notification settings. Enter a valid SMTP mail server name (or IP address), and a valid e-mail address from which messages can be sent.
NOTE: The other options on this tab are not required during this initial configuration to be able to log in to the console, although you can specify them now if you like. For detailed information on the remaining options on the General tab, see "Configuring general settings" in the Designer's Guide.
- (Optional) The Web server URL field is automatically filled in with the server's Web service address. If you've moved the Web server, you can enter the new URL here. You can enter either an IP address or a DNS hostname.
- (Optional) The Service impersonation user field is automatically filled in with the currently logged-in user. Use this option to specify the user that the LANDesk Service Management service runs as. This is important when the service is trying to access files on different servers for data synchronization, attachments, or certain workflow actions such as the execute script action. If this field is empty, the service runs by default as Network Service, which can access local files only. If access to files on other machines is necessary, make sure this user has access rights to resources on those servers.
- (Optional) If you don't want workflow participants who must approve an action or event to be able to specify certain conditions with their approval, check the Hide approve with conditions checkbox. This option controls whether or not approval can include conditions that must be satisfied before approval is granted and the process workflow can continue. In other words, when this option is checked, approvers will have only the ability to approve or deny requests that are part of a workflow.
- (Optional) If you want to require that approvers include comments and a time deadline for a workflow action, check the Require comments and time to complete manual task checkbox.
- (Optional) If you want to allow Web console users to be able to delete multiple asset instances at the same time (instead of only one-by-one), check the Allow deletion of multiple assets in the Web console checkbox.
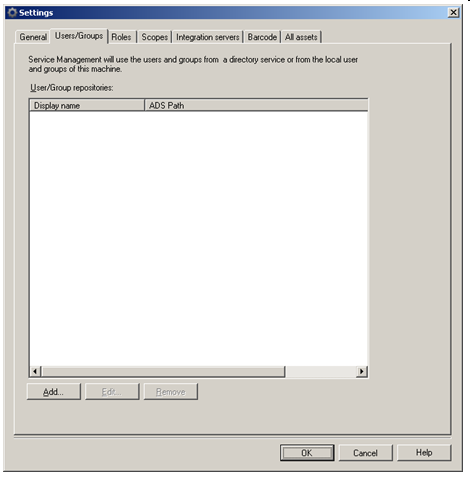
- Click the Users/Groups tab. Use the options on this tab to enter directory service information needed to contact your organization’s Active Directory users. This information is used to discover and identify users that can be assigned assets.
- Click Add, select the directory service, and then click OK.
IMPORTANT: You must enter information for the currently logged-in user or you will not be able to log into the console. The machine must be connected to the domain and the currently logged-in user must be an Active Directory domain user.
- At the Active Directory Settings dialog, enter a display name (any name you want), the domain name, the LDAP path, the user name and password, and then click OK. You should click Test in order to confirm a successful connection to your Active Directory.
NOTE: The Active Directory dialog also includes options to configure advanced Active Directory connection information. Very few installations will require the advanced settings to be completed. Contact your LANDesk Professional Services consultant or LANDesk Support if you have questions about these advanced settings.
- Click OK to save the settings and close the dialog.
You've now completed configuration of the required initial settings, which is the final step of installing and configuring LANDesk Asset Lifecycle Manager.
Additional settings
In addition to the required initial settings described above, the Configuration Options utility includes the following system settings:
- Integration servers: Configure PIMs (Process Integration Modules) including LANDesk Management Suite core server, LANDesk Service Desk, Avocent Mergepoint Infrastructure Explorer (AMIE), BMC Remedy, or a VMWare server, in order to access external data sources.
- Barcode: Configure the e-mail address that barcode scanners send messages to.
- Roles: Create roles to control user access to the asset and process features in the Web console based on individual responsibilities. (NOTE: This tab is hidden during initial configuration, but is available after you log on to the console for the first time.)
- Scopes: Create scopes to control user access to resources in your organization based on criteria such as geographical location or organizational structure. (NOTE: This tab is hidden during initial configuration, but is available after you log on to the console for the first time.)
- All assets: Change the display columns for the All assets data list in the Web console. These display columns are searchable in the Web console.
None of these settings need to be defined during this initial configuration task. You will be able to configure these settings, and change the messaging and user/group settings, at any time in the console (click Tools > Settings). Refer to the "Configuring Settings" section in the Designer's Guide and the online help for detailed information about all of the settings.
Starting the console
Congratulations! You've completed the installation, activation, and basic configuration of LANDesk Asset Lifecycle Manager.
You can now log in to the ALM Design console and begin using this business management tool. You'll be able to perform tasks such as create asset types and supporting resources, design and implement process workflows, design and make forms available to asset managers and regular end users, prepare report views, define lifecycle states, and so on.
To log in to the console
- At the server, click Start > All Programs > LANDesk Service Management > Administrator Console.
- Enter your user credentials, and click Login.
LANDesk Asset Lifecycle Manager includes a complete set of user documentation. For information about IT asset and process management concepts, and step-by-step instructions on how to use all of the tools, consult the Designer's Guide and the Asset Manager's Guide, as well as the online help available from each console.