Creating the rules
When you have defined which attributes are included in the agreement rules, you need to specify the exact values that comprise these rules.
The following procedure details setting the agreement rules for a Response Agreement. You set agreement rules for OLAs and UCs in a similar way.
If your rules include categories, then you can choose to use or not use Exact Match Categories. That is, if you use Exact Match, then the first rule that matches that category including all its sub-categories is used. If the sub-categories do not match, then that rule will not apply. If you use Exact Match categories, you must specify rules for all of the category levels.
To create an agreement rule:
- On the Service Level Management tree, select the Contracts folder, then on the Actions list, click Manage Rules.
The Agreement Rules list appears in the workspace.
If your agreement rules list contains many entries, it is displayed on several pages, with paging controls at the bottom to enable you to move through the list. The number of rows on each page is set using the Default Query page size property in the System Settings.
You can filter the rules list using the drop-down lists at the top to display only those rules that you are currently interested in.
- If you have existing rules, on the Agreement Rules list, select where you want to insert then new rule.
- On the Actions list, click New Rule.
The Create New Agreement Rule dialog appears.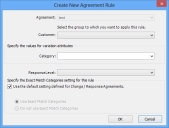
- Select the relevant group.

The only groups that appear in this list are those relevant to the agreement type, and that have been added to the agreement. For example, for a Response Agreement, the groups that appear are Customers. For a UC it would be Suppliers, and for OLAs it would be Support Groups.
- Select the required values for the variation attributes that you have set up, then select the Response Level that you want to apply to this rule.
If you already have a list of agreement rules and want to add a new rule in a specific place on the list, then select the Insert rule before selected check box. When you click OK, this rule is added above the currently selected rule on the list.
- If required, clear the Use the default setting... check box, and select the required option button for exact match category rules.
- Click OK.
The rule is added to the bottom of the Agreement Rules list.
The rule at the top of the list is the most likely to be used, so it is important that you ensure that the order of the list of rules is correct. To move rules, either drag them to the new location or select them in the list and click Move Up or Move Down. If the list extends over more than one page, you can move rules from one page to another by opening two instances of the Administration component (right-click the shortcut, then click Open in New Window) and then dragging from one instance to the other.
Take care when moving a rule in an agreement rules list that has filters applied to it. Be aware that you could be moving the rule further than it appears because you may be moving it past rules that are currently hidden in the list.
- If required, on the Actions list, click Use Exact Match Categories.
- At the bottom of the Agreement Rules list, add a rule that specifies a Response Level, but no Customer or variation attributes. This Response Level with then effectively be the default response level that is used if no combination of variation attributes are met.