Logging for AppConnect apps for iOS
- Overview of logging for AppConnect apps for iOS
- Log levels
- How the log level appears in messages
- Log file details
- Log data collection overview
- Configuring logging for an AppConnect app
- Creating a new label
- Applying labels
- Log level configuration impact on the device
- Activating verbose or debug logging on the device
- Emailing log files from Mobile@Work
- Removing log level configuration when no longer needed
Overview of logging for AppConnect apps for iOS
You can collect detailed log data for AppConnect for iOS apps. You specify the AppConnect apps that should log detailed data. The AppConnect library contained in each specified app also logs detailed data. The log data provides information to help Ivanti Technical Support troubleshoot issues with the apps.
Depending on your configuration, the data is logged to:
- the device’s console.
- the device’s console and files on the device.
IMPORANT: Do not modify the log level if it impacts many devices in your production configuration because the modification can impact Core performance. Make modifications only to configurations that impact only a few devices.
Log levels
You choose one of four log levels for an AppConnect app. The two highest levels can log sensitive data. To prohibit unauthorized users from accessing sensitive data, the two highest levels require the device user to enter a debug code that you specify.
Exactly what sensitive data is logged depends on the app, but can include, for example:
- Device user data, including document names and contents, contact lists, notes, and bookmarks
- Encryption keys, passwords, certificates, signing identities, and cookies
- Complete URLs and URL POST data
- Data that reveals the contents of encrypted data
The following table describes the log levels from lowest (least verbose) to highest (most verbose):
|
Log level |
Description |
Contains sensitive data? |
Requires the user to enter the debug code? |
|
Error |
Provides error, warning, and status messages. This level is the default. It is always turned on. Error messages are for events that block access to part or all of the app. Example: Corrupt or missing data Warning messages are for events that are suspicious, but not quite failures like errors. Example: Unexpected data that is ignored Status messages indicate major changes in the state of the app. Example: User successfully logged in |
No |
No |
|
Info |
Provides error, warning, and status messages, plus more information. Info messages indicate minor changes in the state of the app. Example: AppConnect app check-in times |
No |
No |
|
Verbose |
Provides error, warning, status, and info messages, plus more, possibly sensitive, information. Verbose messages provide more extensive information, possibly including sensitive details. Example: Server URLs |
Yes |
Yes |
|
Debug |
Provides error, warning, status, info, and verbose messages, plus further information, which is possibly sensitive. Debug messages have the most information, possibly including sensitive details. Example: URL request details |
Yes |
Yes |
How the log level appears in messages
When you set the log level for an app, messages logged by the following components are impacted:
•the AppConnect app
•the AppConnect library contained in the AppConnect apps
•the AppConnect wrapper (only applicable for wrapped AppConnect apps)
The messages logged by these components include the log level as shown in the following table:
|
Component |
App name in log message |
How the log level appears in messages |
|
An AppConnect app |
The app’s name |
[Error] [Warning] [Status] [Info] [Verbose] [Debug] The value error for the MI_AC_LOG_LEVEL key in an app’s AppConnect app configuration, can result in messages with [Error], [Warning], and [Status]. |
|
AppConnect library contained in an AppConnect app |
The app’s name |
[AppConnect:Error] [AppConnect:Warning] [AppConnect:Status] [AppConnect:Info] [AppConnect:Verbose] [AppConnect:Debug] The value error for the MI_AC_LOG_LEVEL key in an app’s AppConnect app configuration, can result in messages with [AppConnect:Error], [AppConnect:Warning], and [AppConnect:Status]. |
|
The AppConnect wrapper (only applicable for wrapped AppConnect apps) |
The app’s name |
[AppConnectWrapper:Error] [AppConnectWrapper:Warning] [AppConnectWrapper:Status] [AppConnectWrapper:Info] [AppConnectWrapper:Verbose] [AppConnectWrapper:Debug] The value error for the MI_AC_LOG_LEVEL key in an app’s AppConnect app configuration, can result in messages with [AppConnectWrapper:Error], [AppConnectWrapper:Warning], and [AppConnectWrapper:Status]. |
Log file details
Details regarding the log files for each app are:
•The log files for each app are saved to the following directory:
Apps/<app name>/Library/Application Support/AppConnectLogs
•The log file for each app is named appconnect.log.
•The log file is at most 1 MB.
•When appconnect.log exceeds 1 MB:
It is renamed to appconnect.log.<timestamp>.
Example: appconnect.log.2015-05-28 15:13:21
Logging begins in a new file named appconnect.log.
If 20 log files already exist, the oldest file is deleted.
Log data collection overview
To collect log data, you do the following high-level steps:
| 1. | Create an AppConnect app configuration that specifies a non-default log level for the app and specifies logging to files, if desired. |
You create a key-value pair that specifies one of four log levels. For the two highest log levels, verbose and debug, you create a key-value pair that is the debug code that activates logging.
You create another key-value pair to specify logging to files.
See Configuring logging for an AppConnect app.
| 2. | Create a new label that you apply to the new AppConnect app configuration and no more than a few devices. |
See Creating a new label.
| 3. | Apply labels appropriately. |
See Applying labels.
| 4. | If you chose one of the two highest log levels, ask the device user to turn on logging for the app on the device, and to enter the debug code. |
See Log level configuration impact on the device and Activating verbose or debug logging on the device.
| 5. | Use Mobile@Work to email the log files. |
See Emailing log files from Mobile@Work
| 6. | Revert to the default log level. |
See Removing log level configuration when no longer needed
Configuring logging for an AppConnect app
To configure the log level and debug code for an app, and to specify that you want to log to files in addition to the device console, do the following:
| 1. | In the Admin Portal, select Policies & Configs > Configurations |
| 2. | If the app does not already have an AppConnect app configuration, select Add New > AppConnect > App Configuration. Enter a name and description for the new app configuration and the app’s bundle ID. |
Continue to In App-specific Configurations, click Add+ to add a key-value pair.
| 3. | If the app does have an AppConnect app configuration, select it. |
| 4. | Click More Actions > Save As. |
A dialog box with a copy of the AppConnect app configuration displays.
| 5. | In App-specific Configurations, click Add+ to add a key-value pair. |
| 6. | Enter MI_AC_LOG_LEVEL in the key field. |
The key name is case-sensitive.
| 7. | Enter one of the following in the value field: error, info, verbose, or debug. |
This value is not case-sensitive.
| 8. | If you entered verbose or debug, click + to add another key-value pair. |
| 9. | Enter MI_AC_LOG_LEVEL_CODE in the key field. |
The key name is case-sensitive.
| 10. | Enter a string for the value. |
The device user will enter this string to activate the verbose or debug log level. You can make up any string. For example, enter 37!8D. For the most security, use a code that is difficult to guess.
The string is case-sensitive.
| 11. | In App-specific Configurations, click Add+ to add a key-value pair. |
| 12. | Enter MI_AC_ENABLE_LOGGING_TO_FILE in the key field. |
The key name is case-sensitive.
Apps built with AppConnect for iOS SDK versions prior to 2.3 or wrapped with AppConnect for iOS Wrapper versions prior to 2.5 do not support this key. The logs do not get written to files.
| 13. | Enter Yes in the value field. |
| 14. | Click Save. |
Creating a new label
Create a new label for the new AppConnect app configuration.
| 1. | In the Admin Portal, select Devices & Users > Labels. |
| 2. | Click Add Label. |
| 3. | Enter a name for the label, such as AppConnect for iOS logging. |
| 4. | For Type, select Manual. |
| 5. | Click Save. |
Applying labels
Apply labels so that the AppConnect app configuration with the log level key-value pairs is applied to only a few devices.
IMPORTANT: Modifying an AppConnect app configuration for many devices in your production environment can impact Core performance. For this reason, creating a new label for only a few devices is necessary.
Apply labels as follows:
- Apply the new label to the new AppConnect app configuration.
- Apply the new label to a few test devices.
- If you copied the AppConnect app configuration, make sure the test devices have only the new label, and not the label from the copied AppConnect app configuration.
- If the app has an AppConnect container policy, apply the new label to the policy so that the test devices receive it.
- Apply the new label to the AppConnect global policy for the devices, unless the devices use the default AppConnect global policy.
- If the test devices depend on other configurations or policies, apply the new label to those configurations and policies, too.
To apply the new label to a configuration or policy:
- Select the policy or configuration.
- Select More Actions > Apply To Label.
- Select the new label.
- Click Apply.
To add the new label to a device:
- Select the device.
- Select More Actions > Apply To Label.
- Select the labels to apply to the device.
- Click Apply.
Log level configuration impact on the device
Error level logging is always on, regardless of whether you have configured the MI_AC_LOG_LEVEL key-value pair, and it requires no actions from the device user. Info level logging also does not require device user interaction. However, verbose or debug level logging do not begin until the device user activates debug mode in Mobile@Work.
The status details for an AppConnect app include a Debug Mode switch only when you have configured both of the following in the app’s AppConnect app configuration:
•a log level of verbose or debug
•a debug code
In this case, the status details for an AppConnect app shows the Debug Mode switch:
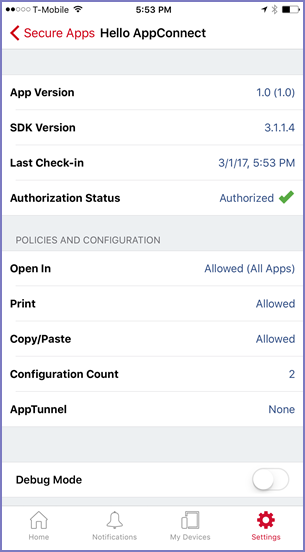
The keys MI_AC_LOG_LEVEL and MI_AC_LOG_LEVEL_CODE are not included in the configuration count on an app’s detailed status display.
Activating verbose or debug logging on the device
To activate verbose or debug level logging, instruct the device user to do the following:
| 1. | Open Mobile@Work on the device. |
| 2. | Tap Settings. |
| 3. | Tap Check For Updates. |
| 4. | Tap Secure Apps. |
| 5. | Tap the app for which you want verbose or debug level logging. |
| 6. | Slide the toggle for Debug Mode. |
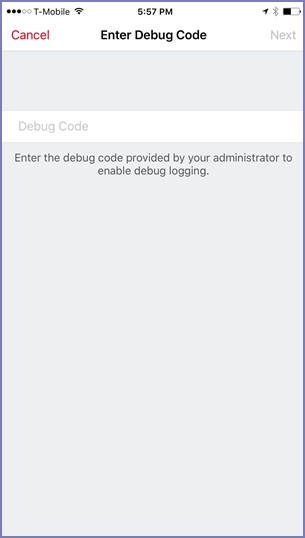
| 7. | Enter the debug code. |
| 8. | Tap Next. |
Verbose or debug level logging is activated for 24 hours, after which it is automatically deactivated the next time that the device user launches or switches to the app. However, the device user can deactivate it any time by tapping Debug Mode again.
Emailing log files from Mobile@Work
Mobile@Work for iOS can send the log files to an email address of your choice. This feature requires:
- Mobile@Work 9.8 for iOS and supported newer versions
- AppConnect apps using AppConnect 4.0 for iOS
Mobile@Work displays the option to send logs on the app’s status details screen, available in Mobile@Work at Settings > Secure Apps > <app name>. The option is at the bottom of the screen with this text: Send <app name> Logs.
The option is displayed only for apps AppConnect apps using AppConnect 4.0 for iOS. However, the displayed option is disabled if the app’s AppConnect authorization status is not authorized.
When the option is displayed and enabled, tapping it brings up the list of apps able to share the log files, such as email apps, if you included the following key-value pair for the app in its AppConnect app configuration:
•MI_AC_ENABLE_LOGGING_TO_FILE set to Yes
For wrapped apps, you can also include the key MI_AC_WR_ENABLE_LOG_CAPTURE set to Yes. This key causes the app’s logs to be included in the log files along with the logs from the AppConnect wrapper and AppConnect library.
Removing log level configuration when no longer needed
Once you have collected the logs from the device user, remove the MI_AC_LOG_LEVEL, MI_AC_LOG_LEVEL_CODE, and MI_AC_ENABLE_LOGGING_TO_FILE key-value pairs from the new AppConnect app configuration. This best practice ensures the app does not continue logging sensitive data unnecessarily.
Do the following:
- In the Admin Portal, select Policies & Configs > Configurations
- Select the app configuration for the app and click Edit.
- In App-specific Configurations, click X to remove the key-value pairs.
- Click Save.
Alternatively, you can also return to using the original AppConnect app configuration for the test devices. Do the following:
- Remove the new test label from the devices and re-apply the original label.
- Delete the new AppConnect app configuration.
- Remove the new label from any configurations or policies that you applied it to.
- Delete the new label.