Configuring Ivanti EPMM as an independent root CA (Self-Signed)
Configuring Ivanti EPMM as an independent root CA requires configuring your infrastructure to trust Ivanti EPMM as an independent root CA.
To configure Ivanti EPMM as an independent root CA, you must follow these basic steps:
-
Generate a self-signed certificate
-
Create a local CA certificate enrollment setting for the self-signed certificate
Generating a self-signed certificate
This section addresses how to generate the self-signed certificate.
Procedure
- Log into the Admin Portal.
- Go to Services > Local CA.
-
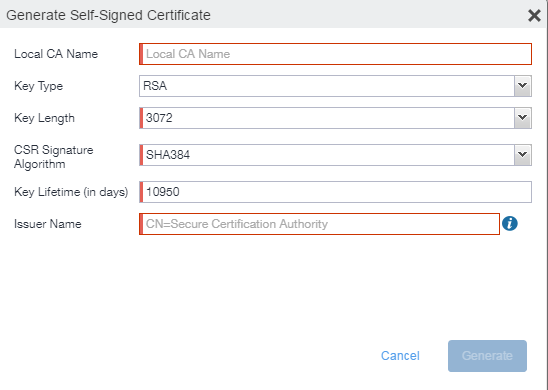
Select Add > Generate Self-Signed Cert.
-
Enter the following information.
- Local CA Name: Enter a recognizable name to identify the self-signed certificate. This name will appear in the list of local certificate authorities in Services > Local CA.
- Key Type: Specify the key type. The options are RSA (default) or Elliptical Curve.
- Key Length: Specify the key length. The values are 2048, 3072 (the default), and 4096. The longer the key length, the more secure the certificate.
-
CSR Signature Algorithm: The values are SHA1, SHA256, SHA384 (default), and SHA512.
-
Key Lifetime (in days): Enter number of days. The key will expire after the entered number of days.
The default is 10,950 days. Ivanti recommends 5 years or longer; 61 days is the minimum.
-
Issuer Name: Requires an X.509 name. For example, CN=www.yourcompany.com, DC=yourcompany, DC=com.
The Issuer Name field uses an X.509 distinguished name. You can use one or more X.509 codes, separated by commas. The following table describes the valid codes for the Issuer Name field:
Code
Name
Type
Max Size
Example
C
Country/Region
ASCII
2
C=US
DC
Domain Component
ASCII
255
DC=company, DC=com
S
State or Province
Unicode
128
S=California
L
Locality
Unicode
128
L=Mountain View
O
Organization
Unicode
64
O=Company Name, Inc.
OU
Organizational Unit
Unicode
64
OU=Support
CN
Common Name
Unicode
64
CN=www.company.com
If you have a registered DNS name that you use to send SMTP mail, a best practice is to use the domain component convention and the DNS name for the certificate name.
-
-
-
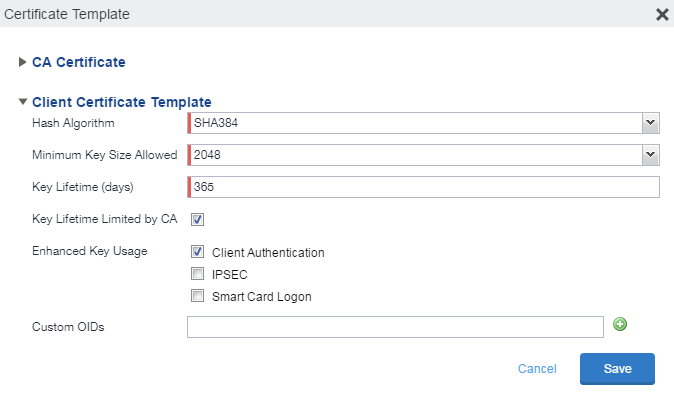
Configure the Client Certificate Template.
Values depend on the purpose for the certificate and the requirements of your environment.
- Hash Algorithm: The larger the hash number, the more secure. The options are SHA256, SHA384 (default), SHA512—part of the SHA2 secure hash algorithm family required for U.S. government applications. The number signifies the output bits.
- Minimum Key Size Allowed: The longer the key length is, the more secure the certificate.
- Key Lifetime (days): 365 days or longer is recommended; 61 days is the minimum.
-
Key Lifetime limited by CA: Select to use the key lifetime specified for the self-signed CA.
Ivanti, Inc recommends enabling this option. Enabling this option ensures that client certificate validity periods do not exceed the life time of the issuing CA certificate.
- Enhanced Key Usage: When a certificate is presented to an application, the application can require the presence of an Enhanced Key Usage OID specific to that application. Leave these deselected if you do not have any applications that require additional OIDs.
- Custom OIDs: If you are using this certificate for SSL authentication, enter the OID in this field.
-
Select Save.
The newly created self-signed certificate will be listed in Services > Local CA.
Creating a local certificate enrollment setting
After you have generated the self-signed certificate, you need to create a local CA certificate enrollment setting for the self-signed certificate. Creating a local CA certificate enrollment setting enables proxy functionality so that Ivanti EPMM generates the certificates and caches the generated keys.
- Log into the Admin Portal.
- Go to Policies & Configs > Configurations.
- Select Add New > Certificate Enrollment > Local.
- Use the following guidelines to specify the settings:
- Name: Enter brief text that identifies this group of settings.
- Description: Enter additional text that clarifies the purpose of this group.
- User Certificate: Specifies that the certificate is distributed to multiple devices assigned to a single user.
- Device Certificate: Specifies that the certificate is bound to the given device.
- Local CAs: Use the drop-down list to select localCA.
- Key Type: Specify the key type.
- Subject: Use the drop-down list to select CN=$EMAIL$.
- Subject Common Name Type: Select the CN type specified in the certificate template. If you enter the $EMAIL$ variable in the Subject field, select None from the drop-down list.
- Microsoft User Security Identifier: Select the check box to include a non-critical extension with OID 1.3.6.1.4.1.311.25.2 and the value of substitution variable $USER_SID$. If the LDAP user has no SID, the extension will not be included.
- Key Usage: Specify acceptable use of the key by Signing, encryption or Encryption & Signing.
- Key Length: The value is 2048 (by default).
- CSR Signature Algorithm: The value is SHA384 (by default).
- (Optional) Click Issue Test Certificate to verify the configuration by generating a test certificate to ensure there are no errors. Although this step is optional, it is recommended. A real certificate is not generated.
- Click Save.
To ensure continuous connectivity, admins can add secondary CRL URL's for Local CA's and choose the preference of the CRL by using the Prefer Primary CRL URL checkbox.
For more information on configuring the settings, see Certificate Enrollment settings.
Pruning revoked CRL certificates
Revoked certificates can be automatically pruned from an Ivanti EPMM Local CA Certificate Revocation List (CRL).
To configure CRL pruning of local CA certificates:
Procedure
-
From the Admin Portal, go to Services > Local CA page and select a certificate.
-
From the Actions menu, select Edit. The certificate template window opens.
-
Select the caret to the left of CA Certificate to open the section.
-
Select CRL Pruning to enable it.
-
Enter the number of days of revoked certificates you want to include in the CRL before pruning. The default is 365.
-
Enter the CRL lifetime in hours, after which Ivanti EPMM regenerates the list. The default is 168 hours (7 days).
-
Select Save. Expired certificates beyond the revocation date are pruned from the CRL.