Custom SyncML
SyncML is a markup language and the Windows standard of xml. Ivanti EPMM allows administrators to upload SyncML files, however, SyncML is not a technology that Ivanti, Inc created. For information or support, best practices, and creating customized SyncML, contact Microsoft.
The Windows Advanced Menu allows you to enable custom features, including SyncML. Custom SyncML is turned off, by default and you must enable it first before you can upload a SyncML file to apply it to a label.
Enterprises can modify policies outside of Ivanti EPMM by enabling and using SyncML that allow administrators the ability to delegate the task to someone who does not have access to Ivanti EPMM to create SyncML files or modify scripts.
By using custom SyncML, you understand and assume all associated risks. You should always verify the content of the uploaded file with the latest Microsoft specification. Ivanti EPMM does not validate custom SyncML and takes no responsibility for damages to devices, including, but not limited to, lost data or unresponsive devices.
Preparing to use SyncML
Before you try to use SyncML, verify that you have the following details in place:
-
Custom SyncML file to upload that will turn on an action (Allow Notepad, as an example call).
-
Custom SyncML file to upload that will turn off the same action (Deny Notepad, as an example reversal call for Allow Notepad).
In cases where the call will not have a feature to turn off (Remote Lock, for example) the device would happen only once and would not need a reversal call.
Ivanti recommends that if your custom file turns on a behavior you should have another file that turns off the same behavior. Administrators implement the behavior (turn actions on or off, for example) via labels. However, the labels (and therefore, the behavior) must be managed manually. Ivanti EPMM uses only the last setting sent.
How to use SyncML
WARNING: By using custom SyncML, you understand and assume the associated risks. You should always verify the content of the uploaded file with the latest Microsoft specification. Ivanti EPMM does not validate custom SyncML and takes no responsibility for damages to devices, including, but not limited to, lost data or unresponsive devices.
This is a three-step process that requires you to:
Step 1: Enable custom SyncML.
Step 2: Upload SyncML files.
Step 3: Apply SyncML settings to labels.
To enable custom SyncML:
-
In Ivanti EPMM, go to Settings > System Settings > Windows > Advanced Menu.
-
Select Enable Custom SyncML Menu.
-
Select Save and OK after Ivanti EPMM successfully enables this feature.
To upload SyncML files:
-
Log into the Admin portal.
-
Go to Policies & Configs > Add New > Windows > Custom SyncML.
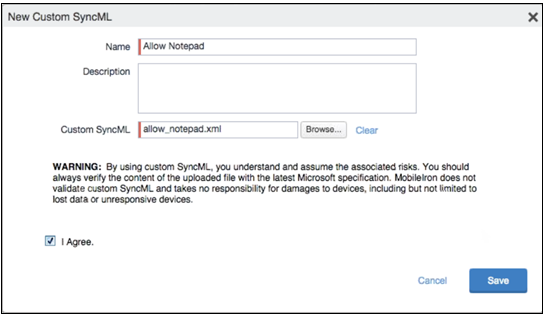
Figure 1. New Custom SyncML
-
Enter a name and description for the setting.
-
Select Browse to locate and upload the SyncML .xml file.
Custom SyncML files must have an .xml extension. -
Read the warning.
-
Select I Agree.
-
Select Save.
-
Repeat these steps for the partner file.
To apply SyncML settings to labels:
-
Go to Policies & Configs > Configurations.
-
Select the newly added SyncML setting.
-
Select Actions > Apply to Label.
-
Select one or more labels.
-
Select Apply then OK to apply the setting the next time the device checks in.