Customizing the self-service user portal
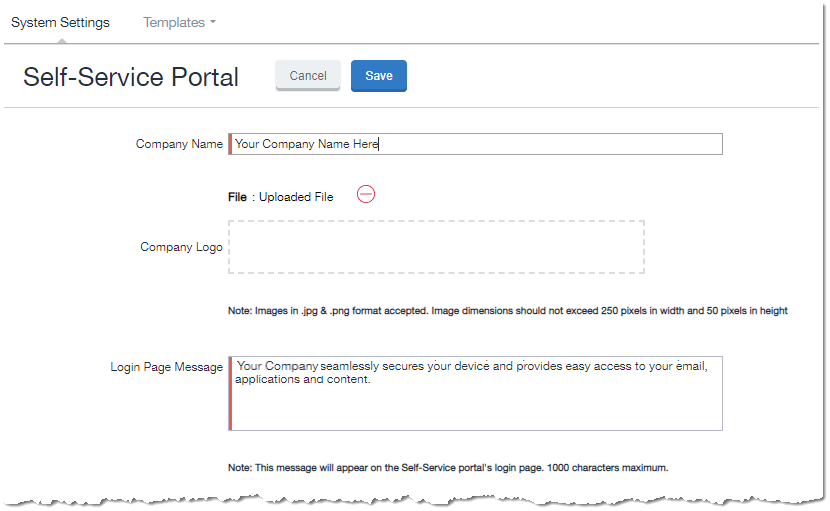
The self-service user portal can easily be customized to reflect your company branding, messaging, and layout. The following elements can be customized:
- Company name
- Company logo
- Login page message
- Background color
- Cascading stylesheet (CSS)
Procedure
-
From the Admin Portal, navigate to Settings > System Settings > General > Self-Service Portal. The Self-Service Portal page opens.

-
Company Name: Enter a customized company name.
-
Company Logo: Upload a customized company logo. Images can be JPG or PNG format, and must not exceed 250 by 50 pixels.
-
Login Page Message: Modify or replace the existing message that displays on the Self-Service Portal's log in page, up to 1,000 characters.
-
Background color:
-
Check Enable customized background color and either:
- Type in a HEX color value, or
- Open the Background color menu.
-
Select or enter a value for the background color.
Based on your choice of background color, Ivanti EPMM will automatically determine the highest-contrast text color (black or white) for that color.
-
Select OK to exit the menu.
-
-
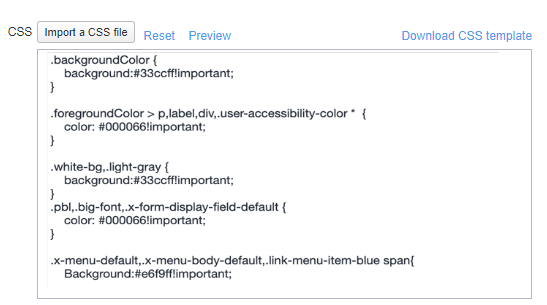
CSS: By default, your message is formatted using the default cascading style sheet (CSS) supplied by Ivanti EPMM. You can import and edit a custom CSS file, modify the default CSS file, or leave the default.

Options are:
-
Import a CSS file: Select to browse to a valid CSS file on your local drive. Select the file and select Open. The CSS file opens in the edit window. You will be asked to confirm the change.
Invalid CSS files will not be imported, and an error message will display.
-
Reset: Select to reset the style sheet to the default values. You will be asked to confirm the reset.
-
Preview: Select to see a preview of your message as users will see it.
-
Download: Downloads a copy of the default CSS file to your browser's Download folder for you to keep and modify. Alternately, you can copy and paste the default CSS file into the CSS text window.
-
-
When all of your changes are made, select Save (at the top of the page) to keep your options. A confirmation message displays.
-
Verify the new custom portal page on Ivanti EPMM by substituting your Ivanti EPMM hostname and SSP user name:
https://<hostname>/mifs/<user>
User portal default stylesheet
You can copy-and-paste the following default stylesheet into the CSS text window and modify it for your needs.
.backgroundColor {
background:#33ccff!important;
}
.foregroundColor > p,label,div,.user-accessibility-color * {
color: #000066!important;
}
.white-bg,.light-gray {
background:#33ccff!important;
}
.pbl,.big-font,.x-form-display-field-default {
color: #000066!important;
}
.x-menu-default,.x-menu-body-default,.link-menu-item-blue span{
Background:#e6f9ff!important;
}
.btn-new-color,.x-btn-accessblue-medium {
background:#000066!important
}
.link-menu-item-blue span {
line-height: 16px;
font-size: 14px;
font-family: Helvetica,Arial,sans-serif;
margin-left: 5px;
color: #2d70b5;
}
.x-menu-item-text-default {
font: normal 11px helvetica,arial,sans-serif;
line-height: 21px;
padding-top: 1px;
color: #222;
cursor: pointer;
}
.x-btn-inner-accesswhite-medium {
font: normal 12px/24px arial,verdana,sans-serif;
color: #2d70b5;
padding: 0 10px;
max-width: 100%;
}
.x-btn-inner {
display: inline-block;
vertical-align: middle;
overflow: hidden;
text-overflow: ellipsis;
}
.x-autocontainer-innerCt {
display: table-cell;
height: 100%;
vertical-align: top;
}
.x-autocontainer-outerCt {
display: table;
}
.x-grid-empty {
padding: 10px;
color: gray;
background-color: white;
font: normal 12px helvetica,arial,sans-serif;
}
.x-grid-header-ct {
background-color: #edf0f2;
}
.x-grid-header-ct {
border: 1px solid #d0d0d0;
border-bottom-color: #a0a7ad;
background-color: #a0a7ad;
}
.x-column-header-inner {
padding: 8px 8px 6px 8px;
}
.x-leaf-column-header {
height: 100%;
}
.x-column-header-inner {
white-space: nowrap;
position: relative;
overflow: hidden;
}
.x-column-header-text {
background-repeat: no-repeat;
display: block;
overflow: hidden;
text-overflow: ellipsis;
white-space: nowrap;
}
.x-grid-item-container {
min-height: 1px;
position: relative;
}
.x-panel-default {
border-color: #d0d0d0;
padding: 0;
}
Restricting user access to activity logs and Settings menu
Check boxes at the bottom of the Self-Service Portal page allow you to restrict device activity log and Settings information from your client users. For more information, see Hide or display Activity Logs and Settings menu.