Configuring content sites in the Docs@Work configuration
Content sites configured in the Doc@Work configuration are automatically added to the Docs@Work app. Device user action is not required. These sites are called Group sites. SharePoint (including OneDrive for Business), WebDAV, CIFS, and DFS sites are configured in the Content Sites section of the Docs@Work configuration. Box and SharePoint sites that use Federated authentication, are configured in the Custom Configurations section using key-value pairs.
- Adding SharePoint, WebDAV, CIFS, and DFS sites
- Support for variables in configuring content sites
- Verifying the SharePoint URL
- Adding Box enterprise as a Group site
- Adding a SharePoint Group site with Federated authentication
- Adding a SharePoint Group site with derived credentials
- Configuring DFS content site
Adding SharePoint, WebDAV, CIFS, and DFS sites
Content sites configured in the Doc@Work configuration are automatically added to the Docs@Work app. Device user action is not required. SharePoint (including OneDrive for Business), WebDAV, CIFS, and DFS sites are configured in the Content Sites section of the Docs@Work configuration.
Procedure
- In the Admin Portal, go to Policies & Configs > Configurations.
- Select Add New > Docs@Work.
- Use the following guidelines to create or edit a Docs@Work setting and add content sites:
- Click Save.
- Select the Docs@Work configuration.
- Click More Actions > Apply To Label.
- Select the appropriate labels to which you want to apply the configuration.
- Click Apply.
Docs@Work is a document centric application. It relies on an API (in native mode) to query directories and files. If the entity being queried is not a folder or file, the APIs fail. As a result, List support is limited to DocumentLibrary. No other type of List is supported.
Support for variables in configuring content sites
Variables allow you to configure content server access that is specific to the user or group. For example, in Active Directory, you can specify a user’s home directory on a network drive as an attribute. If you include the variable in the URL for the content site, the user's view of the network drive will be their home folder.
Prerequisites for using variables for configuring content sites
- Requires LDAP or AD integration.
Supported Content sites for variables
- SharePoint (including Office 365)
- Network Drives
- Cloud Storage
Variables for Box and Dropbox are not supported.
Supported variables for configuring content sites
$EMAIL$
$USERID$
$FIRST_NAME$
$LAST_NAME$
$USER_UPN$
$DISPLAY_NAME$
$USER_CUSTOM1$
$USER_CUSTOM2$
$USER_CUSTOM3$
$USER_CUSTOM4$
Verifying the SharePoint URL
You can view the SharePoint or WebDAV URL in Docs@Work that you should use when configuring a SharePoint or WebDAV site. This allows you to verify and enter the correct URL in the Docs@Work configuration in Ivanti EPMM to configure SharePoint and WebDAV group sites.
Procedure
- Add the SharePoint or WebDAV site as a User site in Docs@Work.
- In Sites, tap on the SharePoint or WebDAV site.
- Navigate to the folder you want to configure as a Group site.
- Tap, hold, and then release the ... menu.
- The menu items will display.
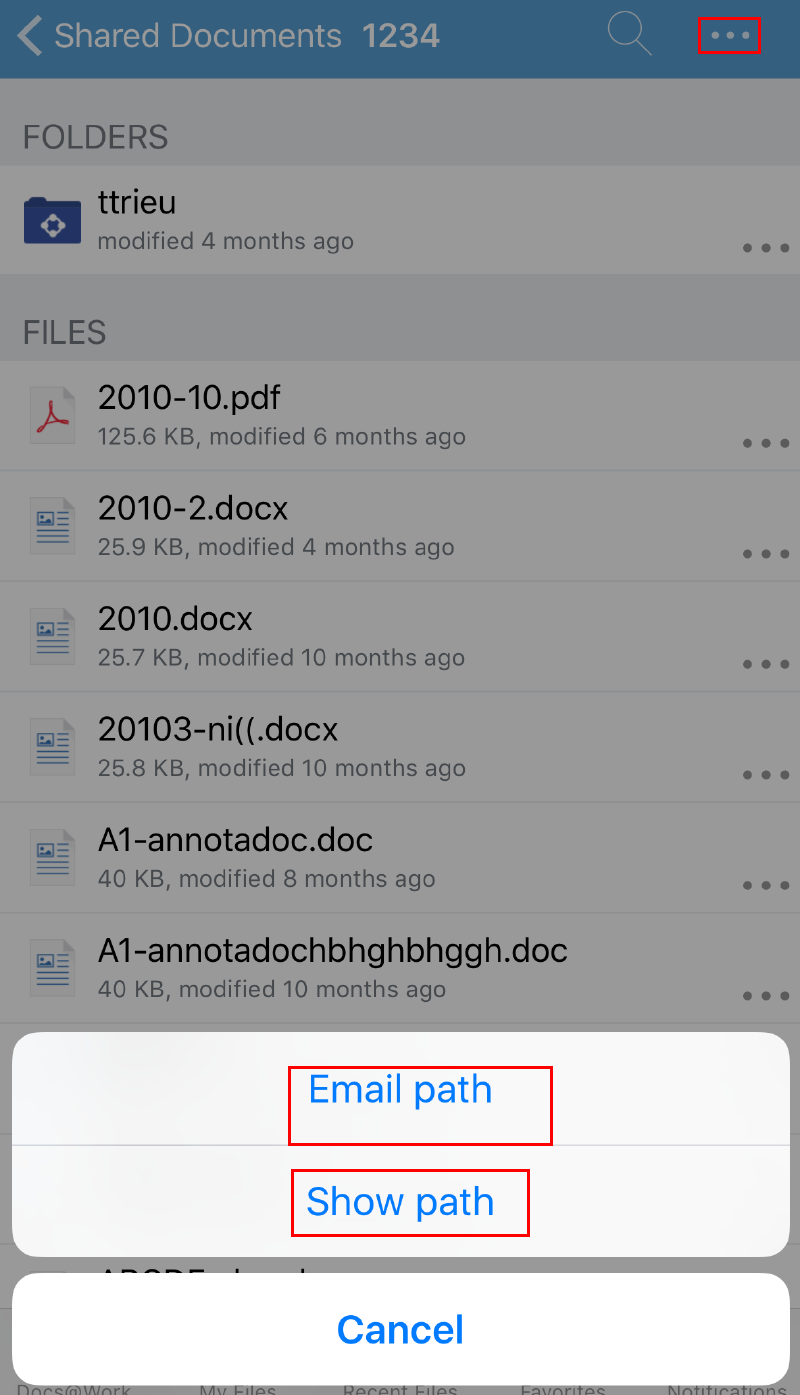
- Select one of the menu items to either view the URL or email the URL.
Item
Description
Email path
A draft email message with the site URL displays.
Enter an email address to email the URL path.
Show path
The URL path for the content site displays.
Adding Box enterprise as a Group site
You add a key-value pair in the Custom Configurations section to configure Box as a Group site. Group sites are automatically pushed to the Docs@Work app.
Procedure
- In the Ivanti EPMM Admin Portal, go to Policies & Configs > Configurations > Add New > Docs@Work > Docs@Work.
- Scroll down to the Custom Configurations section.
- Add the SITE_DETAILS_N key-value pair. For more information, see “Key-value pairs to configure app behavior” section.
- Click Save.
- Device users can also add a Box User site.
Adding a SharePoint Group site with Federated authentication
You add a key-value pair in the Custom Configurations section to configure a SharePoint site that uses Federated authentication as a Group site. Group sites are automatically pushed to the Docs@Work app. If authentication to the SharePoint server is done using Active Directory Federation Services (ADFS), the users must enter their enterprise AD or LDAP credentials to authenticate to the server.
Procedure
- In the Ivanti EPMM Admin Portal, go to Policies & Configs > Configurations > Add New > Docs@Work > Docs@Work.
- Scroll down to the Custom Configurations section.
- Add the SITE_DETAILS_N key-value pair. For more information, see “Key-value pairs to configure app behavior” section.
- Click Save.
Adding a SharePoint Group site with certificate based authentication
Certificate based authentication with Entrust PIV-D certificates and p12 certificates are supported for SharePoint sites.
- In Android 4.1,4.2, 4.3 and 4.4 devices, cert-based auth related to webview certificate challenge is not supported.
- Cert-based auth does not support tunneling.
Adding a SharePoint Group site with derived credentials
Derived credentials with Entrust PIV-D certificates and p12 certificates are supported for SharePoint sites with ADFS. See the Ivanti Derived Credentials Guide for EPMM for information about how to set up derived credentials with Docs@Work.
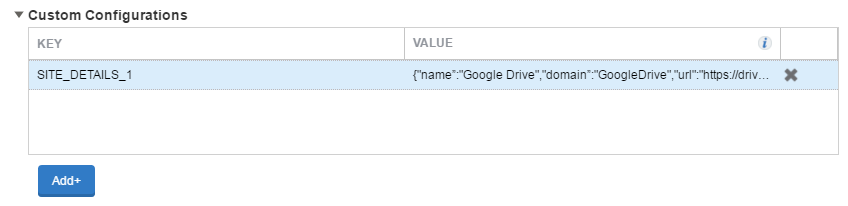
Adding Google Drive as a Group site
You add a key-value pair in the Custom Configurations section to configure Google Drive as a Group site. Group sites are automatically pushed to the Docs@Work app.
Variables are not supported in the URL for configuring the Google Drive site. For example, you will not be able to specify a user name as part of the JSON value. However, you can configure fAUTOFILL_CREDENTIALS key-value pair to autofill the username for Google Drive.
Procedure
| 1. | In the Ivanti EPMM Admin Portal, go to Policies & Configs > Configurations. |
| 2. | Select the Docs@Work configuration to which you want to add Google Drive. |
| 3. | Click Edit. |
| 4. | Scroll down to the Custom Configuration section. |
| 5. | Click Add+ to enter the following key value pair: |
|
Key |
Value |
|
SITE_DETAILS_N Where n is a number 1-100 Example: SITE_DETAILS_1 |
Enter parameters for the content site in the following JSON format: {"name":"name for the site","domain":"Dropbox","url":"https://dropbox.com”}
•Values are case sensitive. Description name for the site: Enter a name for the site. Example: SharePoint . |
| 6. | Click Save. |
Authentication with an identity provider (IdP)
If your Google Drive setup uses an identity provider (IdP) for authentication, device users are directed to the IdP without having to go through any intermediate screens.
If Google Drive is set up through the Docs@Work configuration in Ivanti EPMM, you must also configure the AUTOFILL_CREDENTIALS key-value pair to enable this feature.
Configuring DFS content site
Distributed File System (DFS) allows administrators access to group shared folders located on different servers by transparently connecting them to one or more DFS namespaces. DFS uses CIFS protocol.
Requirements
- Standalone Sentry 8.0.1 through the most recently released version.
- Standalone Sentry 8.5.0 through the most recently released version is required for create, upload, and delete (CUD) operations for files and folders.
- Ivanti EPMM 9.0.0.0 through the most recently released version.
Before you begin
- Ensure that you have Standalone Sentry set up for AppTunnel.: DFS traffic must be tunneled through Standalone Sentry. Context headers, server-side proxy, and ATC are not supported for tunneling to DFS servers.
- Ensure that the necessary SCEP or Certificate setting is created. You will reference the SCEP or Certificate setting when you create the AppTunnel rule in the Docs@Work configuration.
Configuration tasks summary
The following configuration tasks are required. These tasks are done in the Ivanti EPMM Admin Portal.
- Enable DFS in Standalone Sentry settings.
See Enabling DFS.
- Configure an AppTunnel service for a CIFS repository in Standalone Sentry settings.
- Configure AppTunnel rules and DFS content site in Docs@Work configuration.
See Configuring AppTunnel rules and DFS site in the Docs@Work setting.
Enabling DFS
- In the Admin Portal, go to Services > Sentry.
- Edit the entry for the Standalone Sentry that supports AppTunnel.
- In the App Tunneling Configuration section, select the check box for Enable DFS.
Configuring an AppTunnel service for DFS
- In the Admin Portal, go to Services > Sentry.
- Edit the entry for the Standalone Sentry that supports AppTunnel.
- In the App Tunneling Configuration section, under Services, click + to add a new service.
- Use the following guidelines to configure a tunnel service:
Item
Description
Service Name
The Service Name is used in the Docs@Work configuration for setting up tunneling to the content repository.
Enter one of the following:
- A unique name for the service that Docs@Work accesses. One or more of your internal app servers provide the service. You list the servers in the Server List field.
- The service name must begin with CIFS_.
- A service name cannot contain these characters: 'space' \ ; * ? < > " |.
- <CIFS_ANY>
Select <CIFS_ANY> to allow tunneling to any URL for a CIFS-based or DFS content server. Typically, you select <CIFS_ANY> if the URL for a CIFS-based or DFS content server contains wildcards for tunneling, such as *.myCompany.com.
•The order of the Service Name entries does not matter.
•Do not select <ANY>, <TCP_ANY>, <IP_ANY>, or <IP_ANY_WP8.1> for tunneling to DFS.
Server Auth
Select Pass Through
The Sentry passes through the authentication credentials, such as the user ID and password (basic authentication) or NTLM, to DFS.
Server List
The Server List field is not applicable when the service name is <CIFS_ANY>.
Enter the DFS server’s host name or IP address (usually an internal host name or IP address). Include the port number on the DFS server that Standalone Sentry can access.
Example: fs1.companyname.com:445
You can enter multiple servers. Depending on the Global Configuration settings for the Sentry, either round-robin or priority distribution is used to load balance the servers. Separate each server name with a semicolon.
Example: fs1.companyname.com:445;fs2.companyname.com:445
TLS Enabled
Not applicable for app tunnel to DFS.
Proxy/ATC
Not applicable for app tunnel to DFS.
Server SPN List
Not applicable for app tunnel to DFS.
- A unique name for the service that Docs@Work accesses. One or more of your internal app servers provide the service. You list the servers in the Server List field.
- Click Save.
Configuring AppTunnel rules and DFS site in the Docs@Work setting
- In the Admin Portal, go to Policies & Configs > Configurations.
- Select the Docs@Work configuration and click Edit.
- In the AppTunnel Rules section, use the following guidelines to add an AppTunnel rule for CIFS repository:
Item
Description
AppTunnel Rules
Configure AppTunnel rules settings for Docs@Work.
When Docs@Work tries to connect to the URL configured here, Standalone Sentry creates a tunnel to the content server.
To add an AppTunnel entry, click + .
To delete an AppTunnel entry, click - .
Sentry
Select the Standalone Sentry on which you configured the AppTunnel service. The drop-down list contains all Standalone Sentrys that are configured to support AppTunnel.
Service
Select an AppTunnel Service Name from the drop-down list.
This service name specifies an AppTunnel service configured in the App Tunneling Configuration section of the specified Sentry.
URL Wildcard
Enter one of the following:
•A content server’s hostname
Example: cifs-windows.yourcompany.com
•A hostname with wildcards, if the Service Name is <CIFS_ANY>. The wildcard character is *.
Example: *.yourcompanyname.com
If you want finer granularity regarding what requests Standalone Sentry tunnels, configure multiple AppTunnel rows.
The Sentry and Service fields that you specify in this AppTunnel row determine the target content server.
A hostname with wildcards works only with the service <CIFS_ANY>. Unlike services with specific service names, these services do not have associated app servers. The Standalone Sentry tunnels the data to the URL specified in the app.
Ivanti recommends that you carefully consider how you use wildcards. For example, do not use just * for the URL.
The order of these AppTunnel rows matters. If you specify more than one AppTunnel row, the first row that matches the hostname requested is chosen. That row determines the Standalone Sentry and Service to use for tunneling.
Do not include a URI scheme, such as http:// or https:/, in this field.
Port
Enter the port number that Docs@Work can request. Typically, the port number is 445.
Identity Certificate
Select the Certificate or the SCEP profile that you created for devices to present to the Standalone Sentry that supports app tunneling.
- In the Content Sites section, enter the following information:
Item
Description
Name
Enter a name for the content site.
This name will be displayed on the device.
URL
Enter a valid URL for the DFS. Both domain name and IP address are supported.
A valid URL must start with http:// or https://.
Format example:
https://resolvablehostname:445/URL
Variables:
You can enter a valid URL with variables for the content site. Variables in the protocol or the hostname are not supported. See also, Support for variables in configuring content sites.
Examples with variables:
\\$USER_CUSTOM1$
Format of DFS URL with UserId:
https://resolvablehostname:445/users/$USERID$
LDAP or AD integration is required for using variables.
If the Site URL is invalid, it will not be distributed to users.
Domain
Select CIFS from the drop-down list.
Subdomain
Select NetworkDrive from the drop-down list.
Authentication
Select if the device has to authenticate to the server.
Only basic authentication is supported.
Published Site
Select to designate the site as a Published site.
- Click Save.
- Select the Docs@Work configuration.
- Click More Actions > Apply To Label.
- Select the appropriate labels to which you want to apply the configuration.
- Click Apply.