Main steps for Configuring Ivanti Email+ for iOS (Ivanti EPMM)
This section explains the steps to configure Email+ for iOS Ivanti EPMM.
You do not configure a separate Exchange setting for the device as you do for other email apps. The AppConnect app configuration provides the necessary information.
Adding Ivanti Email+ for iOS to Ivanti EPMM as a recommended app
Device users can download Email+ for iOS directly from the Apple App Store. You can also distribute Email+ for iOS as a recommended app through Apps@Work.
Procedure
- In the Admin Portal, go to Apps > App Catalog.
- From the Quick Import drop-down list, select iOS.
- Enter Email+ in the Application Name text box.
- Click Search.
- Select the app from the list that is displayed.
- For Email+, click Import.
- Click OK on the pop-up message, and close the Quick Import dialog.
-
Email+ is now listed in the App Catalog. Information included in the app, such as the name, is automatically configured. All other settings, such as the App Category and whether the app is a free app, are set to default settings.
To view and edit the settings for the app, click on the app name in the App Catalog.
- Select the app to apply the app to a label:
- Click Actions > Apply to Label.
- Select the label that represents the iOS devices for which you want the selected app to be displayed.
- Click Apply.
Next steps
Continue to Enabling third-party AppConnect apps.
- For more information on adding iOS apps to the app distribution library, see “Working with apps for iOS devices” in the Apps@Work Guide. See also, “Setting per app VPN priority” in the Ivanti EPMM Apps@Work Guide.
- For information on creating a VPN setting, see the Ivanti Tunnel for iOS Guide.
Enabling third-party AppConnect apps
Email+ for iOS requires you to enable the licensing option for third-party and in-house AppConnect apps.
Procedure
- In the Admin Portal, go to Settings > System Settings.
- Click Additional Products > Licensed Products.
- Select AppConnect For Third-party And In-house Apps.
- Click Save.
Next steps
Continue to Configuring the AppConnect global policy.
Configuring the AppConnect global policy
Because Email+ for iOS is an AppConnect app, AppConnect must be enabled in the AppConnect global policy if it has not yet been configured. The AppConnect global policy specifies AppConnect app settings such as AppConnect passcode and data loss prevention requirements. You can use the Default AppConnect Global Policy.
Most fields are set to suitable default values.
Procedure
- In the Admin Portal, go to Policies & Configs > Policies.
- Select the Default AppConnect Global Policy and click Edit.
- Enable AppConnect in the AppConnect global policy
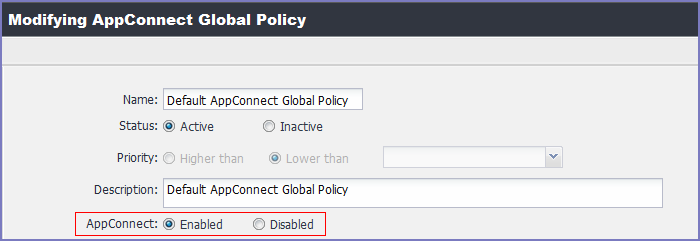
- For AppConnect, select Enabled.
- (Optional) Scroll down to the Data Loss Prevention Policies section.
- (Optional) For Apps without an AppConnect container policy, select Authorize.
If you do not select this option, then you must create an AppConnect container policy for Email+.
- (Optional) If you select Authorize for Apps without an AppConnect container policy, also select the data loss preventions options you want to enable.
- Click Save.
If you create a new AppConnect Global Policy, you must apply it to the appropriate labels. You do not need to apply the Default AppConnect Global Policy to a label.
Procedure: Applying to a label
- Select the AppConnect global policy.
- Click More Actions > Apply To Label.
- Select the appropriate labels to which you want to apply the policy.
- Click Apply.
Next steps
Continue on Configuring the AppConnect container policy.
For more information about the AppConnect Global policy, see the “Configuring the AppConnect global policy” section in the Ivanti AppConnect for Ivanti EPMM Guide and Ivanti Tunnel for iOS Guide for detailed description of each field.
Configuring the AppConnect container policy
This task is only required:
- If you did not select Authorize for Apps without an AppConnect container policy, in the AppConnect Global Policy.
- If you want to configure a different set of data loss prevention policies for Email+.
The AppConnect container policy authorizes an AppConnect app and specifies the data loss prevention settings. The container policy overrides the corresponding settings in the AppConnect Global Policy.
Make sure to apply only one AppConnect container policy for Email+ for iOS.
Procedure
- In the Admin Portal, select Policy & Configs > Configurations.
- Select Add New > AppConnect > Container Policy.
- Enter a name for the policy.
- Enter a description for the policy.
- In the Application field, enter the bundle ID for the app:
com.mobileiron.ios.emailplus - Configure the iOS data loss prevention policies according to your requirements.
- Click Save.
- Select the container policy.
- Select More Actions > Apply To Label.
- Select the labels to which you want to apply the policy.
- Click Apply.
Next steps
Continue on to Creating an AppConnect app configuration for Ivanti Email+.
Creating an AppConnect app configuration for Ivanti Email+
Email+ for iOS requires an AppConnect app configuration in Ivanti EPMM. The AppConnect app configuration provides the type of information that is usually configured in an Exchange setting, such as the fully qualified domain name and user ID for the ActiveSync server, and certificate information. As such, Email+ for iOS does not require an Exchange setting.
The AppConnect app configuration for Email+ for iOS also includes the bundle ID for the app and key-value pairs used to configure app settings.
Make sure to apply only one AppConnect app configuration for Email+ for iOS to each device.
If you make a mistake in the configuration, the app shows a message to the device user indicating an error in configuration.
Procedure
- In the Ivanti EPMM Admin Portal, go to Policy & Configs > Configurations.
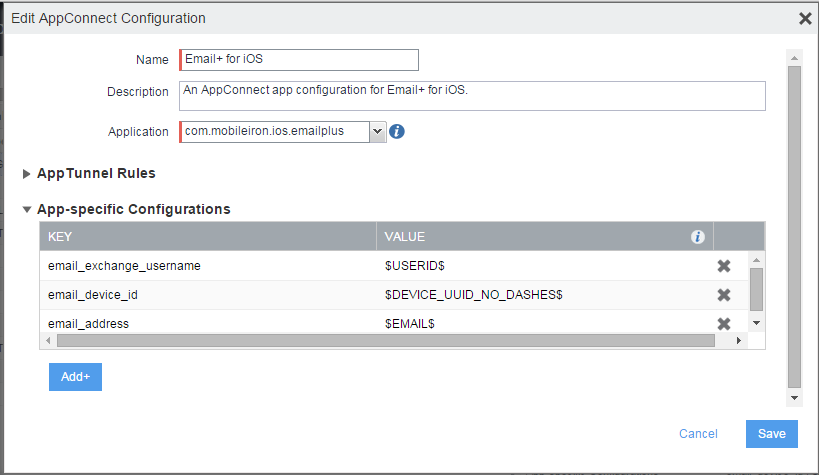
- Click Add New > AppConnect > Configuration to create a new AppConnect configuration.
- In the Name field, enter brief text that identifies this AppConnect app configuration.
- Example: Email+ for iOS
- In the Description field, enter additional text that clarifies the purpose of this AppConnect app configuration.
- In the Application field, enter the bundle ID for the app: com.mobileiron.ios.emailplus
- In the App-specific Configurations section enter the following required key-value pairs:
Key
Value
email_exchange_host
Fully qualified domain name of your ActiveSync server or Sentry.
email_ssl_required
Enter true to secure communication using https to the server that you specified in email_exchange_host. Otherwise, enter false.
Typically, set this field to true unless you are working in a test environment.
- Click Save.
- When you save an app configuration with the bundle ID com.mobileiron.ios.emailplus, Ivanti EPMM automatically applies the following key-value pairs to the app configuration:
- email_exchange_username with value $USERID$
- email_device_id with value $DEVICE_UUID_NO_DASHES$
- email_address with value $EMAIL$
- Select the new AppConnect app configuration.
- Click More Actions > Apply To Label.
- Select the labels to which you want to apply the AppConnect app configuration.
- Click Apply.
ActiveSync server synchronization due to app configuration changes
Email+ for iOS synchronizes all emails, contacts, calendar, and task items with the ActiveSync server when the device user first launches Email+ for iOS. It also does a full synchronization if you change the values of the following keys in the app configuration:
- email_address
- email_exchange_host
- email_exchange_username
After you have changed one of these values, the full synchronization occurs the next time Email+ for iOS receives the updated app configuration. Email+ for iOS receives the update the next time it runs after the AppConnect app checkin interval has expired.
The first Email+ for iOS synchronization with the ActiveSync server may require considerable time and bandwidth, as does changing the values of the keys mentioned here.
Customize Ivanti Email+ app behavior with key-value pairs
Administrators can customize Email+ app behavior by configuring key-value pairs in the App-specific Configurations section of AppConnect app configuration for Email+ for iOS. These key-value pairs define app behavior such as providing detailed notifications to device users and export contacts from Email+. See Additional configurations using key-value pairs for the complete list of custom key-value pairs.
Configuring email attachment control with Standalone Sentry
With Email+ for iOS, you can configure Standalone Sentry to deliver emails with attachments to the secure app. The attachments can then only be shared with other apps according to your data loss prevention policies.
Therefore, when using secure email apps, you typically configure Standalone Sentry to use the email attachment control setting called Open With Secure Email App.
Procedure
- Go to Settings > Sentry in the Ivanti EPMM Admin Portal.
- Select the Standalone Sentry that handles email for the devices.
- Click the edit icon.
- In the section Attachment Control Configuration, select Enable Attachment Control.
- For iOS And Android Using Secure Email Apps, select Open With Secure Email App.
- Click Save.
- For more information about email attachment control, see the Ivanti Sentry Guide for Ivanti EPMM.
Informing users to install Ivanti Email+ for iOS
You can inform device users by sending an APNS (Apple Push Notification Service) notification that directs device users to the new or updated Email+ for iOS app in Apps@Work. Or, you can send an installation request directly to all devices in the labels applied to Email+ for iOS, bypassing Apps@Work entirely.
As with badge notifications, updates are determined by comparing the version number of the installed app with that of the update.
The notification feature applies only to apps designated as Featured apps.
Procedure
- In the Admin Portal, go to Apps > App Distribution Library.
- Select iOS from the Select Platform list.
- Select the featured app you want to work with.
- Click Message.Send app installation request.
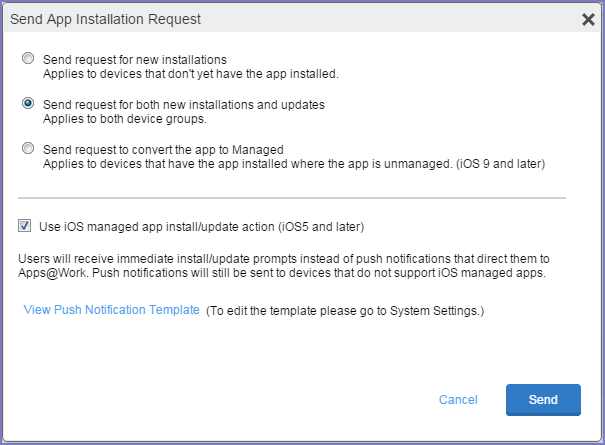
- Use the following guidelines to select the app installation option:
Item
Description
Send request for new installations
Prompts the device user to install the app if it is not already installed.
Send request for updates
Prompts the device user to update the app if it is not already updated.
Send request for both new installations and updates
Prompts the device user to install or update the app.
Use iOS managed app install/update action
Ignore the Apps@Work display and immediately install or update the app.
- To check the content of the message prior to sending:
- a. Select the Push Notification template from the list.
- b. Click View Messages.
- Click Send.
-
The message is sent only for apps configured as featured apps in the app distribution library.