Introduction to Ivanti Email+ Notification Services
When a mail is received on an iOS mobile device, a notification appears if real-time notification is enabled. For each mail there are two notifications received:
- Apple APNS notification: Shows up immediately on the lock screen (depending on the Email+ Notification settings in your device Settings). This notification has the text: “You have new messages”.
- Email+ notification: The Email+app fetches the email summary for the new unread email, removes the original device notification, and replaces it with a new notification. The second notification shows either the unread email count or summary of the new emails, depending on your Email+ settings.
VoIP notifications for Email+ are not supported starting Email+ 3.13.0 and later, due to the changes in Apple Policy with regards to notifications. This impacts the VIP notifications outside of work hours, other notifications such as Work hours notifications and the Weekend notifications work as before.
Email+ Notification Services (ENS) is the recommended solution to fix this issue.
There are two different notification deliverable mechanism for real-time notification:
- Cloud based service which only supports work hour notification, see About real-time push notifications for Email+ for iOS section.
- ENS based service which supports VIP email only notifications. The following sections describes about ENS and how to configure it on your device.
About Ivanti Email+ Notification Services
Email+ Notification Service leverages a standalone server that is based on existing Sentry and hosted inside the organizations firewall. This server is configurable on UEM servers and leverages a service account on Microsoft Exchange to retrieve email metadata information (such as Sender, Subject, and Body Snippet) required to support VIP mails notifications outside of office hours and direct detail notifications.
The following diagram describes how the ENS solution works:
Figure 1. Email+ Notification Services Architecture
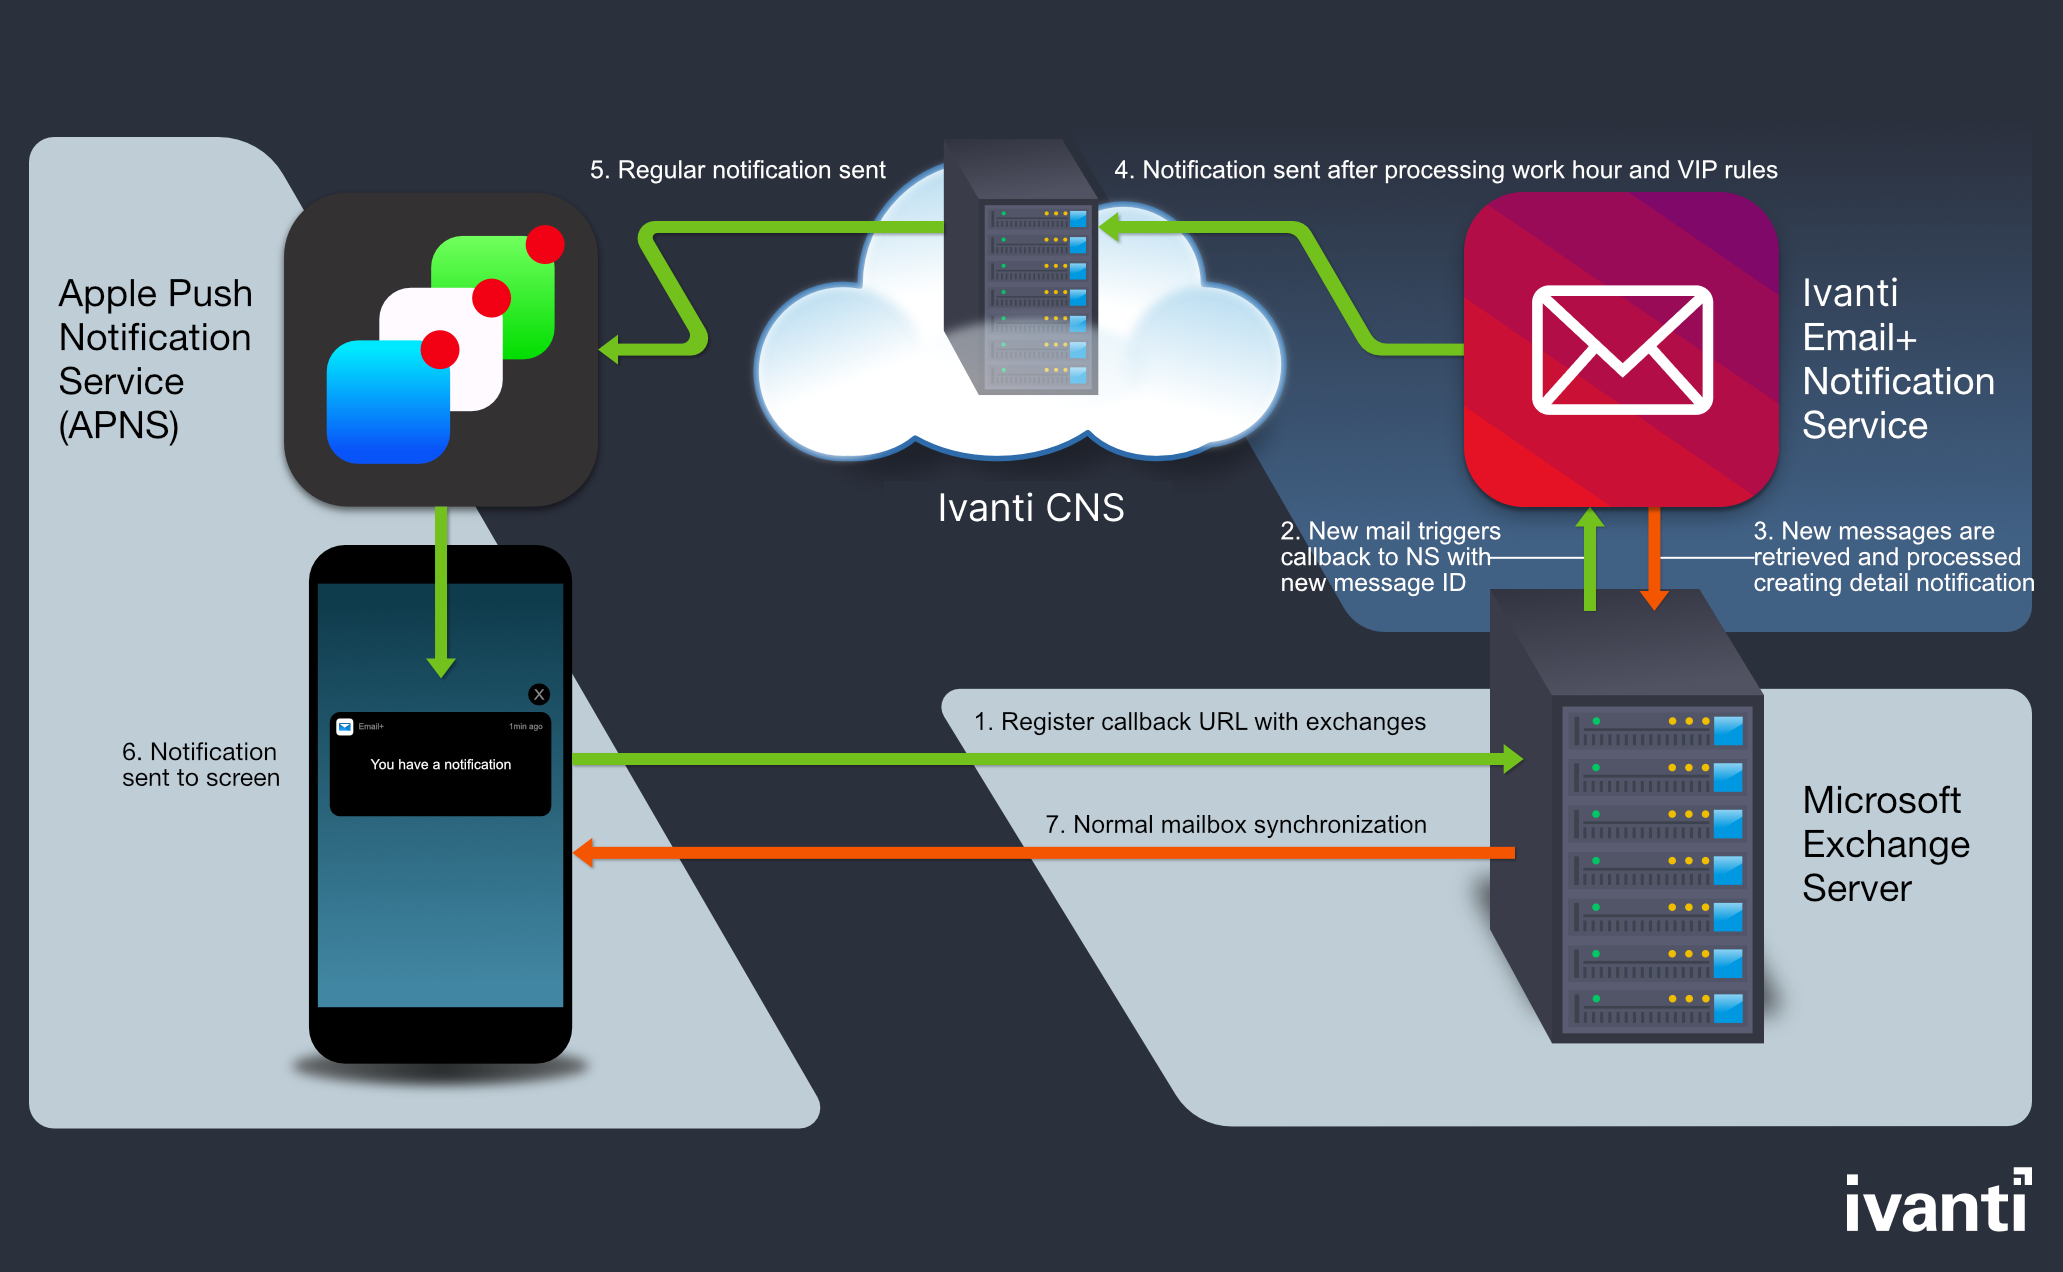
- Email+ App: The Email+ app registers callback URL with Microsoft Exchange server to send out work hours, list of VIP contacts, key-value pairs settings, and VIP notifications outside work hours.
- Microsoft Exchange: When a new mail is received in the folder that you are subscribed to, Microsoft Exchange sends a notification to Email+ Notification Proxy (ENP) which consists of Message Id and Folder Id for the new received mail.
- Email+ Notification Proxy: ENP logs in to the exchange server using a service account and pulls the following information about the mail: Senders email address
- Subject line
- Snippet of the mail
- ENP applies and verifies the rules. Once the verifications is complete, it creates a payload and sends it to real-time push notification server on the Ivanti Neurons for MDM.
- Real-time push notifications: The MobileIron CNS relays the information to Apple Push Notification service (APNs).
- Apple Push Notification service (APNs): Notifies the iOS device.
- Notification workflow on Email+: This feature requires users to be subscribed to CNS for Real Time Notifications. iOS displays a notification to the user indicating that there are new messages.
- Mailbox active sync: A notification is triggered to Email+, to open the correct mailbox a sync up is performed to co-relate the notification and the mail.
Enable Email+ settings on your device to receive notifications. In Email+ app, go to Settings > Notifications and enable Work Hours Only option first to enable Weekend Alerts or VIP Allowed After Work Hours option. The VIP related options are not be enabled if ENS is not configured, as there is no service account to check if the sender is a VIP contact (ensure that the contacts are marked as VIP).
When notification settings is changed, a note similar to the following is displayed:
Changes to alert times will come into effect after 'X' hours. The default interval is 1440 minutes.
If you are using CNS only for real-time notifications. all the settings related to VIP are not visible on the Email+ app and cannot process notifications outside work hours other than delivering notifications over weekend.
The following section describes how to configure ENS.
Limitation: The ENS solution is not supported on Microsoft Exchange Office 365.
Before you begin
- Supported on Ivanti EPMM 10.7.0.0 or later, Ivanti Neurons for MDM R70 and later, and Sentry 9.8.5.
- Ensure that you have configured a service account on Microsoft Exchange Server (Service account on exchange impersonates other mailboxes when accessing exchange over various supported protocols. For the purpose of Exchange Notification Proxy (ENP), Microsoft’s Exchange Web Services (EWS) protocol is used to access mailbox messages.)
- Ensure that you have the JWT token of CNS production server. For more information, see About real-time push notifications for Email+ for iOS section.
The term JWT token is also referred as Authorization Token, Token, and notification_server_authorization in Ivanti products.
- Standalone Sentry must be configured ActiveSync with a publicly trusted certificate.
- Ensure that the Exchange servers are configured with the service account. The servers must have identity certificate to authenticate the service account
- If Exchange server version support is earlier than TLS v1.2, then the supported protocols should be configured in Incoming protocols on MICS.
The following table describes the ENS port rules for firewall.
Table 1. ENS port network rules
|
RequireDirectionment |
Destination |
Port |
Direction |
|---|---|---|---|
|
Standalone Sentry |
CNS.mobileiron.com |
TCP443 |
Outbound Initialized, Bi-direction Connection |
|
Exchange Server |
Standalone Sentry |
TCP443 |
Outbound |
|
Standalone Sentry |
Exchange Server |
TCP443 |
Inbound |
|
Ivanti EPMM Management IP |
Standalone Sentry |
TCP443, 9090 |
Bi-direction Connection |
|
IT Admin PC IP |
Standalone Sentry |
TCP8443, 22 |
Inbound Initialized, Bi-direction Connection |
|
Standalone Sentry |
NTP Server |
NTP |
Outbound |
|
Standalone Sentry |
DNS Server |
DNS |
Outbound |
|
Standalone Sentry |
SMTP Server |
SMTP |
Outbound |
Configuring service account
Service account on Microsoft Exchange impersonates other mailboxes when accessing exchange over various supported protocols. Following are the main steps for configuring service account.
- Setting up service accounts on Exchange server
- Configuring a service account on Exchange server
Setting up service accounts on Exchange server
For the purpose of Exchange Notification Proxy (ENP), Microsoft’s Exchange Web Services (EWS) protocol is used to access mailbox messages.
For example service account is assigned to the following role:
ApplicationImpersonation
The EWS sends requests with the credentials of a single service account which includes an .XML key.
<soap:Header>
<t:RequestServerVersion Version="Exchange2013" />
<!-- The following causes the request to run as [email protected] -->
<t:ExchangeImpersonation>
<t:ConnectingSID>
<t:SmtpAddress>[email protected]</t:SmtpAddress>
</t:ConnectingSID>
</t:ExchangeImpersonation>
</soap:Header>
This allows a single account to access the mailbox of other accounts.
Configuring a service account on Microsoft Exchange Server
To configure service account on EWS follow these steps:
- In the Microsoft Exchange Management console, open a browser and type in URL. For example:https://<hostname>/ecp
- Log in as an Admin, go to Mail > Options > Manage My Organization > Roles & Auditing> Mailboxes and create a new Role group.
- Add the applicationImpersonation role to the group.
- Add members to the group.
- Click Save to finish.
For more information on configuring service account on Microsoft Exchange server, see Microsoft documentation
Setting up Standalone Sentry as an Ivanti Email+ Notification Service
You can set up a dedicated Standalone Sentry as an Email+ Notification Service. This capability allows you to configure multiple Exchange servers to provide notifications for VIP accounts in Email+.
This feature requires UEM servers, Cloud Notification Service (CNS), Standalone Sentry, and Email+. Applicable to iOS only, the Email+ Notification Service cannot be combined with ActiveSync or AppTunnel. Email+ Notification Service requires Sentry 9.8.5 and Email+ 3.13.0 through the latest supported versions. (Content Notification System is automatically upgraded). For more information, see: “Standalone Sentry Email Notifications” section in the Ivanti Sentry Guide for Ivanti EPMM
Configuring Ivanti Email+ using KVPs on Ivanti EPMM for Notification Services
After Standalone Sentry is set up, you must configure Email+ on Ivanti EPMM.
Procedure
- In the Ivanti EPMM Admin Portal, go to Policy & Configs > Configurations.
- Click Add New > AppConnect > App Configuration to create a new AppConnect configuration.
- In the Name field, enter brief text that identifies this AppConnect app configuration. For example: Email+ for iOS.
- In the Description field, enter additional text that clarifies the purpose of this AppConnect app configuration.
- In the Application field, enter the bundle ID for the app:
- In the App-specific Configurations section enter the required key-value pairs. For more information on how to configure the key-value pair on Cloud Notification Service, see Real-time push notifications section.
- Click Save.
- Go to Policies & Configs > Policies, select an AppConnect policy and click Edit. Guidelines to edit AppConnect Global Policy:
Fields Option Name
Default AppConnect Global Policy
AppConnect
Select Enabled option
Security Policies > Apps without an AppConnect container policy
Check the Authorize option
- Click Save.
- Go to Apps > App Catalog > Add + >In-house.
- Click Browse to Upload Email+ Inhouse App.
com.mobileiron.ios.emailplus
Registering your iOS device using Ivanti EPMM
You should register your iOS device with an LDAP user or local user:
- In the Ivanti EPMM Admin Portal, go to Device & Users > Users.
- Click on Add and select Add Local User or LDAP User.
- Fill in the details in the Add New User window.
- Click Save.
- Register device with the Local or LDAP user.
Result: Email+ is pushed to Device as a part of MDM configuration.
Configuring Ivanti Email+ using KVPs on Ivanti Neurons for MDMfor notification services
Set up a Standalone Sentry before configuring Email+ on Ivanti Neurons for MDM, see the Standalone Sentry Email+ Notification Services section in the Ivanti Sentry Guide for Ivanti Neurons for MDM.
Procedure
- In the Ivanti Neurons for MDM Admin Portal, go to Apps > App Catalog > Email+
- Go to App Configuration > Email+ Configuration, click + to create a new Email+ configuration.
- In the Configuration Setup section enter the following:
- In the Name field, enter the name of the configuration.
- In the Description field, enter additional text that clarifies the purpose of the configuration.
- In the Email+ Settings section, enter the following:
- Email Address
- Exchange Host
- Exchange Username
- In the AppConnect Custom Configuration section enter the required key-value pairs, to configure ENS.
- Choose a distribution option for the configuration and click Done. The configuration is distributed to the subset of the devices to which the app is distributed.
The sentry_server_host key-value pair should point to ENS Sentry hostname.
Registering your iOS device using Ivanti Neurons for MDM
To register your iOS device with Email+, see the Device Registration (iOS, macOS, and Android) section in the Ivanti Neurons for MDM Administrator Guide.
Procedure
- In the Ivanti Neurons for MDM Admin Portal, go Admin >User.
- Click on +Add to add a user, select the user type.
- Click Done. New user is added.
- In the Go Client, log in with the user details. After registering on Go Client. The device is listed under the devices tab in Ivanti Neurons for MDM.