Installing Standalone Sentry ISO on a VM
The following provide the steps for installing the Standalone Sentry ISO on a virtual machine (VM):
•Installing Standalone Sentry ISO on VMware
•Installing Standalone Sentry ISO on Hyper-V
Installing Standalone Sentry ISO on VMware
This section provides instructions on how to download the Standalone Sentry ISO to VMware.
Procedure
| 1. | Place the ISO distribution in an existing vSphere datastore. |
| 2. | In the vSphere Client, select the Edit Settings option for the VM you created. |
Figure 1. Virtual machine in VMware

| 3. | Select Datastore ISO File. |
| 4. | Click Browse to select the Sentry ISO distribution. |
| 5. | Make sure the “Connected” and “Connect at power on” options in the Virtual Machine Properties screen are selected. |
| 6. | Select Host Device. |
| 7. | Click OK. |
| 8. | Power on the VM. |
The VM automatically installs and reloads after a few minutes, and the installation program starts. See Using the setup wizard to complete Standalone Sentry installation for the next steps.
Installing Standalone Sentry ISO on Hyper-V
This section provides instructions on how to download the Standalone Sentry ISO to Hyper-V.
Procedure
| 1. | Log into your Windows server. |
| 2. | From a web browser, download the ISO to the VM datastore. |
Figure 2. Virtual machine in Hyper-V manager
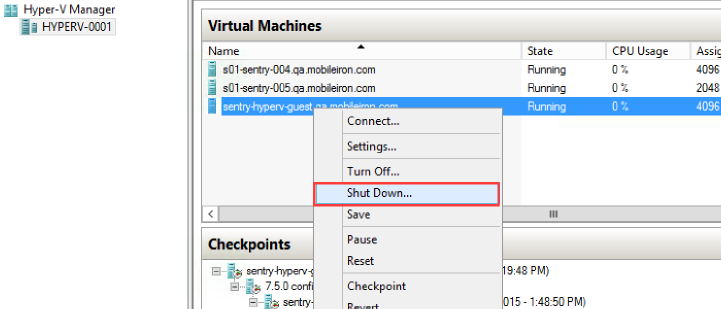
| 3. | In the Hyper-V Manager, select the Virtual Machine (VM) and shut it down by right clicking on the VM and clicking Shutdown. |
| 4. | Right-click on the VM and click on Settings. |
Figure 3. Location of the image file
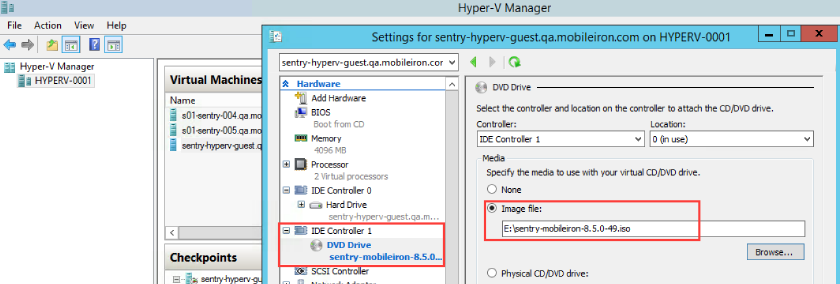
| 5. | Click on DVD Drive and select Image file. |
| 6. | Enter the location of the image file you downloaded in From a web browser, download the ISO to the VM datastore. |
| 7. | Right-click on the VM and click on Start to start the installation. |
See Using the setup wizard to complete Standalone Sentry installation for the next steps.