Adding an entry for Integrated Sentry in Ivanti EPMM
Create an entry for a Integrated Sentry on Ivanti EPMM to specify how Integrated Sentry connects to Ivanti EPMM, the ActiveSync server, and to devices.
•Configuring Integrated Sentry on Ivanti EPMM: Exchange 2010
•Configuring Integrated Sentry on Ivanti EPMM: Hosted Exchange (Office 365)
Additional configuration for Integrated Sentry hosted on Office 365:
•Specifying Office 365 groups for sync (optional)
Configuring Integrated Sentry on Ivanti EPMM: Exchange 2010
Follow the configuration described here if you have installed Integrated Sentry on Exchange 2010.
Procedure
| 1. | Login to the Admin Portal with a user account that has at least the Settings role and Users & Devices role. |
| 2. | Go to Services > Sentry. |
| 3. | Select Add New > Integrated Sentry. |
| 4. | Use the guidelines in the following table to configure the Integrated Sentry: |
|
Item |
Description |
|
Server |
Specify the IP address or host name for the server on which you installed Integrated Sentry. |
|
Port |
Specify the port to use to connect to the server on which you installed Integrated Sentry. |
|
Secondary Server |
Specify the IP address or host name for an alternate server on which you installed Integrated Sentry. Ivanti EPMM uses this secondary Integrated Sentry if the primary one is not available. Your secondary Integrated Sentry must be installed with the same Microsoft Exchange option as your primary Integrated Sentry. For example, if you use Microsoft Exchange Server 2010, you have to select Microsoft Exchange 2010 in the Integrated Sentry installer when installing both the primary Integrated Sentry and the secondary Integrated Sentry. |
|
Secondary Port |
Specify the port to use to connect to the alternate server on which you installed Integrated Sentry. |
|
Secret |
Specify the password for connecting to the Integrated Sentry server. This value is the same as the connection secret you entered when running the Integrated Sentry installer. |
|
Confirm Secret |
Re-enter the password for connecting to the Integrated Sentry server. |
|
Search LDAP Groups |
Enter the name of an LDAP group, or the first few letters of an LDAP group name, and then select the search icon to the right of the text field. Matching groups appear in the Available list in the Apply To LDAP Groups field. Use this field when you intend to use more than one Integrated Sentry, where each one handles a subset of all possible LDAP groups. This field allows you to select the LDAP groups that this Integrated Sentry handles. |
|
Apply to LDAP Groups |
After you have selected the LDAP groups to select from, move groups from the Available list to the Selected list. If you put no groups in the Selected list, the Integrated Sentry handles all the LDAP groups. |
| 5. | Click Save. |
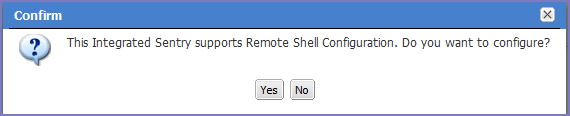
If the machine on which you installed Integrated Sentry has both Exchange Management Tools and PowerShell 2.0 installed, the following pop-up appears:

Click No.
| 6. | Click Resync Integrated Sentry With Exchange. |
| 7. | Select Users & Devices > ActiveSync Associations. |
| 8. | If an error appears before the page begins to populate, navigate away from the page and then back. You should see your ActiveSync users begin to populate. |
It may take up to 15 minutes to populate all users in this screen.
Configuring Integrated Sentry on Ivanti EPMM: Hosted Exchange (Office 365)
Follow the configuration described here if you have installed Integrated Sentry on Office 365.
Procedure
| 1. | Login to the Admin Portal using a user account that has at least the Settings role and Users & Devices role. |
| 2. | Select Services > Sentry. |
| 3. | Select Add New > Integrated Sentry. |
| 4. | Use the guidelines in the following table to configure the Integrated Sentry: |
|
Item |
Description |
|
Server |
Specify the IP address or host name for the server on which you installed Integrated Sentry. |
|
Port |
Specify the port to use to connect to the server on which you installed Integrated Sentry. |
|
Secondary Server |
Specify the IP address or host name for an alternate server on which you installed Integrated Sentry. Ivanti EPMM uses this secondary Integrated Sentry if the primary one is not available. Both your primary and secondary Integrated Sentry must be installed with the “hosted exchange” option in the Integrated Sentry installer. |
|
Secondary Port |
Specify the port to use to connect to the alternate server on which you installed Integrated Sentry. |
|
Secret |
Specify the password for connecting to the Integrated Sentry server. This value is the same as the connection secret you entered when running the Integrated Sentry installer. |
|
Confirm Secret |
Re-enter the password for connecting to the Integrated Sentry server. |
|
Search LDAP Groups |
This field is not applicable when using a hosted Exchange server. Do not use this field. |
|
Apply to LDAP Groups |
This field is not applicable when using a hosted Exchange server. Do not use this field. |
| 5. | Click Save. |
If the machine on which you installed Integrated Sentry has PowerShell 2.0 installed, but not Exchange Management Tools, an additional section automatically displays when you click Save.
However, if the machine on which you installed Integrated Sentry has Exchange Management Tools installed, the following pop-up appears:
Click Yes.
| 6. | Use the following guidelines to complete the lower portion of the screen: |
|
Option |
Description |
|
Remote Exchange FQDN |
Enter the fully-qualified domain name for the hosted Exchange server as supplied by Microsoft. For Office 365, this value is ps.outlook.com. |
|
Authentication |
Select Basic for Office 365. |
|
Use SSL |
We recommend using SSL for the connection between Integrated Sentry and the hosted Exchange server. If you do not use SSL, take the steps specified in “SSL and Hosted Exchange” in the On-Premise Installation Guide. |
|
Skip server CA checks |
This field is not applicable to Office 365. |
|
Use service credentials |
Do not select this option when using Office 365. Clear this option to specify separate credentials for this connection. Specify the separate credentials in the User Name and Password fields below this option. |
|
User Name |
Enter the user name to use for this connection if you are not using the service credentials. Note that the user name typically includes the domain name, such as domain_name\username. |
|
Password |
Enter the password to use for the connection if you are not using the service credentials. |
|
Confirm Password |
Re-enter the password. |
|
Don’t save credentials on Ivanti EPMM |
Select this option if the credentials you entered in the User Name and Password fields should not be stored on Ivanti EPMM. Credentials are encrypted when stored Ivanti EPMM, but some organizations may prefer not to have credentials for hosted systems stored on external systems. |
| 7. | Click Save. |
| 8. | Click Resync Integrated Sentry with Exchange. |
| 9. | Select Users & Device > Devices. |
| 10. | If an error appears before the page begins to populate, navigate away from the page and then back. You should see your ActiveSync users begin to populate. |
It may take up to 15 minutes to populate all users in this screen.
Next steps
Go to Specifying Office 365 groups for sync (optional).
Specifying Office 365 groups for sync (optional)
Use the configuration described here only if you have installed Integrated Sentry on Office 365.
You cannot specify Office 365 groups to sync for dedicated Office 365 deployments.
Setting up Office 365 groups to sync is optional. If a group is not configured, then Integrated Sentry syncs all mailboxes in Office 365.
Setting up syncing for specific Office 365 groups provides the following benefits:
•Allows administrators to enforce Integrated Sentry access control to specific groups in Office 365.
You may want to do this if you only want mailboxes in certain groups to be managed through Integrated Sentry.
•Targeting specific Office 365 groups for sync allows Integrated Sentry to complete sync faster.
Security policies and access control is only applied to mailboxes that are synced with Integrated Sentry.
Before you begin
Ensure you have the Office 365 Group IDs for syncing. To find the full names of the desired group, run the following PowerShell command in a connected remote PowerShell session to Office 365:
Get-Group | Select-Object Name, DistinguishedName | fl
Procedure
| 1. | In Ivanti EPMM Admin Portal, go to Services > Sentry. |
| 2. | Click on the Edit icon for the Integrated Sentry. |
The Edit Integrated Sentry window appears.
Figure 1. Edit Integrated Sentry
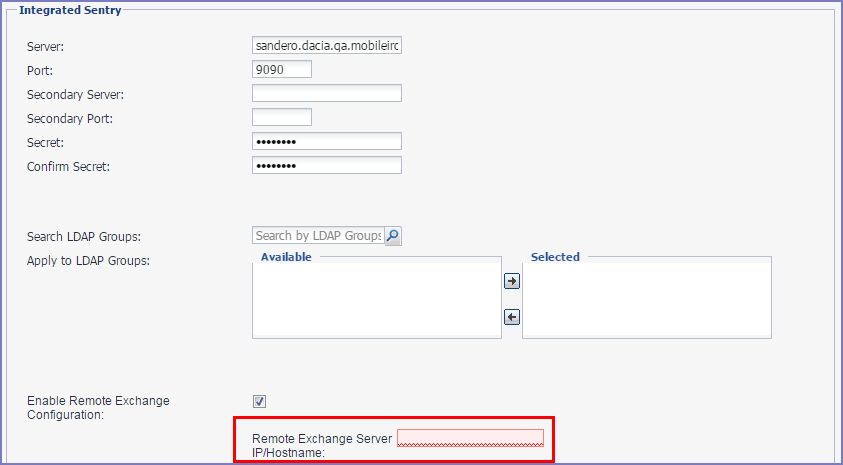
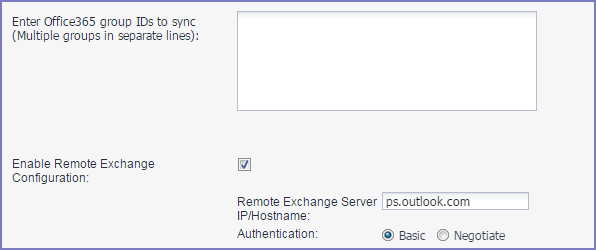
| 3. | For Remote Exchange Server IP/Hostname, enter ps.outlook.com. |
The Search LDAP Groups and Apply to LDAP Groups fields are replaced with the Enter Office 365 group IDs to sync field.
Figure 2. Enter Office 365 group IDs
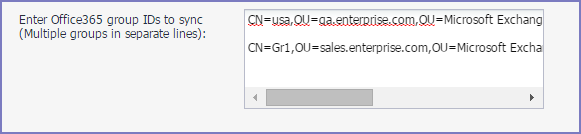
| 4. | In the Enter Office 365 group IDs to sync text box, enter the Office 365 group IDs. |
If you are entering multiple Office 365 groups, list each group ID in a separate line.
Enter the full Distinguished Name of the groups in O365.
Example: CN=usa,OU=qa.enterprise.com,OU=Microsoft Exchange Hosted organizations,DC=NAMPR06A003,DC=prod,DC=outlook,DC=com
Figure 3. Example for multiple Office 365 groups
| 5. | Click Save. |