Interfaces
The Settings > Interfaces screen enables you to change parameters for the network interface points for Ivanti Standalone Sentry:
•physical and VLAN interfaces
•static routes
Physical and VLAN interface fields are not editable for a Ivanti Standalone Sentry installed on Microsoft Azure. These are assigned by the Microsoft Azure infrastructure.
You configure a physical network interface as part of the installation process. You can use the Interfaces screen to:
•Edit the physical interface settings specified during installation
•Add physical interfaces
•Add VLAN interfaces
•Change VLAN interfaces
Physical interface mapping to M2600 NIC ports
The following table provides a mapping of the physical interface name in the Ivanti EPMM System Manager to the physical NIC port in the M2600 appliance. The six Gigabit Ethernet interfaces are available only on an M2600 appliance.
|
Physical interface |
M2600 NIC port |
|---|---|
|
GigabitEthernet1 |
I - eth0 (NIC-3) |
|
GigabitEthernet2 |
J - eth1 (NIC-4) |
|
GigabitEthernet3 |
K- eth2 (NIC-5) |
|
GigabitEthernet4 |
L- eth3 (NIC-6) |
|
GigabitEthernet5 |
C- eth4 (NIC-1) |
|
GigabitEthernet6 |
D- eth5 (NIC-2) |
Changing physical interfaces
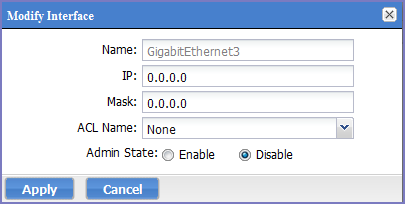
You can change the physical interfaces for Ivanti Standalone Sentry in the Sentry System Manager.
Procedure
| 1. | Click the interface name. |
Figure 1. Modify physical interfaces

| 2. | Change any or all of the following fields: |
|
Field |
Description |
|
IP |
Enter the IP address of the physical network interface. Unless you are configuring a standalone implementation for a small trial, you should specify at least one physical interface. |
|
Mask |
Enter the netmask of the physical network interface. |
|
Admin State |
To enable this interface for use with the system, click Enable. To temporarily prevent use of this interface with the system, click Disable. |
| 3. | Click Save. |
Adding VLAN interfaces
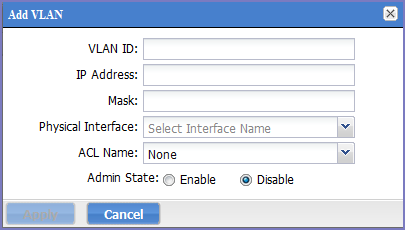
Virtual Local Area Network (VLAN) interfaces are optional interfaces you can configure on UEM to manage bandwidth and load balancing. You can add a VLAN interface in the Ivanti Standalone Sentry System Manager.
Procedure
| 1. | Click Add VLAN. |
Figure 2. Adding VLAN

| 2. | Use the following guidelines to complete the configuration: |
|
Field |
Description |
|
VLAN ID |
Specify a number between 2 and 4094. |
|
IP Address |
Enter the IP address for this VLAN interface. |
|
Mask |
Enter the netmask for this VLAN interface. |
|
Physical Interface |
Select the physical interface that corresponds to this VLAN interface. |
|
Select an Access Control List for this interface. See Access Control Lists. |
|
|
Admin State |
To enable this interface, click Enable. To temporarily suspend use of this VLAN, click Disable. |
| 3. | Click Save. |
Deleting a VLAN interface
You can delete the Ivanti Standalone Sentry Virtual Local Area Network (VLAN) interface in the Sentry System Manager.
Procedure
| 1. | Select the VLAN you want to remove. |
| 2. | Click Delete VLAN. |