Logs
The Logs page allows you to the following:
•Log management
•View module logs
•Export logs
Log management
You can enable or disable logging and control the details collected in Sentry logs for the following services:
•MICS (MobileIron Configuration Service)
•Sentry
For the Sentry service, you can do the following:
•Specify whether to exclude interactions between Sentry and the device or between Sentry and the backend resource.
•Specify levels of increasing detail.
•Filter logs based on specific attributes, such as Device ID.
Figure 1. Troubleshooting
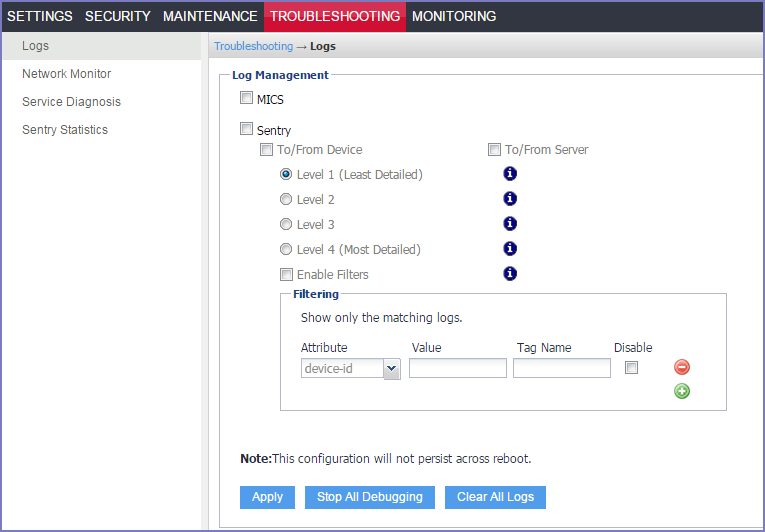
The following table describes the options for managing logs.
|
Item |
Description |
|
MICS |
Includes messages related to the MobileIron Configuration System module that supports the Sentry. |
|
Sentry |
Includes messages related to Sentry operation. |
|
To/From Device |
Includes messages related to interactions between Sentry and the registered ActiveSync devices. |
|
To/From ActiveSync Server |
Includes messages related to interactions between Sentry the configured ActiveSync servers. |
|
Level 1 |
Includes HTTP response/request lines and a few supporting operational messages. This level of provides the least detailed logging. |
|
Level 2 |
Includes Level 1 content, HTTP headers, and additional operational messages. Sufficient when network issues are suspected. Primarily used for troubleshooting AppTunnel issues. |
|
Level 3 |
Includes Level 1 and Level 2 content and the information associated with the messages. Enabled when you know that there are no network issues, but there may be a an issue with ActiveSync. This is the most common level requested by support. The logs contain WBXML. Log data includes email, calendar, and contact information. |
|
Level 4 |
Includes all available log data. Enabled if parsing errors or missing data is suspected. Enable, only when requested by Support. Log data includes email, calendar, and contact information |
| • | Turning logging on or off |
Turning logging on or off
You can turn logging on or off by either selecting or deselecting the MICS or Sentry options under Log Management.
Procedure
| 1. | Select or deselect the MICS checkbox to turn on or off MICS logging. |
| 2. | Select or deselect the Sentry checkbox to turn on or off Sentry logging. |
| 3. | If you turn on Sentry logging, select log options, level, and filters. |
| 4. | Click Apply. |
Filtering log entries
The Filtering section of the Log Management screen enables you to isolate entries based on the following attributes:
•device-id—filters the logs based on the device id
•device-ip—filters the logs based on a specific ip address
•user-id—filters the logs based on a specific user id
User id must be an exact match, but it is case insensitive.
The following example shows how to restrict the display to entries containing user ID johnd.
Figure 2. Filter log entries
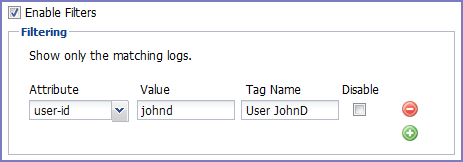
If multiple filters are specified, Sentry performs a logical OR operation; Sentry selects the log lines matching at least one of the filters.
Procedure
| 1. | Select the Enable Filters checkbox. |
| 2. | Click the green + button to display a filter entry. |
| 3. | Select an attribute from the Attribute drop-down list. |
| 4. | In the Value field, enter the value you want to match. |
The field is free-form and case-sensitive.
| 5. | In the Tag Name field, enter a string that identifies the filter. |
The tag name is added to the log output. Tag names are especially useful when you apply multiple filters. Adding a tag name is optional.
| 6. | Click Apply. |
Disabling filters
Disabling a filter removes the effect of the filter. Select the Disable checkbox to disable the filter. Clear it to re-enable the filter.
Deleting filters
If you do not intend to reuse a filter, you can delete it. To delete a filter, click the red – button.
View logs
The Troubleshooting > Logs page enables you to view the contents of logs directly from the console. Logging must be turned on.
|
Log Name |
Description |
|
MICS |
MobileIron Configuration Service log entries Sentry System Manager logs include IP, DNS, debugging, and upgrade configuration. |
|
Sentry |
Sentry operation log entries |
|
System |
Sentry status log entries |
|
Syslog |
A superset of the information in the MICS log Includes Sentry system level information and WARN and above application logs. |
|
Catalina |
Application loading status Includes the Sentry application server (tomcat) console logs. |
|
Catalina2 |
Application loading status Includes the Sentry System Manager (MICS) application server (tomcat2) console logs. |
Viewing logs
The View Module Logs section in the Troubleshooting > Logs page contains links to logs for Sentry modules.
Procedure
| 1. | In the View Module Logs section, click the link for the log you want to view. |
Figure 3. Log view
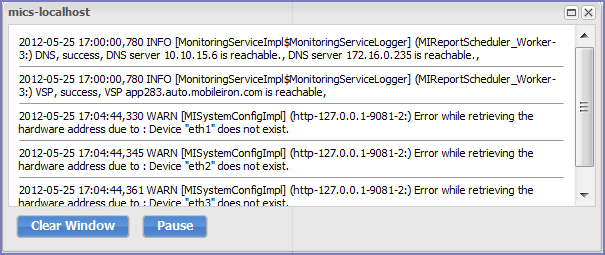
The displayed window shows the most recent log entries. The window scrolls dynamically as the Server adds entries to the log.
| 2. | Click x to close the log view window. |
If you close the log view window and then re-open it, the displayed window shows only log entries made since you closed the window.
To remove existing log entries from the log view window and view only new log entries, click the Clear Window button.
Exporting logs
The Export Logs section allows you to download logs
Downloading logs
The following procedure describes how to download Sentry logs. Logs are downloaded to your local drive.
Procedure
| 1. | Go to Troubleshooting > Logs. |
| 2. | Scroll down to the Export Logs section. |
| 3. | In the Export Logs section, select Download from the Type drop-down list |
| 4. | If you have received a support ticket number associated with this upload, enter it in the Support Ticket Number field. |
| 5. | Click Download. |
SFTP and HTTPS upload support for logs (Ivanti EPMM only)
You can upload logs directly to the default support site or an alternate site.
You can choose from the following log options:
•The Show Tech option provides important debug information for troubleshooting.
•The Show Tech (ALL) option provides additional exhaustive stats and logs.
•You can also select a specific Sentry module log from the dropdown list.
Uploading logs
The following procedure describes how to upload Sentry logs to the default support site or to an alternate site.
Procedure
| 1. | Go to Troubleshooting > Logs. |
| 2. | Scroll down to the Export Logs section. |
Figure 4. Export logs
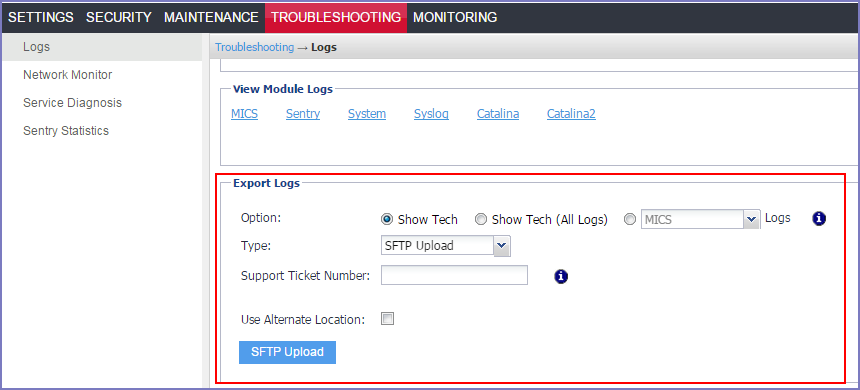
| 3. | In the Export Logs section, select SFTP Upload or HTTPS Upload from the Type drop-down list, depending on the method of upload you want to use. |
You must configure SFTP and/or HTTPS server authentication in the Settings > Log Upload so the log file can be received by your server.
By default, the output files are uploaded to the support site using the credentials configured in Maintenance > Software Updates.
| 4. | If you have received a support ticket number associated with this upload, enter it in the Support Ticket Number field. |
| 5. | Select the Use Alternate Location check box and configure an alternate location. This location can be a backup location or the server of a support provider. This field is also used to upload information to a third party. |
The following additional fields for the alternate location are displayed:
| - | Host/IP or URL For Host/IP, enter the server name. For example, support.mobileiron.com. For URL, enter the FQDN. For example, https://support.mobileiron.com |
| - | User Name |
| - | Password |
| - | Confirm Password |
| 6. | Click SFTP Upload or HTTPS Upload. |