Standalone Sentry Email+ Notification Service for Ivanti EPMM
You can set up Ivanti Standalone Sentry as an Email+ Notification Service. This feature is available only when it is used with Email+ 3.13.0. This capability allows you to configure multiple Exchange servers to provide notifications for VIP accounts in Email+. This feature requires Ivanti EPMM, cloud notification service (CNS), Ivanti Standalone Sentry, and Email+.
To enable Email+ notifications, you must configure Ivanti Standalone Sentry configuration on Ivanti EPMM. You must also configure the key-value pairs in the AppConnect App configuration.
Before you begin
- Ensure that you have Ivanti EPMM 10.5.0.2 or later and Sentry 9.8.5 or later.
- Ensure that you have the JWT token of CNS production server.
A token is a randomly generated string from Ivanti, representing an authorization token for the cloud server.
The term JWT token is also referred as Authorization Token, Token, and notification_server_authorization across Ivanti products. - Ivanti Standalone Sentry must be configured with a publicly trusted certificate.
- Ensure that the Exchange servers are configured with the service account. The servers must have identity certificate to authenticate the service account.
For more information on configuring service account on Microsoft Exchange server, see Configuring a service account.
Also, see Microsoft documentation. - If Exchange server version support is earlier than TLS v1.2, then the supported protocols should be configured in Incoming protocols on MICS.
- Supported protocols are configured under Incoming SSL configuration under custom configuration on Sentry MICS UI.
- Ensure that the Ivanti Standalone Sentry port is configured at 9090 as default.
Procedure
| 1. | In Ivanti EPMM, click Services > Sentry > Add New > Standalone Sentry. |
| 2. | On the New Standalone Sentry window, enter the Sentry Hostname / IP.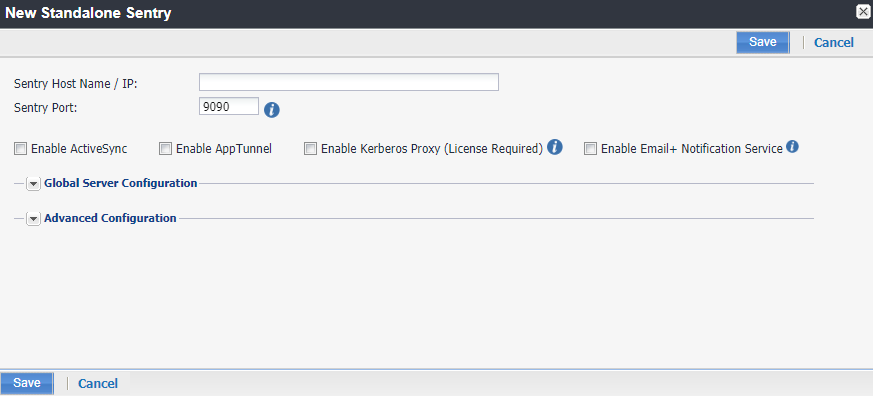 |
| 3. | Select the Enable Email+ Notification Service checkbox. If Email+ notification is enabled, other Sentry services such as ActiveSync, App Tunnel, and Kerberos Proxy are disabled. |
| 4. | For Notification Proxy Hostname, enter the Sentry Hostname. This is the same hostname you entered for Sentry Host Name. |
| 5. | For Notification Server Authorization, enter the CNS JWT token. The CNS JWT token is per tenant and is different for every tenant. 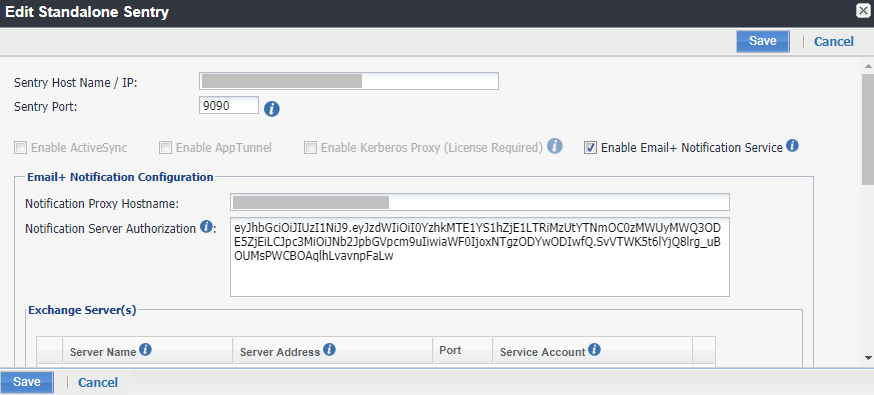 |
| 6. | Under Service Account(s), click  . The Manage Certificate window appears. . The Manage Certificate window appears.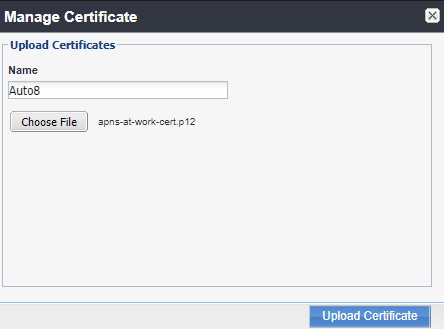 |
| 7. | Enter the Name and click Choose File to upload the PKCS12 certificate to authenticate service account on Exchange server. Ensure that the certificate is uploaded successfully. 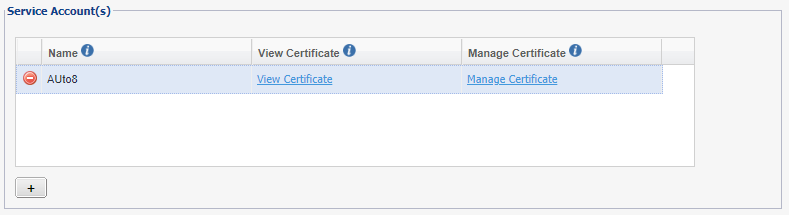 |
| 8. | Under Exchange Server(s), click to add the Exchange Servers.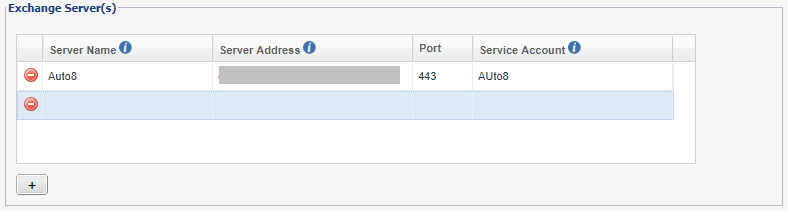 |
| 9. | Enter a display name for the exchange server in the Server Name field and in the Server Address field enter the server address which is the Host Name / IP Address of the Exchange server. The port is configured at 443. |
| 10. | Select the configured Service Account from the drop-down. |
| 11. | Click Save on the New Standalone Sentry screen after configuration is complete. |
Next steps
You must configure the key-value pairs for Email+ notification services. For more information, see "Additional configurations using key-value pairs" in the Email+ Guide.