Ivanti Standalone Sentry certificate
When you first install Ivanti Standalone Sentry, a self-signed certificate is also installed. Ivanti strongly recommends that you replace the default certificate with a publicly trusted certificate. Standalone Sentry presents this certificate to devices so that the devices know that the Sentry server is a trusted server. Sentry also presents its certificate to other servers connecting to it, such as a server that performs health checks on Sentry.
This certificate is not the same as:
-
The certificate that devices use to authenticate themselves to Sentry.
For information about device certificates, see Device and Server Authentication.
-
The portal certificate that Sentry presents to browsers to identify itself as a trusted server.
For more information, see Certificate Management.
The Ivanti Standalone Sentry certificate can be one of the following:
- A certificate from a trusted Certificate Authority (CA), such as Verisign or Entrust.
- A self-signed certificate.
If you use a self-signed certificate, a device or server that is connecting to Sentry is warned that the certificate for Sentry is not from a trusted source. Therefore, Ivanti recommends that you use a certificate from a trusted Certificate Authority (CA).
You can upload and view the Ivanti Standalone Sentry certificate from the Services > Sentry page on the Admin Portal.
To get a certificate from a trusted Certificate Authority (CA), use the Sentry page on the Admin Portal to generate a certificate signing request (CSR) to the CA. Once you receive the signed certificate, you can use the same page to upload it to Ivanti EPMM, which sends it to Sentry.
Generating a CSR for Sentry
You can use the Admin Portal to generate a certificate signing request (CSR) to a Certificate Authority (CA).
Procedure
| 1. | In the Admin Portal, go to Services > Sentry. |
| 2. | Click the Manage Certificate link. |
| 3. | For Certificate Options, select Generate CSR. |
Figure 1. Generate CSR
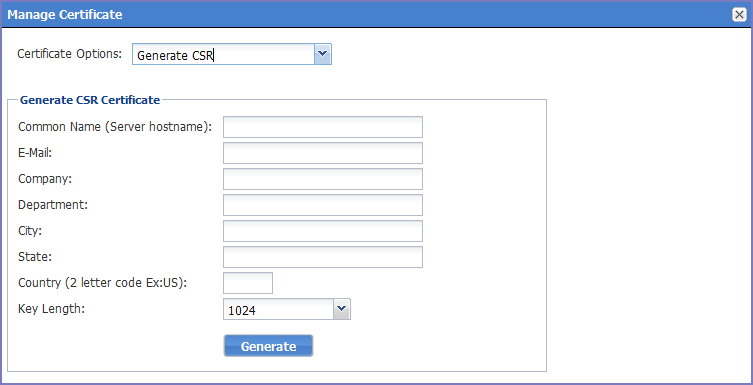
| 4. | Use the following guidelines to complete the form: |
|
Field |
Description |
|
Common Name |
Enter the server host name. |
|
|
Enter the email address of the contact person in your organization who should receive the resulting certificate. |
|
Company |
Enter the name of the company requesting the certificate. |
|
Department |
Enter the department requesting the certificate. |
|
City |
Enter the city in which the company is located. |
|
State |
Enter the state in which the company is located. |
|
Country |
Enter the two-character abbreviation for the country in which the company is located. |
|
Key Length |
Select 1024 or 2048 to specify the length of each key in the pair. |
| 5. | Click Generate. |
A message similar to the following displays.
Figure 2. CSR parameters
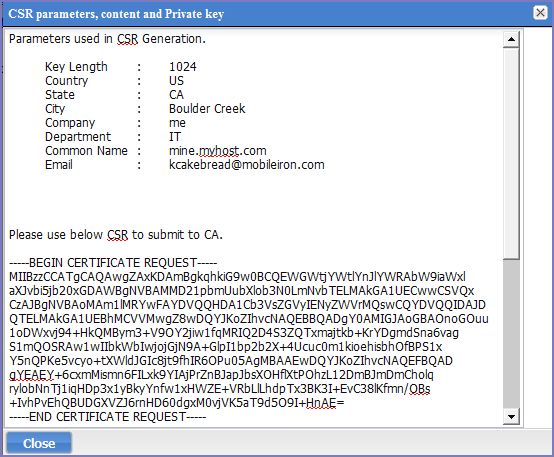
| 6. | Copy the content between BEGIN CERTIFICATE REQUEST and END CERTIFICATE REQUEST to a text file. |
| 7. | Copy the content between BEGIN RSA PRIVATE KEY and END RSA PRIVATE KEY to another text file. |
| 8. | Click OK. |
| 9. | Submit the file you created in step Copy the content between BEGIN CERTIFICATE REQUEST and END CERTIFICATE REQUEST to a text file. to the certifying authority. |
Uploading Sentry certificates
You upload the Sentry certificate in the Ivanti EPMM Admin Portal.
Procedure
| 1. | In the Admin Portal, go to select Services > Sentry. |
| 2. | Click the Manage Certificate link. |
| 3. | For Certificate Options, select Upload Certificate. |
Figure 3. Upload certificate
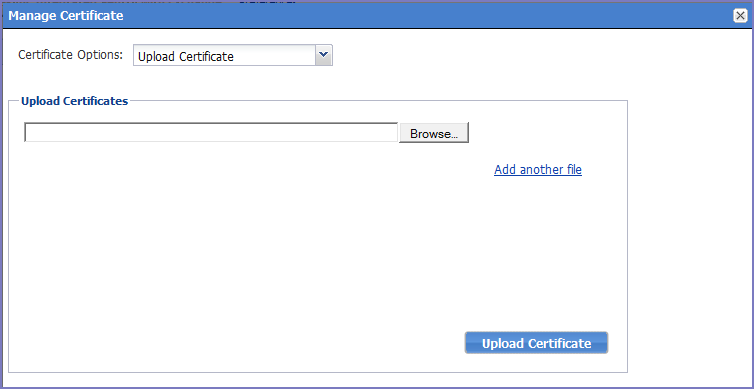
| 4. | Click Browse and select a file to be uploaded. If there are additional files, click Add another file. |
Select the certificates as indicated in the following table:
|
Certificate |
File to Select |
|
Key file |
The file created in Generating a CSR for Sentry. |
|
Server certificate |
The CA certificate file you received from the certifying authority. |
|
CA certificate |
The generic CA certificate file. |
| 5. | Click Upload Certificate. |
Viewing a Sentry certificate
You can view the contents of the Sentry certificate in the Ivanti EPMM Admin Portal.
Procedure
| 1. | Select Services > Sentry in the Admin Portal. |
| 2. | Click View Certificate. |
Changing the Standalone Sentry certificate
Changing the Sentry certificate will impact email, AppTunnel, and Ivanti Tunnel deployments. The AppTunnel AppConfig and Ivanti Tunnel VPN configurations will have to be re-pushed to devices. If you are uploading a new self-signed certificate, the new certificate will have to be re-pushed to devices.
Procedure
| 1. | Upload the Sentry certificate in the Ivanti EPMM Admin Portal in Services > Sentry > Manage Certificate. |
| 2. | If you uploaded a self-signed certificate, in Settings > Sentry, |
Click on View Certificate.
Clicking on View Certificate, makes the Sentry certificate known to Ivanti EPMM.
If you have an Ivanti Tunnel deployment, push the Standalone Sentry certificate to devices.
| 3. | If you have Ivanti Tunnel or AppTunnel deployments, you must re-push the Ivanti Tunnel VPN and AppConnect AppConfig configurations. |
To re-push the configurations, remove then re-apply the configuration to labels.
•For information on how to upload the Sentry certificate, see Uploading Sentry certificates.
•For information on how to push the Sentry certificate to devices see, Using a Self-signed certificate with Standalone Sentry and Ivanti Tunnel knowledge base article in the Support and Knowledge Base portal.