Configuration tasks overview for Android Enterprise (Ivanti Neurons for MDM)
The following configuration tasks are required to set up Tunnel. These configuration tasks are performed in the Cloud Admin Portal.
- Adding and configuring the Ivanti Tunnel app for Android Enterprise(Ivanti Neurons for MDM).
- Creating an Always-On VPN configuration (Cloud, optional).
Adding and configuring the Ivanti Tunnel app for Android Enterprise(Ivanti Neurons for MDM)
Upload the Ivanti Tunnel app to Ivanti Neurons for MDM from Google Play and configure it to make it available to Android Enterprise devices. You can download the app from Google Play.
Before you begin
- Ensure that you have met the requirements detailed in Before you configure Ivanti Tunnel for Android Enterprise (Ivanti EPMM and Ivanti Neurons for MDM).
- If you are configuring app VPN,
- You must have created a Tunnel service for Android in Standalone Sentry. For information on setting up Standalone Sentry with a Tunnel service, see “Working with Standalone Sentry for AppTunnel” in the Standalone Sentry Guide for Ivanti Neurons for MDM.
- Standalone Sentry must be set up to use identity certificates for device authentication.
- Ensure that you have created a Identity Certificate configuration in Ivanti Neurons for MDM. The identity certificate generated must be trusted by the certificate chain in the certificate you uploaded to Standalone Sentry for device authentication.
- If you are configuring Ivanti Tunnel for securing authentication traffic with Access, you must have setup Access. For information about setting up Access see the Access Guide. As part of the Access setup, you will have created a Tunnel service. If you are configuring Ivanti Tunnel to support anti-phishing with MTD, you must have an MTD setup enabled for anti-phishing. See Support for anti-phishing with Mobile Threat Defense
Procedure
-
In the Ivanti Neurons for MDM portal, go to Apps >App Catalog.
-
Click +Add next to App Catalog.
-
Select Google Play from the catalog pull-down menu.
-
In the search text box, enter Tunnel to locate the app in the Google Play store.
-
Click on the Tunnel icon in the search results.
A description and screen captures of the app are displayed.
-
Click Select.
Options to add categories and a description are displayed. -
Make changes as needed and click Next.
The App Delegation screen displays noting that AFW is enabled.
-
Click Next.
-
Select a distribution option and click Next.
The configuration will be distributed to the devices in the group you selected.The App Configurations screen displays.
-
Click + for Managed Configurations for Android to configure settings for the app.
-
Enter a name and description for the configuration.
-
Select Blocks the user for uninstalling the app if you do not want device users to uninstall the app.
-
Do one of the following:
-
Select Use Tunnel for Anti-phishing Only, to enable Tunnel VPN to analyze phishing URLs.
Do not select this option if you have any restrictions configured. Selecting the option removes any configured restrictions and hides the Managed Configurations section. To configure anti-phishing when you have an existing Tunnel deployment, add a new configuration and select the option.
OR
-
Expand Managed Configurations to configure the restrictions for the app.
Select either Use Tunnel for Anti-phishing Only or configure the restrictions under Managed Configurations. To deploy Tunnel for MTD and for Sentry or Access, create two separate configurations.
-
-
Select a distribution option for the configuration and click Next.
-
Click Install Application configuration settings to configure the install options.
-
Edit the Name and Description of the settings if necessary.
-
Install on Device: Enable Install on devices, if you want to require that the app is installed on devices.
-
Silently install on Samsung KNOX and Zebra devices: This option is not applicable to Android Enterprise apps.
-
Do not show app in end user App Catalog: Select if you do not want the app to display in the app catalog on users’ devices.
-
-
Click Next.
-
Click Promotion distribution configuration settings and select a promotion option.
The promotion option determines how the app appears in the app catalog on the device. -
Click Next and then click Done.
Next steps
Go to Creating an Always-On VPN configuration (Cloud, optional).
- See Ivanti Tunnel configuration field description for Android Enterprise for a description of the restrictions.
- For information about how to set up Access as a service with Ivanti EPMM, see the Access Guide.
- For information about adding and configuring an Android Enterprise app, see "Adding Google Play Store app for Android Enterprise," in the Ivanti Neurons for MDM Guide.
- For information about setting up anti-phishing with Threat Defense, see "Advanced phishing protection for managed devices" in the Mobile Threat Defense Solution Guide for Cloud.
- Support for anti-phishing with Mobile Threat Defense.
- Adding multiple Tunnel configurations.
Adding multiple Tunnel configurations
You can create multiple Tunnel configurations and assign the configuration to a distribution group. One reason for creating multiple Tunnel configurations is when you configure Tunnel to support anti-phishing with an MTD deployment as well as for deployment with Sentry or Access.
Use the procedure described here to create additional Tunnel configurations for anti-phishing or for tunneling to Sentry or Access.
If you have an existing Tunnel configuration to use with Sentry or Access, add a new Tunnel configuration for anti-phishing and vice versa.
Procedure
-
On the Ivanti EPMM Admin Portal, go to Apps > App Catalog.
-
Select the Tunnel app for Android Enterprise and click Edit.
-
Scroll down to Configuration Choices.
-
Click Add+ to add a new Tunnel configuration.
-
Select Use Tunnel for Anti-phishing only or expand Configuration for Tunnel to configure the restrictions for the app.
-
If you configured restrictions for the Tunnel app, apply the new configuration to a label.
-
Click Save.
Creating an Always-On VPN configuration (Cloud, optional)
The Ivanti Tunnel app can be configured for Always-On VPN status for devices using Android 7 through the most recently released version as supported by Ivanti.
With Always-On VPN, the VPN connection is always on. Any app in the Android Enterprise container can go through the tunnel.
If a connection fails, Tunnel tries to reconnect periodically. Tunnel makes three quick attempts at one-second intervals, and then at one-minute intervals.
Tunnel attempts to reconnect when there is a network status change or there is a configuration change. Tunnel will also attempt to reconnect if Standalone Sentry times out due to TCP idle time. If Tunnel is idling, Standalone Sentry closes the TCP connection. In this case, Tunnel will attempt to reconnect. The recommended idle timeout is one hour.
Procedure
- In Cloud, go to Configuration and click +Add.
- Click Always On VPN.
- Enter a name for the configuration.
-
Select the Android operating system.
Figure 1. Always on VPN configuration

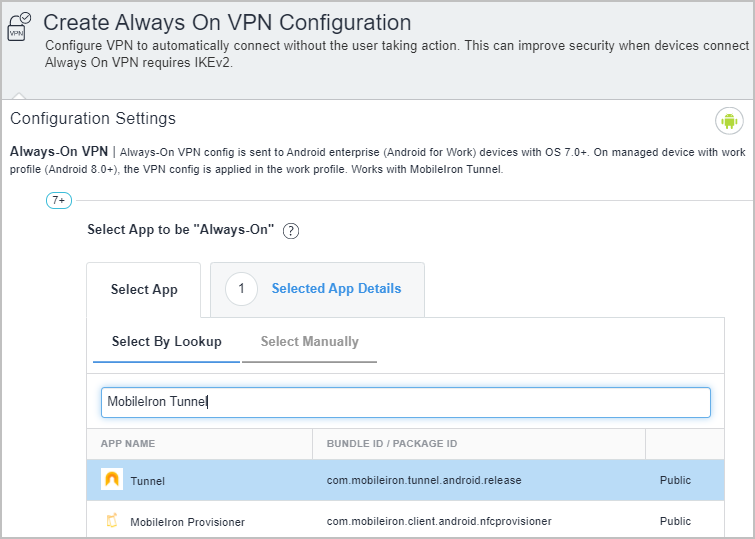
- In Configuration Settings, enter Tunnel in the search box.
-
Select the Tunnel app. Click Next.
Figure 2. Select app for always-on
- Select a distribution group, and click Done.