Custom warning messages for blacklisted URLs (Android)
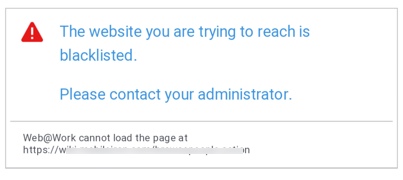
You can provide a customized warning message for blacklisted URLs, using a key-value pair. Device users see the custom warning if they navigate to the affected URLs. This allows administrators to provide additional information about company policies.

When a Web@Work user navigates to a blacklisted URL, they will see the custom warning message instead of the default warning message if the custom warning message is configured

.

The default text “The website you are trying to reach is blacklisted. Please contact your administrator.” is replaced by your custom text.

To use the default warning, no configuration is necessary.

Configuring a custom warning message for a blacklist

To add a custom warning message for a blacklist:

1. Sign in to the Core Admin Portal.
2. Go to Policies & Configs > Configurations.
3. Select the Web@Work setting that applies to the devices of interest.
4. Click Edit.
5. Under Custom Configurations, click Add.
6. Add the following key and value:

Key

Value Description

blacklist_warning_message

Write your custom message here.

- Do not include double-quotes around the text.
- Text will appear as written. Tag-like content (<, >) and punctuation is shown as-is.
7. Click Save.
8. Apply this Web@Work configuration to labels that identify the devices that should receive this configuration.