Set up a device passcode (iOS only)
The security policy that you apply to the iOS device requires a device passcode. A device passcode enables iOS data protection, which is necessary for Web@Work to encrypt browser data.
To set up a device passcode on iOS devices:
| 1. | On the Admin Portal, go to Policies & Configs > Policies. |
| 2. | Select the security policy that applies to the devices that you want to run Web@Work. |
| 3. | Click Edit. |
| 4. | For the Password option, select Mandatory. |
| 5. | Fill in the remaining options relating to passwords. |
| 6. | Click Save. |
| 7. | Repeat steps 2 through 6 for all security policies that apply to devices on which you want to run Web@Work. |
For detailed information about security policies, see “Working with security policies” in the Core Device Management Guide or Connected Cloud Device Management Guide.
Set up a Standalone Sentry to support AppTunnel for Web@Work
Standalone Sentry configured for AppTunnel is required to secure the data (data-in-motion) that moves between secure apps and your internal corporate data sources. Setting up app tunneling is a two-step process.
| 1. | Configuring an AppTunnel service in Standalone Sentry |
| 2. | Configuring AppTunnel rules in the Web@Work configuration. |
Before you begin
Ensure that you have a Standalone Sentry that is set up for AppTunnel and the necessary device authentication is also configured. See “Configuring Standalone Sentry for app tunneling” in the Sentry Guide.
The Web@Work setting you configure will refer to the Certificate Enrollment or Certificates setting. Do not assign labels to the certificates settings. The certificates are distributed to the appropriate devices based on the Web@Work setting.
Configuring an AppTunnel service in Standalone Sentry
To configure an AppTunnel service for Web@Work on Standalone Sentry:
| 1. | In Core, go to Services > Sentry. |
| 2. | Edit the entry for the Standalone Sentry that supports AppTunnel. |
| 3. | In the AppTunnel Configuration section, under Services, click + to add a new service. |
| 4. | Use the following guidelines to configure an AppTunnel service for Web@Work. |
|
Item |
Description |
|
Service Name |
Use the dropdown to select <ANY> <CIFS_ANY> is not relevant to Web@Work. Selecting <ANY> means that the Web@Work user can reach any of your internal servers. Typically, you do not want to restrict users’ access. However, if you do want to restrict their access to internal servers, you can list the services here instead of selecting <ANY>. The service name is any unique identifier for the internal servers. For example, some possible service names are:
The following characters are invalid: 'space' \ ; * ? < > " |. The Service Name is used in the Web@Work setting. |
|
Server Auth |
Select the authentication scheme for the Standalone Sentry to use to authenticate the user to the enterprise server:
|
|
Server List |
Since you typically select <ANY> for the service name for Web@Work, the server list is not applicable. If you do specify service names, enter the internal server’s host name or IP address (usually an internal host name or IP address). Include the port number on the internal server that the Sentry can access. For example: sharepoint1.companyname.com:443 You can enter multiple servers. The Sentry uses a round-robin distribution to load balance the servers. That is, it sets up the first tunnel with the first internal server, the next with the next internal server, and so on. Separate each server name with a semicolon. For example: sharepoint1.companyname.com:443;sharepoint2.companyname.com:443. |
|
TLS Enabled |
Since you typically select <ANY> for the service name for Web@Work, TLS Enabled is not applicable. If you do specify service names, select TLS Enabled if the enterprise servers listed in the Server List field require SSL. Although port 443 is typically used for https and requires SSL, the enterprise server can use other port numbers requiring SSL. |
|
Proxy Enabled |
Select if you want to direct the AppTunnel service traffic through the proxy server. You must also have configured Server-side Proxy. |
|
Server SPN List |
Since you typically select <ANY> for the service name for Web@Work, Server SPN List is not applicable. When the Service Name is <ANY> and the Server Auth is Kerberos, the Standalone Sentry assumes that the SPN is the same as the server name received from the device. If you do specify service names, enter the Service Principal Name (SPN) for each server, separated by semicolons. For example: sharepoint1.company.com;sharepoint2.company.com. The Server SPN List applies only when the Service Name is not <ANY> and the Server Auth is Kerberos. If each server in the Server List has the same name as its SPN, you can leave the Server SPN List empty. However, if you include a Server SPN List, the number of SPNs listed must equal the number of servers listed in the Server List. The first server in the Server List corresponds to the first SPN in the Server SPN List, the second server in the Server List corresponds to the second server in the Server SPN List, and so on. |
| 5. | Click Save. |
Configure an AppConnect global policy
Because Web@Work is an AppConnect app, configure an AppConnect global policy. In this policy, you configure AppConnect global settings, which are settings that are not specific to an AppConnect app.
These global settings include:
•whether AppConnect is enabled in the device
•AppConnect passcode requirements
•conditions for wiping AppConnect data
•the app check-in interval for iOS devices, indicating how often AppConnect apps receive AppConnect-related policy updates.
On Android devices, the policies are updated on the regular device check-in, configured in the sync policy.
•the default end-user message for when an app is not authorized
•whether AppConnect apps with no AppConnect container policy are authorized by default
•settings for data loss prevention policies
| - | For iOS devices, these settings are used for devices which do not have an AppConnect container policy for Web@Work. |
| - | For Android devices, these settings apply to all AppConnect apps on the device. Only the Screen Capture setting can be overridden on the AppConnect container policy for Web@Work. |
To configure an AppConnect global policy:
| 1. | In the Admin Portal, select Policies & Configs > Policies. |
| 2. | Select Add New > AppConnect. |
If you already have an AppConnect global policy, select it, and click Edit.
| 3. | Fill in the fields as described in “Configuring the AppConnect global policy” in the AppConnect and AppTunnel Guide. |
Most fields default to suitable values, but make sure that you select Enabled to enable AppConnect on the device.
| 4. | Click Save. |
| 5. | Apply the appropriate labels to the AppConnect global policy. If you are using the default AppConnect global policy, it automatically applies to all devices. |
Configure an AppConnect container policy for Web@Work
This task is only required:
•If you did not select Authorize for Apps without an AppConnect container policy, in the AppConnect Global Policy.
•If you want to configure a different set of data loss prevention policies for Docs@Work.
The container policy overrides the corresponding settings in the AppConnect Global Policy.
The AppConnect container policy:
•authorizes an AppConnect app.
•specifies the data loss prevention settings.
Separate AppConnect container policies are required for iOS and for Android.
Ensure that only one Web@Work AppConnect container policy is applied to a device.
To configure an AppConnect container policy for Web@Work:
| 1. | In the Admin Portal, go to Policies & Configs > Configurations. |
| 2. | Select Add New > AppConnect > Container Policy. |
| 3. | Enter a name for the policy. For example, enter “Web@Work container policy.” |
| 4. | Enter a description for the policy. |
| 5. | In the Application field: |
| - | For iOS, enter com.mobileiron.securebrowser. |
| - | For Android, select Web@Work from the dropdown list. |
| 6. | Select the settings you require from those described in the following table. |
|
Item |
Description |
|||||||||||||||
|
Exempt from AppConnect passcode policy |
iOS only
|
|||||||||||||||
|
|
||||||||||||||||
|
Allow Print |
This setting allows an AppConnect app to use print capabilities if the app supports them. However, Web@Work does not allow users to print documents from within Web@Work, even if you select this option. |
|||||||||||||||
|
Allow Copy/Paste To |
Select Allow Copy/Paste To if you want the device user to be able to copy content from Web@Work to other apps. When you select this option, then select either: •All apps Select All apps if you want the device user to be able to copy content from Web@Work and paste it into any other app. •AppConnect apps Select AppConnect apps if you want the device user to be able to copy content from Web@Work and paste it only into other AppConnect apps. |
|||||||||||||||
|
Allow Open In |
Select Allow Open In if you want Web@Work to be allowed to use the Open In (document interaction) feature. When you select this option, then select either: •All apps Select All apps if you want Web@Work to be able to send documents to any other app. •AppConnect apps Select AppConnect apps to allow Web@Work to send documents to only other AppConnect apps. •Whitelist Select Whitelist if you want Web@Work to be able to send documents only to the apps that you specify. Enter the bundle ID of each app, one per line, or in a semi-colon delimited list. For example: com.myAppCo.myApp1 com.myAppCo.myApp2;com.myAppCo.myApp3 The bundle IDs that you enter are case sensitive.
•Web@Work does not allow Open In for these file types:
•Web@Work for iOS automatically blocks AirDrop and unauthorized apps with iOS 8 share extensions from selective Open In. For Web@Work for Android, Open In is always restricted to all AppConnect apps. |
|||||||||||||||
|
Android Data Loss Prevention |
||||||||||||||||
|
Allow Screen Capture |
Select Allow Screen Capture if you want Web@Work to allow screen capture. |
|||||||||||||||
| 7. | Select Save. |
| 8. | Select the Web@Work container policy. |
| 9. | Click More Actions > Apply To Label. |
| 10. | Select the labels to which you want to apply this policy. |
| 11. | Click Apply. |
Enabling Web@Work
The Web@Work configuration is required on the device in order to use Web@Work. It applies to Android devices, and sets up the following features and behaviors:
•AppTunnel settings for Web@Work.
AppTunnel provides secure access to web sites behind your firewall. See Set up a Standalone Sentry to support AppTunnel for Web@Work.
•Administrator-specified bookmarks.
The bookmarks you specify here are automatically available to device users.
•Key-value pairs for custom configurations and features.
Key-value pairs to further customize Web@Work. (These key-value pairs are analogous to the key-value pairs that an AppConnect app configuration provides in its App-specific Configurations section.)
Make sure only one Web@Work setting applies to each device.
Configuring a Web@Work configuration
To configure a Web@Work setting:
| 1. | In the Admin Portal, go to Policies & Configs > Configurations. |
| 2. | Click Add New > Web@Work. |
The New Web@Work Setting dialog appears.
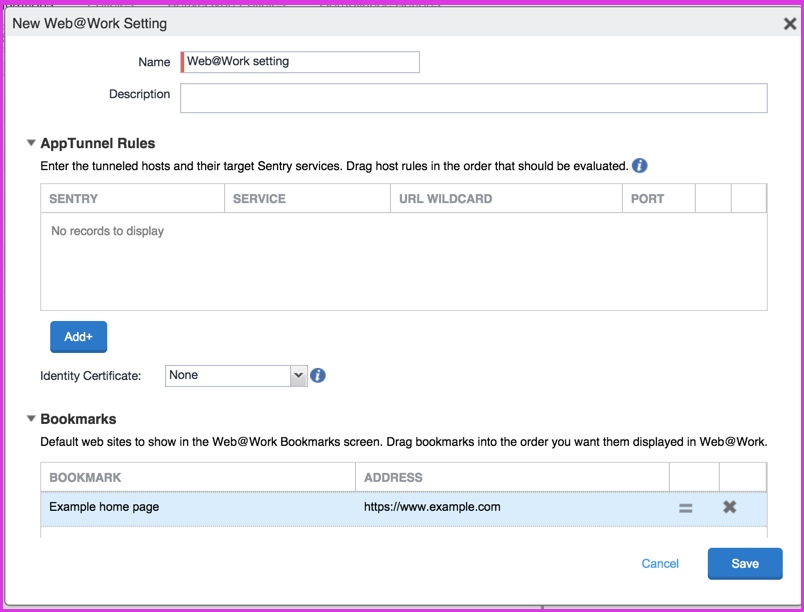
| 3. | Use the following guidelines to create or edit a Web@Work setting: |
|
Item |
Description |
|
Name |
Enter brief text that identifies this Web@Work setting. |
|
Description |
Enter additional text that clarifies the purpose of this Web@Work setting. |
|
AppTunnel Rules Configure AppTunnel rules settings for Web@Work. First, configure the Standalone Sentry to support AppTunnel. See Set up a Standalone Sentry to support AppTunnel for Web@Work. When Web@Work tries to connect to the URL and port configured here, the Sentry creates a tunnel to the Service. |
|
|
Sentry |
Select the Standalone Sentry that you want to tunnel the URLs listed in this AppTunnel entry. The drop-down list contains all Standalone Sentrys that are configured to support AppTunnel. |
|
Service |
Select a Service Name from the drop-down list. Typically, for Web@Work, the service is <ANY>. <CIFS_ANY> is not relevant to Web@Work. This service name specifies an AppTunnel service configured in the App Tunneling Configuration section of the specified Sentry. If the service on the Sentry is configured with its Server Auth set to Kerberos, Web@Work uses Single Sign On for the enterprise server. That is, the device user does not enter any further credentials when Web@Work accesses the enterprise app server. |
|
URL Wildcard |
Typically, for the Web@Work AppTunnel, enter a hostname with wildcards. The wildcard character is *.. Example: *.yourcompanyname.com If you want finer granularity regarding what requests the Standalone Sentry tunnels, configure multiple AppTunnel rows. If Web@Work requests to access this hostname, the Sentry tunnels the Web@Work data to an app server. The Sentry and Service fields that you specify in this AppTunnel row determine the target app server.
•The Web@Work data is tunneled only if Web@Work’s request matches this hostname and the port number specified in the Port field of this AppTunnel row. If Web@Work requests a hostname that does not match the value of any of the AppTunnel entries in the Web@Work setting, tunneling does not occur. In this case, if the requested hostname is behind your firewall, Web@Work informs the device user that it cannot access the requested hostname. •A hostname with wildcards works only with the service <ANY>. Unlike services with specific service names, these services do not have associated app servers. The Sentry tunnels the data to the app server that has the URL that Web@Work specified. •The order of these AppTunnel rows matters. If you specify more than one AppTunnel row, the first row that matches the hostname (and port, for Android) that Web@Work requested is chosen. That row determines the Sentry and Service to use for tunneling. •Do not include a URI scheme, such as http:// or |
|
Port |
Enter the port number that Web@Work requests to access. The Web@Work data is tunneled only if Web@Work’s request matches the hostname in the URL Wildcard field and this port number. If you do not enter a port number, the port in Web@Work’s request is not used to determine whether data is tunneled. Entering a port number in this field is required when both of the following are true: •The hostname in the URL Wildcard field does not contain a wildcard. •The service is not <ANY>. |
|
Identity Certificate |
Select the Certificate or the Certificate Enrollment setting that you created for devices to present to the Standalone Sentry that supports app tunneling. For more information, see “Certificate Enrollment settings” and “Certificates settings” in the Core Device Management Guide or Connected Cloud Device Management Guide. |
|
Bookmarks Specify the bookmarks that you want to appear automatically in the Bookmarks screen of Web@Work. The bookmarks appear in the Bookmarks screen of Web@Work in the same order that they appear in the Web@Work setting. To change the ordering, drag the bookmarks in the Web@Work setting. |
|
|
Bookmark |
Enter the name of the bookmark. The name is any string that describes the URL that the bookmark points to. For example: Sales information |
|
Address |
Enter the URL for the bookmark. For example: https://sales.mySecureCompany.com |
|
Custom Configurations Specify Web@Work custom configuration settings as key-value pairs. |
|
|
Key |
Enter the key. The key is any string that Web@Work recognizes as a configurable item. Unrecognized keys are ignored. See Custom configurations with key-value pairs for a description of available keys and values. |
|
Value |
Enter the value associated with the key. |
| 4. | Click Save. |
| 5. | Select the new Web@Work setting. |
| 6. | Select More Actions > Apply To Label. |
| 7. | Select the labels to which you want to apply this Web@Work setting. |
| 8. | Click Apply. |