Managing local users in the Admin Portal
This section explains how to manage local users in the Admin Portal. For information on managing local users in System Manager, refer to Ivanti EPMM System Manager Guide. Local users that you create in the Admin Portal are separate from the local users that you create in the System Manager.
High-security environments using Ivanti EPMM 11.5.0.0 and higher can apply the CLISH limitUser command during post-installation configuration to limit the creation of Local Users to one. Once enabled, you will need Ivanti Customer Support to modify the configuration. This feature has no effect on the number of LDAP users. In these cases, the following tasks do not apply.
Adding local users in the Admin Portal
Required role: The Manage user role is required for completing this task. See Assigning and removing device user roles for more information.
Avoid creating user IDs that include _MIxx, where xx is a number. This sequence is reserved for user IDs requiring special processing, which includes stripping the _MI sequence and all characters following it.
Procedure
-
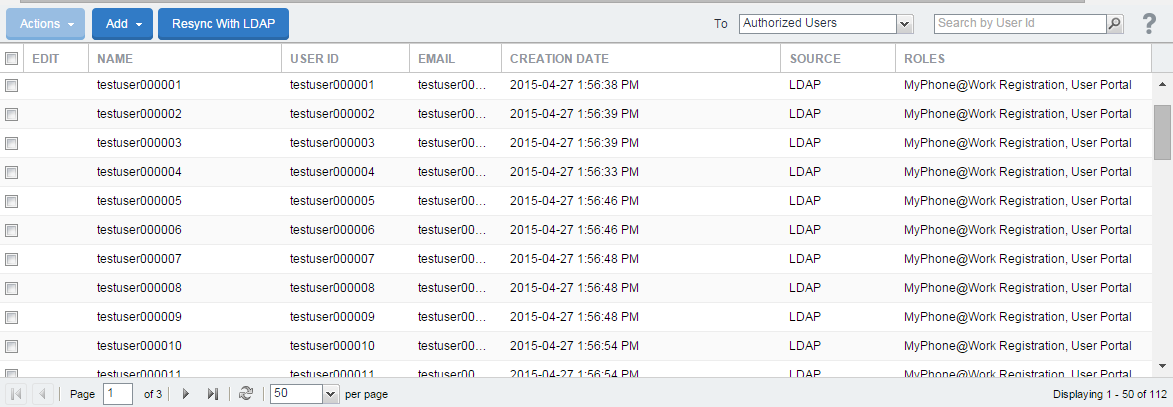
From the Admin Portal, go to Devices & Users > Users to open the Users window.
-
Select Add > Add Local User. The Add New user window displays.
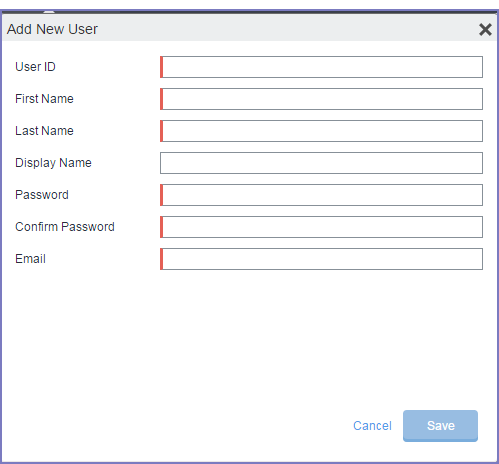
- Refer to the following guidelines to complete the information:
- Add the new user. Refer to the Add New User window for details.
- Click Save.
- Assign the necessary roles to users. See Assigning and removing device user roles.
| Field | Description |
|
User ID |
Enter the unique identifier to assign to this user. The following characters are allowed when entering a UserID. All other characters, including spaces, are prohibited.
If you are using local users and LDAP users, the user ID cannot match that of an LDAP user. |
|
First Name |
Enter the user’s first name. |
|
Last Name |
Enter the user’s last name. |
|
Optional name used to identify the device user. If you leave this field blank, then the display name will have the following format: Firstname Lastname |
|
|
Password |
Enter a password for the user. Valid passwords are determined by the password policy for local users. For details, see: |
|
Confirm Password |
Confirm the password for the user. |
|
|
Enter the user’s email address. |
Editing local users in the Admin Portal
Required role: The Manage user role is required for completing this task. See Assigning and removing device user roles for more information.
You can edit account information for local users. For example, you can:
- Change the user’s Ivanti EPMM password.
- Edit the first name, last name, or display name.
- Update the email address.
You cannot change the User ID.
To edit local user account information:
Procedure
- From the Admin Portal, go to Devices & Users > Users.
- Click the Edit icon for the user entry to display the Edit User dialog.
- Make the changes to the displayed information. See Adding local users in the Admin Portal for information on completing each field.
- To change the user password, click the Change Password link, and then enter the old password, the new password, and the new password again in the space provided.
- Click Save.
Linking local users to LDAP users
A local user can be matched with its corresponding LDAP user. For example, suppose you created a local user for preliminary system rollout and testing, but for the production rollout, you want that user matched with their LDAP equivalent.
To match a local user to their corresponding LDAP entry:
Procedure
- From the Admin Portal, go to Devices & Users > Users.
- Click the check box for the local user you want to match.
- Select Actions > Link to LDAP.
Existing roles for the local user are removed. The next time the user authenticates, roles will be applied based on the LDAP group of the corresponding LDAP user.
Unlocking locked-out local users
Administrators can unlock users who have locked themselves out of the user portal. Users who fail to correctly log in to the user portal within the configured number of tries is blocked from logging in again for a configured period of time, for example, 30 minutes. This function allows an Ivanti EPMM administrator to unlock the user account before the required waiting period completes.
Procedure
- From the Admin Portal, go to Devices & Users > Users.
- Click the check box for the user you want to admit.
- Select Actions > Unlock User.
Deleting local users in the Admin Portal
You can delete a local user if that user is not associated with a registered device.
Procedure
- From the Admin Portal, go to Devices & Users > Users.
- Click the check box for the user you want to delete.
- Select Actions > Delete User.
Deleting multiple local users in the Admin Portal
You can delete multiple local users. You cannot delete multiple users if:
- a user you are trying to delete is currently logged in (administrator)
- a user is an administrator user - you first need to remove the user's administrator role
- there is a non-retired device associated to the user
Procedure
- From the Admin Portal, go to Devices & Users > Users.
- Select the check boxes of the users you want to delete.
- Select Actions > Delete User.
-
Click Yes to confirm deletion of user.
A dialog box displays confirming successful deletion of user.
- Click OK to close the dialog box.
Forcing a password change for local users
If there is a possibility that a local user’s credentials have been exposed or compromised, you can force that user to change the password during the next login. For example, if you have emailed credentials, you should consider forcing the user to set a new password.
Procedure
- From the Admin Portal, go to Devices & Users > Users.
- Select the user whose password you want to change.
- Select Actions > Require Password Change button.
- Click Yes to confirm the action.
-
The next time the user completes a successful login, the Ivanti EPMM login window displays, prompting the user to set a new password.