Setup tasks
This section includes the following setup tasks:
- Setting the enterprise name
- Setting the external hostname
- Setting the idle timeout for the Admin Portal and user portal
- Setting the EULA or other login text
- Enabling last login information display
- Enabling Notes for Audit Logs
- Trusted certificates management
- Uploading your MDM certificate
- Enabling iOS MDM support
- Requesting an MDM certificate
- Confirming MDM for a macOS or iOS device
- Denying check-Ins for devices having expired MDM certificates
- Displaying a report of devices having expired MDM certificates
- Setting a System Event to be notified about certificate expiration
- Renewing your MDM certificate
Setting the enterprise name
The company name entered during Ivanti EPMM installation is used as the default enterprise name identifying your organization in email, SMSes, alerts, and certificates. If the company name you entered is not the one you want to use in these contexts, you can change the name.
Be sure to set the enterprise name before you upload certificates, or you may impact all registered devices.
Procedure
-
Log into the Admin Portal.
-
Go to Settings > System Settings > General > Enterprise.
-
In the Enterprise Name field, enter the text to use when referring to the enterprise.
-
Click Save.
Setting the external hostname
The external hostname is set during installation. It is used in the registration URL sent to users for completing the registration process. It is also used in self-signed certificates.
Impact: Changing this field requires the following:
- Regeneration of any self-signed certificates or uploading matching portal-HTTPS and client-TLS certificates
- Rebooting the appliance
Procedure
-
Log into the Admin Portal.
-
Go to Settings > System Settings > General > Enterprise.
-
In the External Host field, enter the fully-qualified domain name to be used for accessing Ivanti EPMM.
-
Click Save.
Setting the idle timeout for the Admin Portal and user portal
Based on your security requirements, you can decide how much idle time is allowed before an administrator or user is automatically logged out of the Admin Portal or self-service user portal. You configure the idle session timeout in the Admin Portal at Settings > System Settings > General > Timeout. You can choose an idle timeout between 5 and 90 minutes.
A pop-up warns the administrator or user about the impending timeout a few minutes before the configured idle time elapses.
Figure 1. Idle time out window
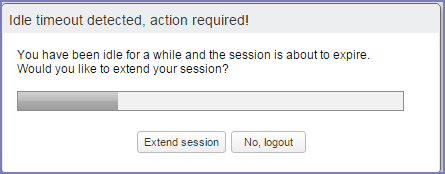
When the time elapses, the administrator or user is logged out. If the administrator or user clicks Extend session, the timer is reset.
Changing the idle timeout impacts all future logins. It does not impact your current session.
Setting the idle timeout for CLI and SSH sessions
You can set the idle timeout for command line interface (CLI) and secure shell (SSH) sessions in Ivanti EPMM System Manager.
For details, see “System Settings” in the Ivanti EPMM System Manager Guide.
Warning period details
The pop-up that warns that the administrator or user will be logged out precedes the timeout as follows:
| Configured idle timeout | Pop-up warning appearance |
|
5 to 35 minutes |
3 minutes before timeout |
|
40 or 45 minutes |
4 minutes before timeout |
|
50 or 55 minutes |
5 minutes before timeout |
|
60 or 65 minutes |
6 minutes before timeout |
|
70 or 75 minutes |
7 minutes before timeout |
|
80 or 85 minutes |
8 minutes before timeout |
|
90 minutes |
9 minutes before timeout |
Setting the EULA or other login text
You can configure Ivanti EPMM to display an End User License Agreement (EULA) or any other text on the following user interfaces:
- Admin Portal login screen
- System Manager login screen
- A CLI session
- The Self-service user portal login screen
Procedure
- In the Admin Portal, go to Settings > System Settings > General > Login.
- Select Enable Login Text Box.
-
In Text To Display, enter the text.
Ivanti EPMM treats the text as plain characters. It does not recognize, for example, HTML tags. The text must be ASCII only; no multi-byte characters are allowed.
-
Click Save.
The Admin Portal and the System Manager display this text the next time a user logs in.
The Ivanti EPMM CLI command banner, available in CLI CONFIG mode, also sets this text.
To disable this setting:
- In the Admin Portal, go to Settings > System Settings > General > Login.
-
Uncheck Enable Login Text Box.
The text you had entered in Text To Display is grayed out.
- Click Save.
The login screens and CLI session do not show the text the next time a user logs in.
Enabling last login information display
You can enable a setting to show the current Admin Portal user some login information about the last login to the Admin Portal. This information provides you security insight about Admin Portal use. The information displays when you click on the user icon at the top right of the screen. An example of the information is:
Last login was 3/11/2014 1:28:52 PM from 171.15.10.221
The information includes:
- the date of the last login
- the time of the last login
- the IP address of the computer that was used for the last login
To configure this setting:
- In the Admin Portal, go to Settings > System Settings > General > Login.
- Select Always Show Last Login.
-
Click Save.
The Admin Portal displays the last login information the next time a user logs in.
Enabling Notes for Audit Logs
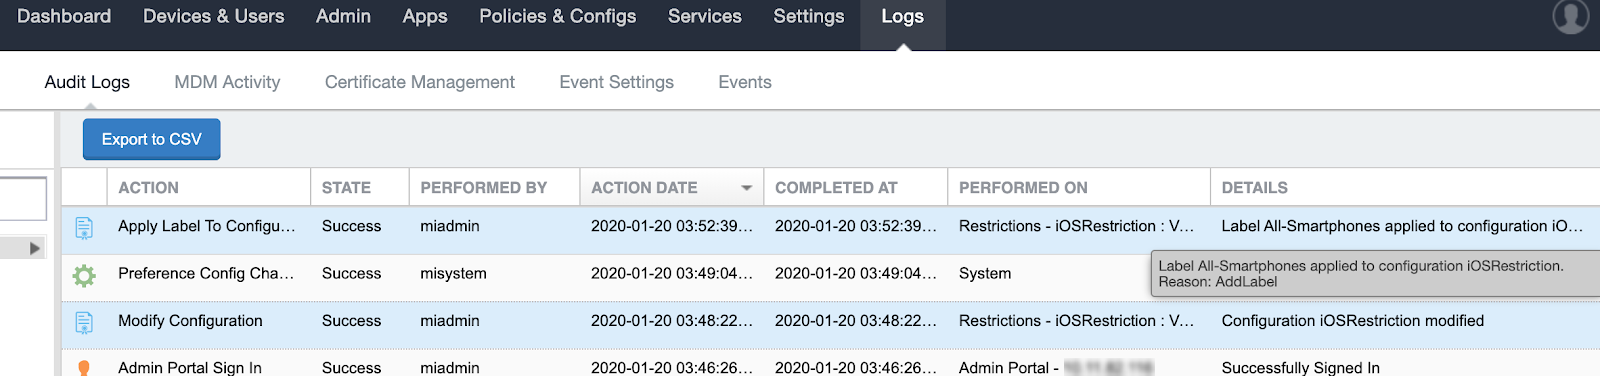
As a best practice, we recommend enabling Notes for Audit Logs. This is used for tracking changes to labels made by administrators. By default, this feature is disabled. When enabled, administrators will be prompted with a text box similar to the one below.
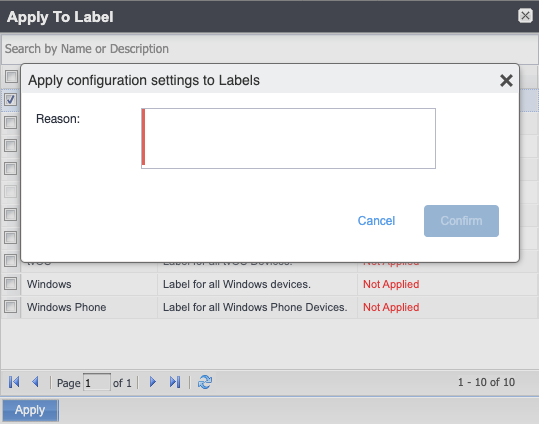
For example, an administrator can enter a change ticket order number, thus allowing for automated monitoring of the Ivanti EPMM environment. This information is then displayed in the Audit logs, in the Details column as "Reason."
Notes for Audit Logs is applicable for the following label-related activities:
- Add/Edit/Delete/Save Label (Both filter and manual)
- In the Devices & Users > Devices > Advanced Search > Save to Label
- Add/Edit/Remove Label to devices
- Add/Edit/Remove Label to configurations
- Add/Edit/Remove Label to policies
- Add/Edit/Remove Label to apps
- Add/Edit/Remove Label to iBooks
Using this feature, you can also track administrator-made changes to iOS
Procedure
To set the tracking of changes made by administrators:
- Go to Settings > System Settings.
-
In the left pane, click General > Notes for Audit Logs. The Notes for Audit Logs page displays.

- Select Enable Notes for Audit Logs and then click Save.
Trusted certificates management
Ivanti EPMM uses TLS/SSL to secure incoming and outgoing connections to outside entities, such as servers, clients, and Sentry. Clients connecting to a server over TLS/SSL are required to verify the server certificate chain obtained during the TLS/SSL handshake. To ensure these connections are secure, Ivanti EPMM verifies the certificate chain and server hostname, and checks the certificate against the Certification Revocation List (CRL).
The Trusted Certificates feature provides administrators with the ability to:
- Check the CRL: This ensures that verification information is current by checking certificates (trusted and new) against obtained CRLs. Certificate validity periods are checked against the current time provided by the verifier's system clock.
- Verify signatures: These are verified using the public key in the issuer's certificates.
- Verify the certificate chain: This ensures the certificate chain is well-formed, valid, properly signed, and trustworthy. Certificate chain verification stops at trusted anchor certificate stored by Ivanti EPMM.
- Verify server hostname: This verifies the server's hostname against names included in server certificate.
The trusted certificate feature has the following settings:
- Allow only TLS/SSL connections certified by trusted CAs: This setting provides the highest level of security using the TLS/SSL protocol. Administrators manually enable the configuration of trusted certificates with additional preferences for server hostname verification and revocation status validation based on the Certification Revocation List (CRL).
- Allow all TLS/SSL connections and register certifying CAs as trusted: This setting adds all connections to the Show Trusted Certs table. This action creates a migration path where administrators can review details of each certificate and manually turn on TLS/SSL over time.
- Allow all TLS/SSL connections: This is the default setting and allows all outgoing connections after verifying the Issuer, Subject, Signature, and Validity status.
Configuring trusted certificate settings
Ivanti EPMM allows you to configure any of the following trusted certificate settings:
- Allow only TLS/SSL connections certified by trusted CAs. This setting allows administrators to manually configure trusted certificates and allows them to disable the server hostname and revocation status verification. Revocation status validation is based on Certification Revocation List (CRL) that are automatically downloaded and verified. The CRL grace period is configurable with a default value of 30 minutes.
- Allow all TLS/SSL connections and register certifying CAs as trusted. This setting automatically adds all required certificates to the trusted certificate table available for review in the Admin Portal. This allows administrators to turn on TLS/SSL instantly.
- Allow all TLS/SSL connections. This setting allows all outgoing connections, providing basic certificate chain verification including certificate names, signatures, and validity.
Switching among these TLS/SSL settings requires you to restart Ivanti EPMM for your changes to take effect.
Procedure
-
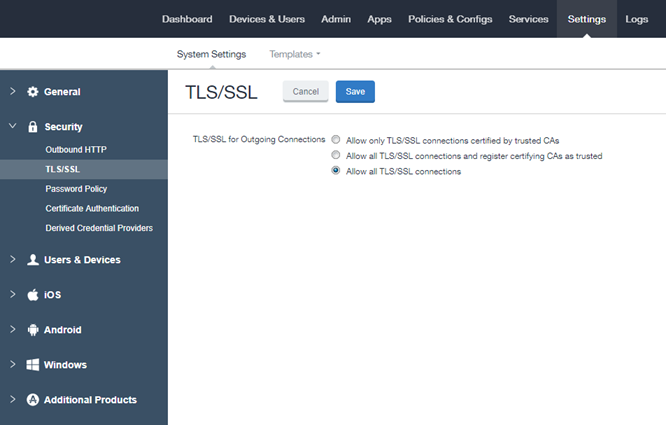
From the Admin Portal, go to Settings > System Settings > Security > TLS/SSL to open the trusted certificate settings window.
-
Select one of the following settings.
- Allow only TLS/SSL connections certified by trusted CAs. This setting allows administrators to manually configure trusted certificates and allows them to disable the server hostname and revocation status verification. Revocation status validation is based on Certification Revocation List (CRL) that are automatically downloaded and verified. The CRL grace period is configurable with a default value of 30 minutes.
- Allow all TLS/SSL connections and register certifying CAs as trusted. This setting automatically adds all required certificates to the trusted certificate table available for review in the Admin Portal. This allows administrators to turn on TLS/SSL instantly.
- Allow all TLS/SSL connections. This setting allows all outgoing connections, providing basic certificate chain verification including certificate names, signatures, and validity.
- Click Save.
Managing trusted certificates
Depending on how trusted certificates are configured, Ivanti EPMM adds trusted and untrusted root certificates to the Admin Portal. The procedures in this section describe how to manage the information in these tables.
This section contains the following procedures:
- Delete a certificate.
- Trust an untrusted certificate.
- Add a trusted certificate.
- View certificate details.
To delete a certificate:
- From the Admin Portal, go to Services > Trusted Root Certificates.
-
Click the drop down box to the right and select one of the following options:
- Show Trusted Certs
- Show Untrusted Certs
- Select one or more certificates.
- Select Actions > Delete.
-
Click Yes in the confirmation box.
IMPORTANT: You must restart the server to complete the process of deleting the selected trusted certificates.
To trust an untrusted certificate:
- Log into the Admin Portal and select Services > Trusted Root Certificates.
- Click the drop down box and select Show Untrusted Certs.
-
Click the View Certificate link for the certificate you want to trust.
You can select only one certificate at a time to allow you to review each certificate individually.
- Review the certificate information and click Close when you have completed the review.
- Select Actions > Trust.
- Review the trust certificate.
- Click Trust if you want to continue or Cancel.
To add a trusted certificate:
- Log into the Admin Portal and select Services > Trusted Root Certificates.
- Click the drop down box and select Show Trusted Certs.
- Click the Add+ button to open the Upload Trust Root Certificate dialog.
- Add the certificate to the File box using the Browse button.
- Click Upload Certificate to add it to the list of trusted certificates.
- Click OK.
To view certificate details:
- Log into the Admin Portal and select Services > Trusted Root Certificates.
-
Click the drop down box to the right and select one of the following options:
- Show Trusted Certs
- Show Untrusted Certs
- Click the View Certificate link for a single certificate.
- View the certificate details, then click Close.
Importing untrusted certificates
Ivanti EPMM fails to connect to a service if both of the following are true:
- On Settings > Security > TLS/SSL, you have selected Allow only TLS/SSL connections certified by trusted CAs.
- Ivanti EPMM does not trust at least one Certificate Authority (CA) in the certificate chain that the service presents to Ivanti EPMM.
This failure can occur for:
- Services listed on Services > Overview.
- Additional services you use, such certificate providers configured in certificate enrollment settings.
On a new Ivanti EPMM installation, to simplify the process to trust the services listed on Services > Overview, Ivanti recommends the following procedure:
Procedure
- On Settings > Security > TLS/SSL, select Allow all TLS/SSL connections and register certifying CAs as trusted.
-
Verify your connections with the backend services by selecting Verify All in Services > Overview.
Ivanti EPMM imports the certificate chains, which will now appear in Services > Trusted Root Certificates.
- On Settings > Security > TLS/SSL, select Allow only TLS/SSL connections certified by trusted CAs.
- To trust additional certificates, follow the procedure in Managing trusted certificates.
Managing Mobile Device Management (MDM) certificates for iOS and macOS
This section includes the following topics:
- Requesting an MDM certificate
- Uploading your MDM certificate
- Enabling iOS MDM support
- Confirming MDM for a macOS or iOS device
- Denying check-Ins for devices having expired MDM certificates
- Displaying a report of devices having expired MDM certificates
If you are using only MAM-only iOS devices, skip these MDM-related sections. For more information, see “Managing apps on MAM-only devices” in the Ivanti EPMM Apps@Work Guide.
Requesting an MDM certificate
You can request an MDM certificate from Apple.
Before you begin
When using the option Allow only TLS/SSL connections certified by trusted CAs as selected in Configuring trusted certificate settings, make sure that all certificates listed in Services > Trusted Root Certificates are trusted. To trust certificates, see Managing trusted certificates.
Procedure
- Log into the Admin Portal and select Settings > System Settings.
- Select iOS > MDM.
- Select the Enable MDM Profile option.
-
Click Install MDM Certificate.
The MDM Certificate Generation window displays.
-
Click Download Certificate Signing Request.
If an empty text file downloads, see the steps in Before you begin. Otherwise, this step generates the required property list in Apple’s .PLIST XML format. This may take a few minutes.
-
Select a location for the plist when prompted.
The downloaded file is req-plist.txt.
- Click the Apple Push Certificates Portal link to start the process of requesting the MDM certificate.
- When you receive the MDM certificate from Apple, click Upload MDM Certificate. The Upload MDM Certificate dialog appears.
- Click
- Click Upload Certificate.
Uploading your MDM certificate
If you have already requested and received your MDM certificate from Apple, you can upload the certificate using the following steps:
Procedure
- Log into the Admin Portal.
- Go to Settings > System Settings.
- Select iOS > MDM.
- Select the Enable MDM Profile option.
- Click Install MDM Certificate to open the MDM Certificate Generation dialog.
-
Select I already have an MDM Certificate, and want to upload it.
- Click Display Upload Certificate Form to open the Upload MDM Certificate dialog.
- Click Choose File to select the MDM certificate.
- Click Upload Certificate.
Enabling iOS MDM support
Once you have completed all steps required by Apple, you can enable iOS MDM support in Ivanti EPMM. See the following source for information on Apple’s current program:
http://www.apple.com/ipad/business/integration/mdm/
Ivanti EPMM uses Apple’s enhanced MDM certificate infrastructure to streamline the process of acquiring and uploading an MDM certificate. You can now complete the following tasks from a single screen within the Admin Portal:
- generate a Certificate Signing Request (CSR)
- upload the CSR
- access the Apple Push Certificates Portal to request a certificate
- upload the MDM certificate
If you already have an MDM certificate, but have not uploaded it, you can upload it from the same screen.
If you enabled iOS MDM support in a previous Ivanti EPMM release, then you should not use the enhanced certificate infrastructure at this time unless otherwise instructed by Apple or Ivanti EPMM. Doing so will disable your current certificates for all registered Mac iOS devices.
If you intend to develop in-house apps for distribution, then you still need to participate in Apple Device Enrollment. For more information about participating in Apple Device Enrollment, see “Managing Devices Enrolled in the Apple Device Enrollment Program” in the Ivanti EPMM Device Management Guide for iOS and macOS devices
Confirming MDM for a macOS or iOS device
To confirm that MDM is operational for a macOS or an iOS device:
Procedure
- Log into the Admin Portal and select Device & Users > Devices.
- Select any iOS device and click the up arrow to expand the device details.
- In the Device Details tab, confirm that the MDM Operational flag value is Yes.
Denying check-Ins for devices having expired MDM certificates
By default, Ivanti EPMM allows macOS and iOS devices with expired MDM certificates to check in. You can, however, configure Ivanti EPMM to deny check-ins to these devices.
Procedure
- Log into the Admin Portal and select Settings > System Settings.
- Select iOS > MDM.
- In the MDM Preferences section, clear the Permit expired client certificate option.
- Click Save.
Displaying a report of devices having expired MDM certificates
You can save to a CSV file a list of the iOS or macOS devices with expired MDM certificates.
Procedure
- Log into the Admin Portal and select Settings > System Settings.
- Select iOS > MDM.
- Click Download Expired MDM Certificate Devices Report .
- Open or save the resulting CSV file.
Setting a System Event to be notified about certificate expiration
You can be notified of the pending expiration of your iOS MDM certificate 30 days before its expiry.
Procedure
- Log into the Admin Portal and select Logs > Event Settings.
- Click Add New > System Event.
- Enter a name for the System Event.
- Make sure Certificate Expired is selected. Select other options according to your requirements.
- In the Send Alerts section, under Apply to Labels, do not select a label.
- In the Search Users field, enter the user ID of an administrator who has a device registered on Ivanti EPMM.
- Select the administrator in the Apply to Users list.
- Click the right arrow to move the administrator to the Selected list.
- Click Save.
"System event settings" in the Ivanti EPMM Device Management Guide for iOS and macOS devices.
Renewing your MDM certificate
Renew your MDM certificate before it expires. This procedure uses the Ivanti EPMM Admin Portal and the Apple Push Certificates Portal. You need the Apple ID that was originally used to create the MDM certificate. If you don't know what Apple ID to use, open a ticket with Apple Developer Program Support.
- Do not use Internet Explorer for this procedure.
- Apple might change the steps involving the Apple Push Certificates Portal.
Procedure
- Log into the Ivanti EPMM Admin Portal and select Settings > System Settings.
- Select iOS > MDM.
- Click Install MDM Certificate.
- Click Download Certificate Signing Request.
- Note to where the file is downloaded.
- Click Apple Push Certificates Portal.
- Log in to the Apple Push Certificates Portal using the same Apple ID that was used to create the certificate.
- In the Apple Push Certificates Portal, you will see your MDM certificate.
- Click Renew.
- Click Choose File and find the txt file that you downloaded.
- Click Upload.
-
When you see the confirmation screen, click Download.
The renewed certificate, a PEM file, downloads.
- In the Ivanti EPMM Admin Portal, in the MDM Certificate Generation screen, click Upload MDM Certificate.
-
Browse to the PEM file and click Upload Certificate.
A confirmation screen displays.
- Click the X to close the confirmation screen.
- Click View Certificate to note the new date and time on the certificate.
How To Identify a Matching MDM Cert in the Apple Push Certificate Portal