Configuring Tunnel in Cloud
Tunnel creates a secure connection between the managed device and Access for authenticating users accessing enterprise cloud resources.
Before you begin
- Add a Certificate Authority and create an Identity Certificate setting in Cloud.
- Add the Certificate Authority in Admin > Certificate Authority.
- Create an Identity Certificate setting in Configuration > Add > Identity Certificate.
For Certificate Distribution, select Dynamically Generated and for Source, select the certificate you configured in Admin > Certificate Authority.
- If you were using a Sentry profile to configure Access in Cloud, reconfigure your setup to use an Access profile before deploying Tunnel 3.1.0 for iOS through the most recently released version as supported by Ivanti. To set up an Access profile, see Configuring Access in Cloud.
-
For Android enterprise, app configuration is done when adding the app to the UEM for distribution. The following procedure applies to all supported OS except Android enterprise. However, configuration information provided in this procedure also applies when you configure Android enterprise. For information on how to add Tunnel for Android enterprise to Cloud, see the relevant section in the Tunnel Guide for Administrators.
NOTE: If you are configuring Tunnel for Android enterprise and using MobileIron Access Profile only, Ivanti recommends adding configuring AllowedAppList to specify the apps for which authentication traffic goes through Tunnel.
Procedure
- In Cloud, go to Configurations > +Add.
- Search for Tunnel and click Tunnel.
- Select the OS type for the configuration.
- Create a separate Tunnel configuration for each OS type.
- Enter a name for the configuration.
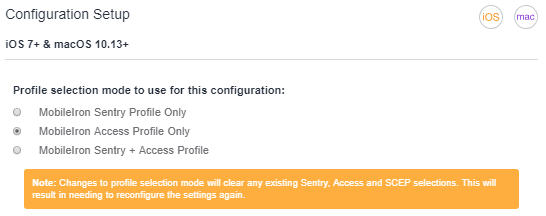
- Select one of the following:
- MobileIron Access Profile Only - Select if Tunnel traffic goes only to Access.
- MobileIron Sentry + Access Profile - Select if Tunnel VPN supports both traffic to Access for authentication to enterprise cloud resources and through Standalone Sentry to on-premise enterprise resources. This option is available for iOS and Android only.
Figure 1. Profile mode selection
- If you selected MobileIron Sentry + Access Profile for profile mode, select the Sentry profile and the iOS or Android service you created in the Sentry profile.
- For a Tunnel for Android configuration, do the following:
- For Client Cert. Alias, for Tunnel for Android only, select the same certificate configuration you select for SCEP Identity.
- For SCEP Identity, select the Identity Certificate configuration you created for Tunnel.
- For a Tunnel for Windows 10 configuration, do the following:
- For SCEP Identity, select the Identity Certificate configuration you created for Tunnel.
- For Define Tunnel App Settings, select Advanced.
Enter the following key-value pairs:
Key
Value
AppTriggerList/0/App/Id
App Id that will trigger Tunnel.
Example:
%PROGRAMFILES% (x86)\Google\Chrome\Application\chrome.exe
TrafficFilterList/0/App/Id
App Id that will tunnel traffic through Tunnel.
Example:
%PROGRAMFILES% (x86)\Google\Chrome\Application\chrome.exe
RouteList/0/Address
If your Cloud tenant is *.access-na1.mobileiron.com enter:
18.232.253.154If your Cloud tenant is *.access-eu1.mobileiron.com enter:
18.194.253.44RouteList/0/PrefixSize
32
TrafficFilterList/0/RoutingPolicyType
SplitTunnel
RouteList/1/Address
If your Cloud tenant is *.access-na1.mobileiron.com enter:
18.232.30.29If your Cloud tenant is *.access-eu1.mobileiron.com enter:
18.194.99.243RouteList/1/PrefixSize
32
-
Leave all defaults as is and click Next.
NOTE: If you are configuring Tunnel for Android enterprise and using MobileIron Access Profile only, Ivanti recommends adding configuring AllowedAppList to specify the apps for which authentication traffic goes through Tunnel. - Select the distribution for the configuration and click Done.
- In Access,
- Navigate to the UEM tab.
- Select the Cloud UEM and click the Sync UEM button.
- Enter the credentials and click Verify and Done.
This step is required to pull the Tunnel certificates from the UEM and established trust between Tunnel and Access.
Next steps
| 1. | Add Tunnel to Cloud. For information on how to add Tunnel to Cloud, see the relevant section in the Tunnel Guide for Administrators for the device OS. |
| 2. | Set up SP and IdP federated pairs. |
See Service provider (SP) metadata and Identity provider (IdP) metadata.
For more information about configuring and distributing Tunnel see the Tunnel Guide for Administrators for the OS.