Configuring Ivanti Access as the delegated IdP
Setting up Access as the delegated IdP requires configuration in UEM, Access, and in the IdP as well. Ivanti Access supports delegation for the following IdPs: Idaptive, Microsoft ADFS, Okta, and PingFederate.
Only authentication from managed devices is allowed for Delegated IDP with Idaptive pair.
The setup described here does not apply to an Ivanti Access + Standalone Sentry deployment. If your deployment is Ivanti Access + Standalone Sentry, see the following KB article: Access as Delegated IDP.
Overview of tasks
- In UEM, configure certificates for single sign-on. If single sign-on is configured, Ivanti Access authenticates the user. Otherwise, the user is redirected to the original IdP for forms-based authentication.
- In Ivanti Access, enable Delegated IdP in Settings > Tenant Settings.
- In Ivanti Access, and set up the original IdP in Profile > Federation > Add Pair > Delegated IdP.
- In the original IdP, set up delegation to Ivanti Access.
Before you begin
Ensure the following:
- You have an existing federated authentication set up between the cloud service provider (SP) and the supported identity provider (IdP).
-
In a delegated IdP setup, Access sees the IdP as an SP. Therefore, download the SP metadata from the IdP. If you are enabling authentication for unmanaged devices, also download the IdP metadata from the IdP. The following table provides links to instructions on how to get the metadata for your IdP.
Table 12. instructions to get the metadata IdP
For instructions on how to get the metadata go to
Supported methods for providing metadata in Access
Idaptive
Download the metadata. See the Cookbook for Idaptive.
Upload metadata
ADFS
Download metadata from https://<YourADFS>/FederationMetadata/2007-06/FederationMetadata.xml
Upload metadata
Enter metadata URL
Okta
(Manual Setup)
See the Cookbook for Okta.
See the "How to get Metadata from Okta as SP for Access" section for instructions on downloading the SP metadata from Okta.
See the "How to get Metadata from Okta as IdP for Access" section for instructions on downloading the IdP metadata from Okta. Required only for enabling authentication for unmanaged devices.
Upload metadata
Enter metadata URL
Okta
(Automated Setup)
Cookbook for configuring Okta as delegated IDP
See "Step 1: Creating an application and download the metadata for Okta" section for instructions on downloading the metadata from Okta.
: If the okta admin wants to unhide the Access application created from the automated workflow, they can do so by from Okta console. For more information , see the cookbook.
PingFederate
See the "Configure PingFederate for Delegated-IdP flow" section in Cookbook for PingFederate.
Upload metadata
Enter metadata URL
-
If single sign-on is configured in UEM, SCEP obtains user information from LDAP. Therefore, ensure that the LDAP settings in UEM fetch the appropriate attributes from LDAP.
The Ivanti Tunnel certificate is setup to include the mapping to a certificate field for certificate native mobile application single sign-on (SSO). The following tables describe the certificate field mapping for Ivanti Neurons for MDM and Ivanti EPMM.Table 13. ivanti tunnel certificate field mapping in iavnti neurons for mdm LDAP for Ivanti Neurons for MDM deployments
Certificate
SAN Type in SCEP
Idaptive
${userEmailAddress}
${userEmailAddress}
RFC 822 Name
ADFS
${sAMAccountName}
${sAMAccountName}
RFC 822 Name
${userDN}
${userDN}
Distinguished Name
${userEmailAddress}
${userEmailAddress}
Not Applicable
Okta and Ivanti Neurons for MDM deployments
${userEmailAddress}
${userEmailAddress}
RFC 822 Name
PingFederate and Ivanti Neurons for MDM deployments
${userEmailAddress}
${userEmailAddress}
RFC 822 Name
F5
${userEmailAddress}
${userEmailAddress}
RFC 822 Name
Table 14. ivanti tunnel certificate field mapping in Ivanti EPMM LDAP for Ivanti EPMM deployments
Certificate
SAN Type in SCEP
Idaptive
EmailAddress
$EMAIL$
RFC 822 Name
ADFS
sAMAccountName
$USERID$
RFC 822 Name
distinguishedName
$USER_DN$
Distinguished Name
Okta
userPrincipalName
$EMAIL$
RFC 822 Name
PingFederate
userPrincipalName
$EMAIL$
RFC 822 Name
F5
userPrincipalName
$EMAIL$
RFC 822 Name
- To make it easier to configure mobile application single sign-on, upload a sample Ivanti Tunnel certificate and assign user friendly names to each field in the certificate. For more information, see User Certificates.
Procedure
- In Ivanti Access, go to Settings > Tenant Settings.
- For Delegated IDP, click the toggle to ON to enable delegated IdP.
-
Navigate to Profile > Federation.
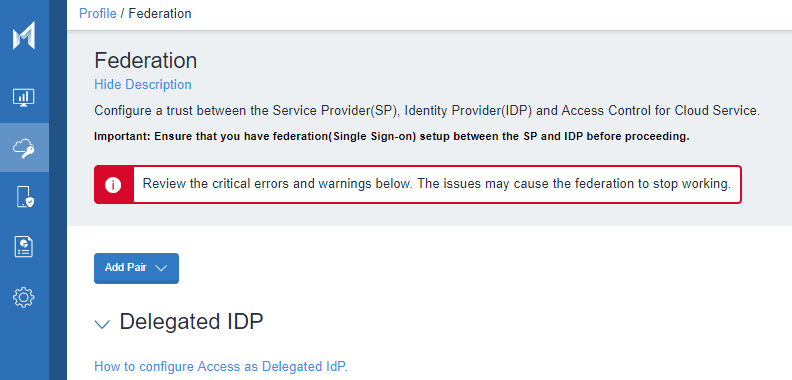
-
Click Add Pair and select Delegated IdP.
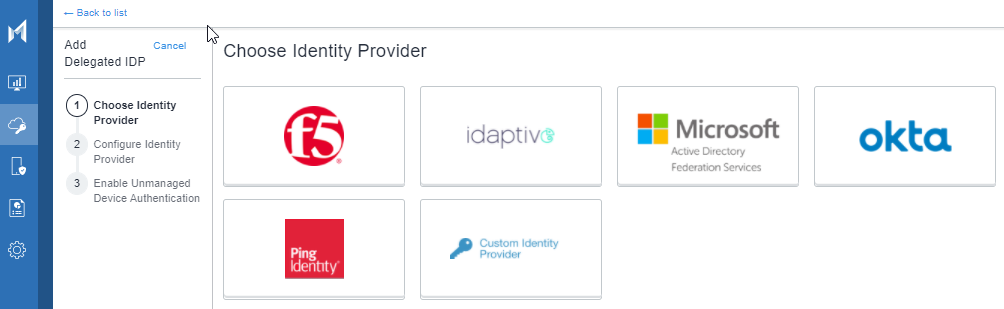
- Click the appropriate IdP to configure identity provider settings.
Select Custom Identity Provider for any other provider other than the available identity providers. - Select the signing certificate.
A default signing certificate is selected. You can select a different signing certificate from the drop-down list. - Select "Validate signature for authentication requests sent by the service provider". For backward compatibility, this option is unchecked for the existing pairs. Ensure that the SP/IdP metadata is updated and enable the checkbox.
- (Optional) Select the check box for Encrypt SAML assertions.
- Upload the service provider (SP) metadata from the original identity provider (IdP).
- For mobile app single sign-on do the following:
- From the Reference Client Certificate drop-down list, select the sample Ivanti Tunnel certificate.
- In the SAML Subject Configuration section:
- For Type,
If your IdP is Idaptive, select Email.
If your IdP is ADFS, select Persistent.
If your IdP is Okta, select Email.
If your IdP is PingFederate, select Email. - For Get Value From, select SAN of type rfc822Name.
The instance maps to the order it is listed in the certificate configuration in UEM.
- For Type,
(Only if your IdP is ADFS) In the SAML Attribute Configuration section:
SAML Attribute Configuration is not needed for Okta and PingFederate, irrespective of the SP.
Name
Get Value from
Additional transforms
UserID
SAN of type rfc822Name
-
UserDomain
SAN of type directoryName: Instance 1
dn:domain
- If you selected Encrypt SAML assertions, select the encryption algorithms.
The options for encryption algorithms are only visible if you selected Encrypt SAML assertions.
- Click Next.
-
(Optional for Okta Manual Setup) For Unmanaged Device Authentication, check Enable policy and configurations for handling authentication of Unmanaged Mobile Devices via IDP.
Enabling the option directs authentication traffic from unmanaged devices to the original IdP for forms-based authentication.
If the original IdP is Okta or PingFederate, the option to upload IdP metadata becomes available.
This option is not available for ADFS because the metadata for ADFS, uploaded earlier in the configuration, includes both SP and IdP metadata.This set up is for Okta manual setup only. Follow the Cookbook for Okta automated setup for automated setup.
Figure 1. unmanaged devices authentication
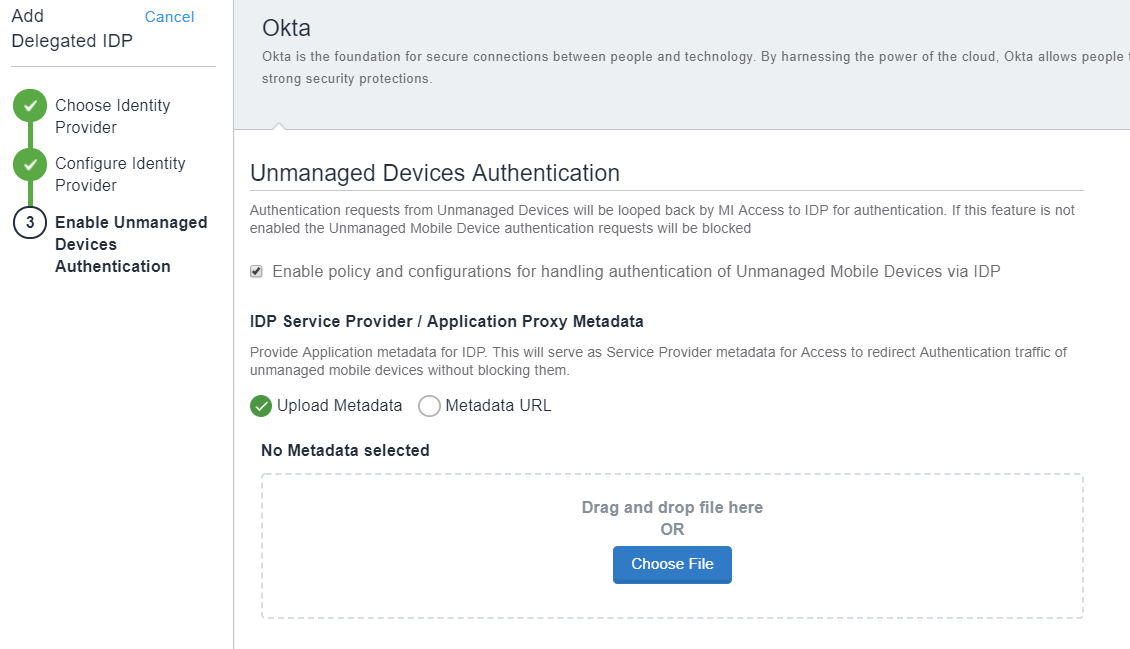
- (Optional) For Okta or PingFederate, if you enabled Unmanaged Device Authentication, upload the IdP metadata downloaded from the respective IdP.
- Click Done to complete the configuration.
- In Profile > Federation, click on the IdP listed in Delegated IdP and download the Access IDP Metadata. If Unmanaged Device Authentication is enabled, you will also see Access SP Metadata. Download the Access SP metadata as well.
- (Optional) If your IdP is ADFS, click Download the Powershell Command for ADFS.
If there are changes to the SP or delegated IDP metadata, Access detects these changes and notifies the administrator via email.
The following alert message also displays for the federated pair in Access > Delegated IDP: SP/Application metadata (IDP) has changes. For the delegated IDP, click Actions > Sync SP/Application metadata (IDP) to update the metadata file in Ivanti Access.
An email notification is sent to the Ivanti Access administrator after the sync.
Next steps
- Set up the IdP for delegation to Ivanti Access. This includes uploading the Access IdP, and the Access SP, if applicable, metadata to the IdP. Upload the Access IdP metadata in the IDP where delegations are configured. Upload the Access SP metadata in the IdP where service providers are configured. Do one of the following:
- If your IdP is ADFS, run the PowerShell script in ADFS. This is the same PowerShell script you downloaded from Ivanti Access. The PowerShell script contains the commands to setup delegation to Ivanti Access.
See PowerShell commands for ADFS.
See also Using Ivanti Access as a Delegated IdP for ADFS. - If your IdP is Okta, see Okta as Delegated IdP (Manual Setup) and Okta as Delegated IdP (Automated Setup).
- If you IdP is PingFederate, see Ivanti Access as Delegated IdP for PingFederate
- If your IdP is ADFS, run the PowerShell script in ADFS. This is the same PowerShell script you downloaded from Ivanti Access. The PowerShell script contains the commands to setup delegation to Ivanti Access.
- If you enabled unmanaged device authentication, ensure that the conditional policies applied to the Delegated IdP configuration does not block unmanaged devices.
- Signing certificates
- Identity provider (IdP) metadata
- Encrypting SAML assertions
- Conditional policies
PowerShell commands for ADFS
Ivanti Access provides PowerShell scripts for the following:
- Set up Ivanti Access as the delegated IdP in ADFS
- Create a new Ivanti Access theme in ADFS for iPads running iOS 13
The PowerShell scripts eliminate the need to copy and paste the commands. The PowerShell scripts can be downloaded from Profile > Federation and run on your machine.
The following describes how to use the PowerShell scripts:
- Running the PowerShell scrip to set up Ivanti Access as the delegated IdP in ADFS
- Using the PowerShell script to create a new Ivanti Access theme in ADFS for iPadOS 13 upgrades
Running the PowerShell scrip to set up Ivanti Access as the delegated IdP in ADFS
The commands to set up Access as the delegated IdP in ADFS are provided as a PowerShell batch script that can be downloaded and run on your machine. After you create a delegation for ADFS in Access, the link to download the PowerShell batch script becomes available in the listing for the delegated IdP in Profile > Federation.
Running the script as described allows you to set up Access as a Claims Provider Trust in ADFS. When Access presents its claims to ADFS, ADFS serves the corresponding Relying Party, such as Office 365 or Salesforce, and allows the user to authenticate to the Relying Party. The Relying Party, such as Office 365 or Salesforce, must also be configured in ADFS.
If authentication of unmanaged devices is enabled in the delegated IdP configuration in Access, the PowerShell script also adds Access as a Relying Party with all required claims in ADFS.
Before you begin
- Ensure that you have PowerShell Administrator permissions.
- Depending on your ADFS version, run one of the following commands to get the Active Directory identifier:
- For ADFS 4.0: (Get-AdfsClaimsProviderTrust -Name "Active Directory").Identifier
- For ADFS 3.0: Get-ADFSProperties
Look for the value for Identifier.
Procedure
- Download the PowerShell script.
- In Access, go to Profile > Federation.
- For the ADFS listed, click the three vertical dots in Actions.
- Click Download Powershell Commands for ADFS to download the script.
-
Run the following command in PowerShell:
.\MICROSOFT_ADFS_SP_WSFED-script.ps1 -activeDirectoryIdentifier "ActiveDirectoryIdentifier" -sourceAdfsWebThemeName default -targetAccessWebThemeName "AccessThemeName"
You will be prompted to enter values specific to your environment.
For ActiveDirectoryIdentifier, enter your enterprise Active Directory identifier.
For AccessThemeName, enter any name. This the web theme name for Access. ADFS automatically creates the web theme name based on the name you enter.
Using the PowerShell script to create a new Ivanti Access theme in ADFS for iPadOS 13 upgrades
The iPadOS 13 upgrade PowerShell script creates a new Access theme in ADFS so that authentication traffic from iPads running iPadOS 13 is redirected to Ivanti Access.
-
The iPadOS 13 upgrade PowerShell script becomes available only if you have an existing delegated IdP setup with ADFS. If you are creating a new delegated IdP setup with ADFS, follow the procedure in Running the PowerShell scrip to set up Ivanti Access as the delegated IdP in ADFS.
-
The upgrade script does not overwrite or delete any existing web theme in your environment. It creates a new theme from an existing source theme that you specify.
Before you begin
Ensure that you have PowerShell Administrator permissions.
Procedure
- Download the PowerShell script.
-
In Access, go to Profile > Federation.
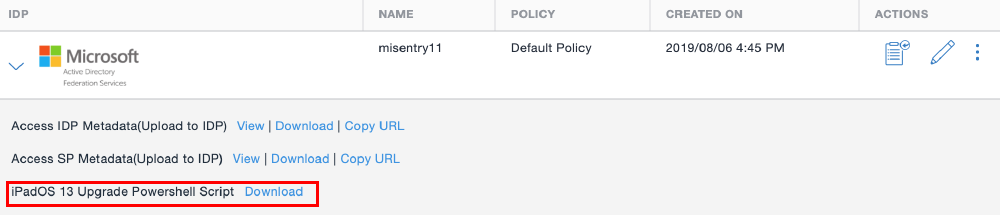
- For the ADFS listed, for iPadOS 13 Upgrade Powershell Script, click Download.
-
Run the following command in PowerShell:
MICROSOFT_ADFS_SP-iPadOS13-upgrade-script.ps1
-
Enter values that are specific to your environment.
For ActiveDirectoryIdentifier, enter your enterprise Active Directory identifier.
Run one of the following commands to get the Active Directory identifier based on the version of ADFS:
- For ADFS 4.0: (Get-AdfsClaimsProviderTrust -Name "Active Directory").Identifier
- For ADFS 3.0: Get-ADFSProperties
Locate the value for Identifier.
-
Enter the source web theme name from which to create the new web theme.
Enter the existing Access web theme name. A duplicate of the Access web theme is created.
-
Enter a new target web theme name for the new web theme.
ADFS automatically creates a new web theme name based on the name you enter.
If you provide an existing web theme name, the script prompts you to enter a new name.
After the new web theme is created, you are presented with the following options:
- Apply customized ADFS web theme to all Relying Party Trusts: Select this option to apply the new web theme to all Relying Party Trusts.
- Do not apply ADFS web theme now. Exit: Select this option to save the web theme and exit PowerShell without applying to any Relying Party Trusts. If you need to apply the new web theme to only some Relying Party trusts in your environment, contact your ADFS administrator.