Customizable conditional rules
You can customize the following set of conditional rules:
•Tunnel Rule. For more information, see Tunnel rule.
•User Info Rule. For more information, see User Info Rule.
•Network Rule. For more information, see Network Rule.
•App Rule. For more information, see App Rule.
•Advanced Network Rule. For more information, see Advanced Network Rule.
•Multi-Factor Authentication: For more information, see Multi-factor Authentication
•Request Header Rule: For more information, see Request Header Rule.
•Zero Sign-on Rule: For more information, see Multi-factor Authentication.
•Desktop Trust Rule. For information, see Desktop Trust Rule.
•Device Ownership Rule : For more information, see Device Ownership Rule.
Tunnel rule
Add a Tunneled rule to control access for tunneled apps. The following describes the fields in the Tunnel Rule.
|
Item |
Description |
|
Name |
Enter a name for the rule. |
|
Description |
Enter descriptive text for the rule. |
|
Action |
From the drop down menu, select one of the following: Allow: Allows traffic from the specified Tunneled application. Block: Blocks traffic from the specified Tunneled application. Warn: Warns traffic from the specified Tunneled application. Follow Policy: Applies the conditional policy that you choose from the existing list. |
User Info Rule
Add a User Info Rule to control access for an user or an user group. By default, all the fields in the SAML assertion, including subject and any attributes are matched against the values specified in this rule.
•Add attribute names in this rule if you want to match the values specified in this rule only to the attribute you specify here.
•If you want the values specified in this rule to match all attributes, use the attribute name "*".
Values can be user IDs or group IDs. If you configure your Identity Provider to include a group ID to match against, it enables you to configure a small list of group IDs instead of a large list of individual user IDs.
|
Item |
Description |
|
Name |
Enter a name for the rule. |
|
Description |
Enter descriptive text for the rule. |
|
SAML Assertion Field |
Select the SAML Subject checkbox if you want the UserInfoRule to match the SAML Subject. The default option is set to true. Enter the Attribute Name. For example, *.abcd. If the username or the group is part of the Attributes in the SAML response, then the Attribute name must be added here or the * must match with all of the attributes if any in the SAML response. |
|
Match With |
From the drop-down menu, select one of the following: •Add: Lets you add users to the list to configure the rule. •Upload to Append: Lets you upload a text file with one user or group per line. •Upload to Replace: Lets you replace the existing list of users with a new list of users in a new text file. Ivanti recommends to use .txt format files to upload the users. The file must contain only one user per line. |
|
Action |
From the drop-down menu, select one of the following: •Allow: Allows traffic from the specified User or User group. •Block: Blocks traffic from the specified User or User group. •Warn: Warns traffic from the specified User or User group. •Follow Policy: Applies the conditional policy that you choose from the existing list. |
Network Rule
Add a Network Rule to control access from an IP network range. The following describes the fields in a Network Rule.
|
Item |
Description |
|
Name |
Enter a name for the rule. |
|
Description |
Enter descriptive text for the rule. |
|
Action |
From the drop down menu, select one of the following: Allow: Allows traffic from the specified IP address range. Block: Blocks traffic from the specified IP address range. Warn: Warns traffic from the specified IP address range. Follow Policy: Applies the conditional policy that you choose from the existing list. |
|
Start IP Mask or CIDR Network Address |
Enter the start address for the IP address range. The IP address can be in the form of an IPv4 address or CIDR. |
|
End IP Mask or CIDR Network Address |
Enter the end address for the IP range. The IP address can be in the form of an IPv4 address or CIDR. |
App Rule
Add an App Rule for an app or device platform to allow or block the app or device platform. The following describes the fields in an App Rule.
|
Item |
Description |
|
Name |
Enter a name for the conditional rule. |
|
Description |
Enter descriptive text for the conditional rule. |
|
Action |
From the drop down menu, select one of the following: Allow: Allows traffic from the specified Application. Block: Blocks traffic from the specified Application. Warn: Warns traffic from the specified Application. Follow Policy: Applies the conditional policy that you choose from the existing list. |
|
Matching Algorithm |
From the drop down menu, select one of the following: Regex: Select if you plan to use a regular expression for the user agent. Wildcard: Select if you plan to use wildcard for the user agent Literal: Select if the rule should exactly match the configured expression. |
|
Expression |
Enter an expression for the app, based on the matching algorithm you selected. Check the Reports view to see the user agents in the traffic for authentication. |
|
Case Sensitive |
Select if the rule should consider the case configured in the expression. |
|
Partial Match |
Select if the rule can be applied to a partial match of the configured expression. |
Advanced Network Rule
Add an advanced network conditional rule to control access based on source IP and/or headers added by an HTTP proxy or load balancer. For more information, see the KB article.
Figure 1. adding advanced network rule
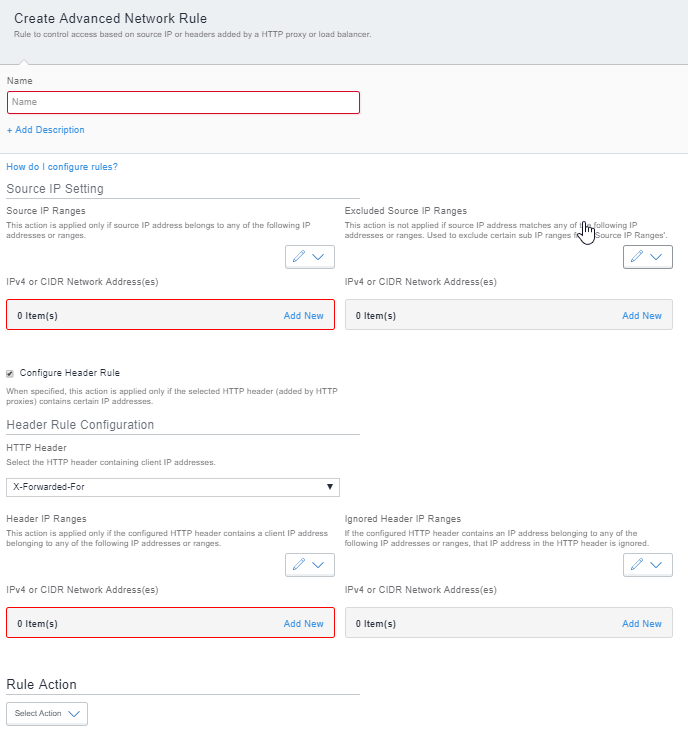
The following describes the fields in an Advanced Network Rule.
|
Item |
Description |
|
Name |
Enter a name for the conditional rule. |
|
Description |
Enter descriptive text for the conditional rule. |
|
Source IP Setting |
|
|
Source IP Ranges |
•Click Add New to add the IP address manually. Enter the Source IP address range that must be IPv4 or CIDR Network Address. For example: 192.168.0.1 or 192.168.0.0/24 •Select Upload to Append to upload a fine and append the IP addresses to the existing IP address. Select Upload to Replace to replace all the IP address with the IP address from the uploaded file. Upload a text file containing the IP addresses in CIDR format or the normal IP Address format. The maximum number of allowed entries of IP address(es) in the text file is 1000 for successful upload of IP address(es). |
|
Excluded Source IP Ranges |
Exclude Source IP range is required when you have a large IP range that to configure for source IP and exclude subsets of that range from the consideration. For example: The rule must be configured for the range 192.168.0.0 – 192.168.0.255. However, you might not want IP ranges from this set. The IP ranges to be excluded are 192.168.0.0 – 192.168.0.3 and 192.168.0.8 – 192.168.0.11. Configure the source IP range as 192.168.0.0/24. In exclude IP range, add 192.168.0.0/30 and 192.168.0.8/30. Procedure •Click Add New to enter the sub IP address range that you wish to exclude from the Source IP ranges. For example: 192.168.0.1 or 192.168.0.0/24 •Use the drop-down list to Upload to Append or Upload to Replace an IP address range. You must upload a plain text file with each line containing an IP address or a CIDR network. The maximum number of IP range entries supported is 1000. |
|
Configure Header Rule - Select the check-box to configure the Header Rule. By default, this checkbox is enabled. Deselect the checkbox to create a rule without headers. |
|
|
Header Rule Configuration |
|
|
HTTP Header |
Select one of the HTTP header types containing client IP addresses. •X-Forwarded-For •X-MS-Forwarded-Client-IP |
|
Header IP Ranges |
•Click Add New to enter the Header IP range that contains a client IP address. For example: 192.168.0.1 or 192.168.0.0/24 •Use the drop-down list to Upload to Append or Upload to Replace a Header IP range. You must upload a plain text file with each line containing an IP address or a CIDR network. The maximum number of IP range entries supported is 1000. |
|
Ignored Header IP Ranges |
Use the Ignored Header IP Range when you have multiple proxies that always get added to the header. •Click Add New to enter the IP address range that the IP address in the HTTP header is ignored. •Use the drop-down list to Upload to Append or Upload to Replace an IP Header range. You must upload a plain text file with each line containing an IP address or a CIDR network. The maximum number of IP range entries supported is 1000. |
|
Action |
From the drop down menu, select one of the following: Allow: Allows traffic from the specified Application. Block: Blocks traffic from the specified Application. Warn: Warns traffic from the specified Application. Follow Policy: Applies the conditional policy that you choose from the existing list. |
Certain deployments masks an X-Forwarded-For header with Z-Forwarded-For before adding its own X-Forwarded-For header identifying the originating customer IP address. This prevents the internal IP addresses leaking out of the enforcement nodes. This provides the true static IP address of the user. Hence a request through the proxy will have a static IP address into X-Forwarded-For header. To set up the Advanced Network Rule that only leverages a static IP address as X-Forwarder-For header.
- Source IP Setting: 0.0.0.0/0
- Configure Header Rule (X-Forwarded-For) and upload a .txt file (including the static IP)
- Rule action: Allow
- Set the General bypass rule to Block.
All the source IPs are valid unless the IP matches, it is blocked by General bypass rule.
Multi-factor Authentication
For information about adding the multi-factor authentication rule, see Multi-factor Authentication with Authenticator
Zero Sign-on Rule
For more information about adding the Zero Sign-on rule, see Zero Sign-on with Ivanti Access
Desktop Trust Rule
For information about adding a desktop trust rule, see the Ivanti Access Desktop Trust Agent Guide.
Request Header Rule
Add the Request Header Rule to match the value of a HTTP request header with a specified pattern. The Request Header rule is very similar to the App rule; however, you can select any header name other than just the User-Agent.
Use case: When the user has Access federated with Microsoft ADFS and Office 365 and then tries to register a device, it gets blocked by the untrusted Apps on Windows 10 rule. If you use the Azure Domain integration, then the actual MDM registration is also done by Azure.
Due to the current policies, there is no option to allow device registrations on these Windows 10 devices except from allowing Edge.
The new Request Header Rule thus helps to match the value of any HTTP request header with a specified pattern.
Figure 2. request header rule
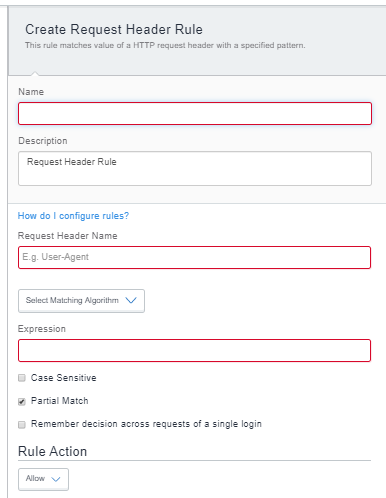
The following table lists the fields in a Request Header Rule:
|
Item |
Description |
|
Name |
Enter a name for the conditional rule. |
|
Description |
Enter descriptive text for the conditional rule. |
|
Request Header Name |
Enter any appropriate header name such as User-Agent. |
|
Matching Algorithm |
From the drop-down menu, select one of the following options: Regex: Select if you plan to use a regular expression the header name. Wildcard: Select if you plan to use wildcard for the header name. Literal: Select if the rule should exactly match the configured expression. |
|
Expression |
Enter an expression for the app, based on the matching algorithm you selected. Check the Reports view to see the header name that you mentioned in the traffic for authentication. |
|
Case Sensitive |
Select if the rule should consider the case configured in the expression. |
|
Partial Match |
Select if the rule can be applied to a partial match of the configured expression. |
|
Remember decision across requests of a single login |
Select this checkbox to remember the action for the first request and to apply the same action for the rest of the requests. This action skips the rule evaluation for the remaining requests of SP login. |
|
Action |
From the drop down menu, select one of the following: Allow: Allows traffic from the specified Application. Block: Blocks traffic from the specified Application. Warn: Warns traffic from the specified Application. Follow Policy: Applies the conditional policy that you choose from the existing list. |
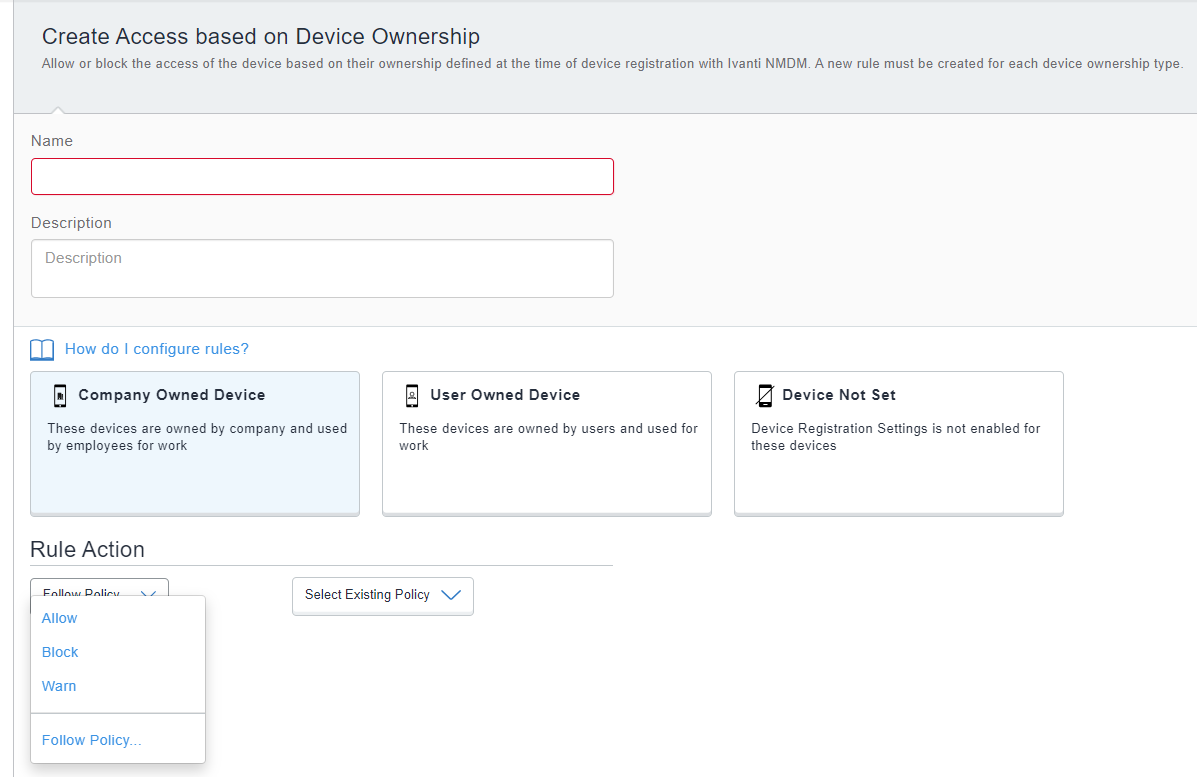
Device Ownership Rule
Add the Device Ownership Rule to control access based on the user's device ownership at the time of registration with Ivanti NMDM. You can impose stricter conditional access policies using this rule. The user's device ownership is identified using an API that is used for a complaint or non-complaint device check. To use this rule, a new rule must be created for each of the device ownership types. If the device ownership is selected as "Device Not Set" and no rule is created for "Device Not Set," by default, all traffic from all the applications is allowed.
The three different types of supported device ownerships are:
-
Company Owned Device
-
User Owned Device, and
-
Device Not Set
To create the Device Ownership Rule:
-
Navigate to Profile > Conditional Access > Add Conditional Policy > Add Rule.
-
Click Device Ownership tile.
-
On the Create Access based on Device Ownership page, enter a name and description for the rule in the Name and Description fields, respectively.
-
Select an ownership tile for which you want to create the rule.
-
Select an action from the Rule Action dropdown for the selected ownership tile. If you select Follow Policy from the dropdown, then you must specify a policy in the Select Existing Policy dropdown.
-
Click Done to finish configuring the rule.
Figure 3. Device ownership rule
The following table lists the fields and elements associated with the Device Ownership Rule:
|
Item |
Description |
|
Name |
Enter a name for the conditional rule. |
|
Description |
Enter descriptive text for the conditional rule. |
|
Company Owned Device |
Company owned devices used by the employees for work |
|
User Owned Device |
User owned devices used for work |
|
Device Not Set |
Device registration settings not enabled for devices during registration with Ivanti NMDM. |
|
Rule Action |
From the drop down menu, select one of the following: Allow: Allows traffic from the specified Application. Block: Blocks traffic from the specified Application. Warn: Warns traffic from the specified Application. Follow Policy: Applies the conditional policy that you choose from the existing list. |
|
Select Existing Policy |
An existing policy that could be applied to the rule. This dropdown displays when you select Follow Policy option in the Rule Action dropdown. |