Configuring Zero Sign-on in Ivanti Access
The following describes the configuration Ivanti Access for Zero Sign-on.
Before you begin
- Step 1: Enabling Password-less Authentication on MobileIron Go and Mobile@Work
- Step 2: Review Registration Settings
- Step 3: Adding a Zero Sign-on Rule in the Policies
- Setting the session timeout duration
- Configuring branding for Zero Sign-on
- Publishing the changes
Step 1: Enabling Password-less Authentication on MobileIron Go and Mobile@Work
Before you begin
-
Upload a sample Tunnel certificate in Profile > User Certificates. For more information about adding a certificate, see User Certificates.
-
Configure the user information for Zero Sign-on.
-
To configure the user information, map the fields in the certificate from which Access gets user identifying information. This is the identity certificate used for setting up Tunnel. Configuring the user information enables passwordless authentication.
-
Procedure
- In MobileIron Access, go to Profile > Zero Sign-on.
- Under Steps to deploy, expand Enable Password-less Authentication on MobileIron Go and Mobile@Work.
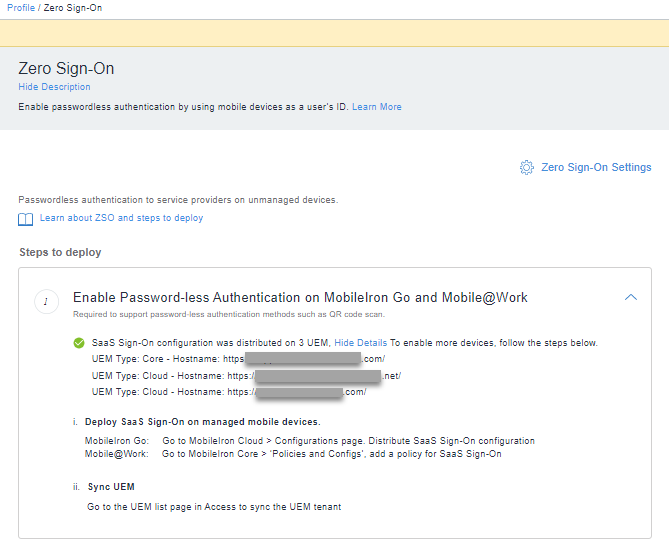
- Click See Details to view the existing configuration details for the devices.
- To enable more devices follow the steps i) and ii) as shown above.
- Deploy SaaS Sign-On on managed mobile devices.
- Sync UEM.
Next steps
Step 2: Review Registration Settings.
Step 2: Review Registration Settings
The Registration settings are used by clients such as MobileIron Go to register user’s device with Access.
Procedure
-
In MobileIron Access, go to Profile > Zero Sign-on.
-
Under Steps to deploy, expand Step 2: Review Registration Settings.
Verify the certificate mapping.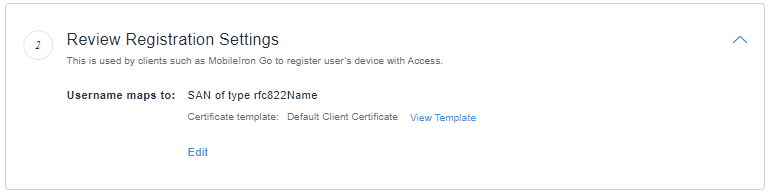
-
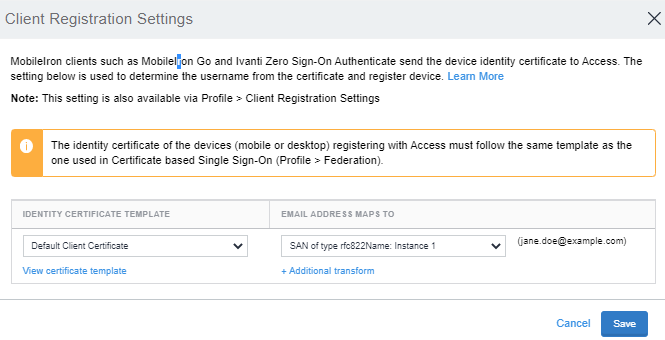
Click Edit to modify the registration.
-
Select the username mapping in the certificate appropriately and click Save. For more information, see Client Registration Settings.
Next steps
Add a Step 3: Adding a Zero Sign-on Rule in the Policies.
For information about MiTra expressions, see Language to generate values from certificate fields.
Step 3: Adding a Zero Sign-on Rule in the Policies
In the policy associated with the saml pair for which Zero Sign-on is required, add a Zero Sign-on Rule conditional rule. If the rule is added, users accessing the cloud service from an unmanaged device see an interaction page. The interaction page contains a QR code, which device users can scan from a managed device to authenticate to the cloud service. Alternately, the interaction page also contains a link to authenticate with username and password.
Before you begin
- Ensure that mobile app single sign-on is configured for the federated pair or delegated IdP to which you want to assign the Zero Sign-on Rule. If mobile app single sign-on is not configured, you will see errors when creating or assigning the Zero Sign-on Rule.
Procedure
- In MobileIron Access, go to Profile > Zero Sign-on.
- Under Steps to deploy, expand Add Zero Sign-On Rule in the Policies.

- Verify that the rule is configured.
Else add a rule in Profile > Conditional Policies. - In Access, go to Profile > Conditional Access.
- Expand Default Policy.
If you want Zero Sign-on only for some federated pairs or delegated IdP, create a new policy.
The Zero Sign-on rule can be added to any policy. Adding the Zero Sign-on rule to the default policy makes it available to all pairs to which the default policy is applied. Add the Zero Sign-on rule to another policy if you want to apply the rule to only some federated pairs or delegated IdP. -
Click +Add Rule > Zero Sign-on Rule to add the conditional rule for Zero Sign-on.
- Enter a name and description for the rule.
- For Rule Action, select Allow.
- Click Done to save the policy and rule.
The order of the conditional rules matters. When you create a Zero Sign-on Rule, Access automatically orders the rules such that the Zero Sign-on Rule follows the Trusted App and Device rule. The order of rules, if they are configured, is as follows: Trusted App and Device rule, Zero Sign-on Rule, Multi-Factor Authentication rule. However, the rules can be manually reordered. Ensure that the order of the rules matches the order stated in this note.
Next steps
Configure branding. See Configuring branding for Zero Sign-on.
Setting the session timeout duration
Use the Zero Sign-on configuration, Profile >Zero Sign-on, to do the following:
-
Set the session timeout duration after users authenticate using Zero Sign-on.
If device users select the Yes, this is my personal computer option in the QR interaction page when they attempt to log in to the cloud service, they are not prompted to sign in for subsequent login attempts for the duration set in Profile > Zero Sign-on > Zero Sign-on Settings and their user ID is remembered on the browser for 30 days. For login attempts after the session timeout duration, a push notification is automatically sent to their managed device. Users have the option to either enter an OTP or scan a QR code. At the end of 30 days, the user ID is no longer remembered in the browser, and users are once again prompted to scan a QR code.
Procedure
-
In MobileIron Access, go to Profile > Zero Sign-on.
-
Click Zero Sign-on Settings to update the number of hours, if needed, for Enable Signed In Session.
-
By default, the option is enabled and the number of hours is set at 12. The option sets the session timeout that is applied when users select the Yes, this is my personal computer option in the Zero Sign-on interaction page.
-
Click Save Settings.
Configuring branding for Zero Sign-on
Customize the user experience for your enterprise users by uploading your company logo to Access. The user notification screen as well as the interaction page with the QR code are customized to display your company logo.
Ensure that your company logo is no more than 260 pixels wide by 30 pixels high. Supported file types are: PNG, JPG, JPEG, and SVG.
Procedure
- In Access, go to Profile > Branding.
- In the Company Logo section, drag and drop your company logo or click Choose to navigate to the location of the file and add.
Next steps
Publish the updates. See Publishing the changes.
Publishing the changes
Publish the changes to make the updates available. In the Access administrative portal, a publish banner appears in any of the Profile tabs when there are configuration changes.
Procedure
- In the Access, go to Profile > Overview.
- Click Publish.
- Click OK.
Next steps
Configure Zero Sign-on in MobileIron UEM. See,