How to initialize your .NET app to use AppConnect C# APIs
To use the AppConnect C# APIs, do the following:
- Register as a handler of the AppConnect URL scheme
- Declare the AppConnect URL scheme as allowed
- Add AppConnect-related entries to your Info.plist
- Use AppConnect’s UIApplication subclass
- Initialize the AppConnect library
- Wait for the AppConnect singleton to be ready
- Optional: Specify app permissions and configurations in a plist file
Register as a handler of the AppConnect URL scheme
Your app must handle the AppConnect URL scheme. The Ivanti client app uses this URL scheme to communicate with your app’s instance of the AppConnect library.
Register the AppConnect URL scheme by modifying the app’s Info.plist. You edit the key called URL types as follows:
-
Set URL Identifier to the app’s bundle ID.
For example:
com.mobileiron.ios.xamarin.HelloAppConnect
-
Set URL Schemes to the app’s bundle ID, prefixed with ac.
For example:
accom.mobileiron.ios.xamarin.HelloAppConnect
For example, to edit Info.plist using Visual Studio:
-
Open your app’s .NET solution.
-
Open the app’s Info.plist in the property list editor.
-
Select Advanced.
-
Click Add URL Type.
-
Set URL Identifier to the app’s bundle ID.
For example:
com.mobileiron.ios.xamarin.HelloAppConnect
-
Set URL Schemes to the app’s bundle ID, prefixed with ac.
For example:
accom.mobileiron.ios.xamarin.HelloAppConnect
Declare the AppConnect URL scheme as allowed
Declare the appconnect and the alt-appconnectURL schemes in your app’s Info.plist as allowed URL schemes. Your app’s instance of the AppConnect library:
- uses the appconnect URL scheme to communicate with Mobile@Work or Go.
- uses the alt-appconnect URL scheme to communicate with AppStation.
To allow the appconnect and alt-appconnect URL schemes, add a key called LSApplicationQueriesSchemes to the app’s Info.plist as follows:
- Add a key of type Array.
- Set the name of the key to LSApplicationQueriesSchemes.
- Add an item to the array.
- Set the value of the item to appconnect.
- Add another item to the array.
- Set the value of the item to alt-appconnect.
Example : Editing the Info.plist using Visual Studio
- Open your app’s .NET solution.
- Open the app’s Info.plist in the property list editor.
- Select Source.
- Select Add new entry.
- Select the +.
- Change the name of the property from Custom Property to LSApplicationQueriesSchemes.
- In the Type column, select Array.
- Select Add new entry, which appears indented under the new property.
- Select the +.
- In the Value column for the new String item, enter appconnect.
- Similarly, add a new entry to the LSApplicationQueriesSchemes array with the value alt-appconnect.
Add AppConnect-related entries to your Info.plist
Enable screen blurring
The AppConnect library can automatically blur your app’s screen whenever it is not active. This security measure protects the app’s data from being captured in screenshots. The AppConnect library blurs the screen when
-applicationWillResignActive: is called and unblurs it when -applicationDidBecomeActive: is called.
To enable screen blurring, add the key MI_AC_PROVIDE_SCREEN_BLUR to your app’s Info.plist as a Boolean. Set the value to YES.
When you set the Info.plist key MI_AC_PROVIDE_SCREEN_BLUR to YES, the Ivanti server administrators can disable screen blurring by setting a key-value pair on the server for your app’s configuration. The server key is MI_AC_ENABLE_SCREEN_BLURRING with the value false.
If you already implemented screen blurring in your app, remove that code and use the MI_AC_PROVIDE_SCREEN_BLUR plist key. Using the plist key ensures that all AppConnect apps behave consistently.
Allow Face ID
Include Privacy - Face ID Usage Description to your app’s info.plist, with a string value indicating the purpose of Face ID use. For example, add the value AppConnect. If you manually add this key, its name is NSFaceIDUsageDescription.
Server administrators can allow the use of Touch ID or Face ID instead of an AppConnect passcode. Therefore, this Info.plist entry is required on iOS 11 or supported newer versions.
Use AppConnect’s UIApplication subclass
To use AppConnect’s UIApplication subclass:
-
Open Main.cs for editing.
-
Change the second argument of the call to UIApplication.Main() to
AppConnectBinding.Constants.kACUIApplicationClassName.The second argument, the principalClassName argument, is the UIApplication class or subclass for the app.
-
Make sure the third argument of the call to UIApplication.Main() is your UIApplicationDelegate subclass name.
For example, in the HelloAppConnectDOTNET app provided with the AppConnect for iOS SDK, the statement that calls UIApplication.Main() is:
UIApplication.Main(args, AppConnectBinding.Constants.kACUIApplicationClassName,
                   "HACAppDelegate"));
If you use a subclass of UIApplication for your app:
-
Derive your subclass from AppConnectUIApplication instead of UIApplication.
-
Use the name of your AppConnectUIApplication subclass for the principalClassName argument in the call to UIApplication.Main().
-
When you override a UIApplication method in your AppConnectUIApplication subclass, always invoke the method implementation of the superclass AppConnectUIApplication at the end of your method.
If you do not invoke the superclass implementation, AppConnect features will not work in your app.
Initialize the AppConnect library
To initialize the AppConnect library for your app to use:
Edit your AppDelegate source file
-
Open your AppDelegate source file for editing.
-
Add the following line to your using statements:
using AppConnectBinding;
Create a subclass of AppConnectDelegate
In your AppDelegate source file:
-
Create a subclass of AppConnectDelegate. Do the following:
-
Implement each abstract method in AppConnectDelegate.
-
Implement each virtual method in AppConnectDelegate that your app’s functionality requires.
For example, in HelloAppConnectDOTNET, in AppDelegate.cs, the HACAppConnectDelegate class derives from the AppConnectDelegate class.
Details about each method is available in the code. You can also refer to the corresponding Objective-C method in AppConnect for iOS API.
-
-
If you want to retrieve you app’s original UIApplicationDelegate object, model your code from this line from HelloAppConnectDOTNET:
   this.hacAppDelegate = (HACAppDelegate)
      ((AppConnectUIApplication)UIApplication.SharedApplication).OriginalDelegate;
..NET apps must use OriginalDelegate to get the UIApplicationDelegate object. For more information, see originalDelegate property (deprecated).
Modify your UIApplicationDelegate subclass
Modify your UIApplicationDelegate subclass as follows:
-
Instantiate the AppConnectDelegate subclass object.
For example, in HelloAppConnectDOTNET:
this.appConnectDelegate = new HACAppConnectDelegate();
-
Call the static method InitWithDelegate() of the AppConnect class.The method takes as a parameter an object of the AppConnectDelegate subclass.
For example, in HelloAppConnectDOTNET, in the HACAppDelegate class implementation, the method FinishedLaunching() calls InitWithDelegate() as follows:
AppConnect.InitWithDelegate(this.appConnectDelegate);
-
Save the singleton instance of the AppConnect library.
For example, in HelloAppConnectDOTNET, the HACAppDelegate object saves the singleton instance in the appConnect member variable:
this.appConnect = AppConnect.SharedInstance;
-
Call the AppConnect singleton’s method StartWithLaunchOptions().
The app must:
- Call this method from its AppDelegate’s method FinishedLaunching()
- Pass along its options parameter value.
For example, in HelloAppConnectDOTNET:
this.appConnect.StartWithLaunchOptions(options);
After this step, the AppConnect singleton is initializing. However, the app cannot yet use the singleton’s instance properties. The app can:
- use the AppConnect class properties.
- use the methods of the AppConnect singleton object.
-
If your application supports UIScene, call the AppConnect singleton’s method SceneWillConnectToSessionWithOptions() from your UIScene delegate's void WillConnect (UIScene scene, UISceneSession session, UISceneConnectionOptions connectionOptions) method passing connectionOptions as an input parameter.
For example:
public class MySceneDelegate : UIWindowSceneDelegate { public override void WillConnect (UIScene scene, UISceneSession session, UISceneConnectionOptions connectionOptions) { AppConnect.SharedInstance.SceneWillConnectToSessionWithOptions(connectionOptions); } } -
Indicate in the user interface that the app is initializing if the app requires the AppConnect singleton’s instance properties to determine what to do. For example, use an activity indicator (spinner). Remove the indication after the app is notified that the AppConnect singleton is ready.
One reason this indication is important involves when to display sensitive data. Do not show any sensitive data until the AppConnect singleton is ready, because until that time, the app cannot determine whether it is authorized. Only an authorized app should show sensitive data.
Wait for the AppConnect singleton to be ready
The app cannot use the AppConnect singleton’s instance properties until the Ready property on the AppConnect singleton is set to true. It is set to true when the callback method AppConnectIsReady() in your AppConnectDelegate subclass is called. The app can now access the instance properties, such as AuthState and PasteboardPolicy, on the AppConnect singleton.
Before accessing any instance properties, use the Ready getter to make sure the properties are accessible.
For example, in HelloAppConnectDOTNET, the AppConnectIsReady() callback method calls UpdateLabels(). The UpdateLabels() method calls various methods that access the instance properties on the AppConnect singleton. Because other methods also call
UpdateLabels(), UpdateLabels() first checks the Ready property:
if (this.appConnect.Ready) {

    // Call methods that access instance properties.
}
else {
        authInfoText = "Ready: NO (AppConnect is not ready yet)";
        policyInfoText = "AppConnect is not ready yet";
        configInfoText = "AppConnect is not ready yet";
}
For details about the AppConnectIsReady() callback method andthe Ready property, see the code. You can also refer to the corresponding Objective-C information in AppConnect ready API details .
Optional: Specify app permissions and configurations in a plist file
If your app is an in-house app, you can specify default values for:
- the data loss prevention policies, such as the Open In policy
- the key-value pairs for your app-specific configuration
Specifically, you can provide a special plist file called AppConnect.plist as part of your in-house app that:
- specifies whether your app should be allowed by default to copy to the iOS pasteboard, use document interaction (Open In and Open From), and print.
- specifies app-specific configuration keys and default values.
These default values are used by Ivanti server to make it easier for the server administrator to set up your app with the correct data loss prevention policies and app-specific configurations. Your app never reads the AppConnect.plist.
When you include the AppConnect.plist in your app:
| 1. | When an administrator uploads your in-house app to the Ivanti server, the server uses this plist file to automatically create server policies that contain your specified data loss prevention policies and app-specific configuration. |
| 2. | The administrator can then edit these policies. |
For example:
| - | If one of your app-specific configuration keys requires a URL of an enterprise server, the administrator provides that value. |
| - | If the administrator requires stricter data loss prevention policies than your app’s default values, the administrator changes the values. |
| 3. | The administrator then applies these policies to the appropriate set of devices. |
| 4. | When your app runs, it receives the data loss prevention policies and app-specific configuration by using the AppConnect for iOS APIs. |
For example, to handle app-specific configurations, you use the Config property (an NSDictionary object) and the callback method ConfigChanged().
| 5. | If the administrator later changes the data loss prevention policies or app-specific configuration, your app receives the updates by using the AppConnect for iOS APIs. |
An example of an AppConnect.plist file as viewed in Visual Studio looks like the following:
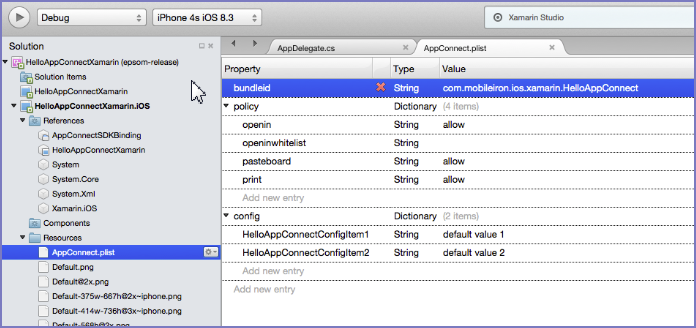
Edit the AppConnect.plist
| 1. | In the Root key of AppConnect.plist, place a key called bundleid with the type String, and set the value to the bundle ID of your app. |
| 2. | In the Root key of AppConnect.plist, create two keys called policy and config, each with the type Dictionary. |
| 3. | In the policy dictionary, create keys called openin, openinwhitelist, openfrom, openfromwhitelistpasteboard, and print, each with the type String. |
| 4. | Set these keys’ values as given in the following table: |
|
Key |
Possible values and meanings |
|
openin |
•allow Document interaction is allowed with all other apps. •disable Document interaction is not allowed. •whitelist Only documents in the openinwhitelist list can open documents from your app. •appconnect Document interaction is allowed with all other AppConnect apps. This value results in the app receiving a whitelist in the Open In policy API. The whitelist contains the list of all currently authorized AppConnect apps. You do not enter an openinwhitelist key in the plist. See The openInPolicy and openInWhitelist properties . |
|
openinwhitelist |
Semi-colon separated list of the bundle IDs of the apps with which document interaction is allowed. This key is necessary when the openin key has the value whitelist. |
|
pasteboard |
•allow Pasteboard interaction is allowed with all other apps. That is, this option allows the device user to be able to copy content from your app to the iOS pasteboard. Then, any app can copy from the content from the pasteboard. •disable Pasteboard interaction is not allowed. •appconnect Pasteboard interaction is allowed only with other AppConnect apps. That is, this option allows the device user to be able to copy content from your app to the iOS pasteboard. Then, only other AppConnect apps can copy from the content from the pasteboard. |
|
|
•allow Printing is allowed. •disable Printing is not allowed. |
| 5. | In the config dictionary, create keys as required for your app. |
| 6. | Optionally, add values for the keys. The values must be String types. |
The value $USERID$ in the example tells Ivanti EPMM to substitute the device user’s user ID for the value. Other possible variables for Ivanti EPMM are $EMAIL$ and $PASSWORD$. Depending on the Ivanti EPMM configuration, custom variables called $USER_CUSTOM1$ through $USER_CUSTOM4$ are sometimes available.
Convert the AppConnect.plist to binary format
The Ivanti server requires that the AppConnect.plist uses binary plist format. When creating an iOS app with Visual Studio, you must manually convert the AppConnect.plist to binary format. You can convert AppConnect.plist using a custom build command.
Do the following:
| 1. | In Visual Studio, select your project. |
| 2. | Select Options. |
| 3. | Select Build > Custom Commands. |
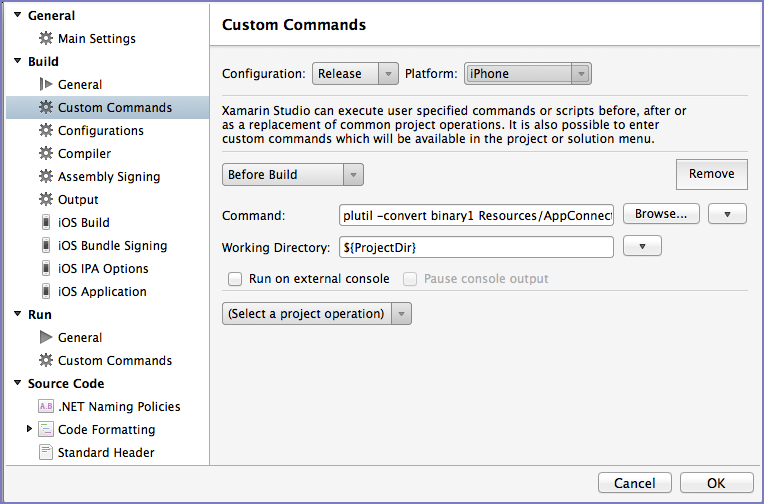
| 4. | For Configuration, select Release. |
| 5. | For Platform, select iPhone. |
| 6. | Select Before Build. |
| 7. | In the Command field, enter: |
plutil -convert binary1 Resources/AppConnect.plist
| 8. | Set Working Directory to ${ProjectDir}. |
| 9. | Click OK. |
| 10. | Repeat steps, this time selecting Debug for the Configuration field. |