Getting started tasks
Use these tasks to begin development of Cordova AppConnect apps.
Once you have completed these tasks, your app is ready to use the Cordova plugin to, for example, enforce Ivanti server settings and apply app-specific configurations from the Ivanti server.
Before you begin
•Get the latest version of the AppConnect for iOS Cordova Plugin from the Ivanti Product Downloads page
•Be sure you have the required product versions for working with apps built with the AppConnect for iOS Cordova plugin.
See Product versions required .
Getting started task list
Do the following tasks to add the AppConnect for iOS Cordova Plugin to your app:
| 1. | Run the AppConnect Cordova Plugin installation script |
| 2. | Declare the AppConnect URL schemes as allowed |
| 3. | Add AppConnect-related entries to your Info.plist |
| 4. | Update Xcode project settings |
| 5. | Initialize the AppConnect library |
| 6. | Wait for the AppConnect library to be ready |
Optionally, you can create an AppConnect.plist file. See Specify app permissions and configuration in a plist file.
Run the AppConnect Cordova Plugin installation script
The AppConnect Cordova Plugin installation script is called install_ac_cordova_plugin.sh. The script does the following:
•Installs the AppConnect Cordova Plugin into your Cordova app.
•Creates the iOS platform directory for your app if it was not already created.
•Modifies main.m in the iOS platform directory to include code that the AppConnect Cordova Plugin requires.
If you delete the iOS platform directory and re-create it without using the script, follow the instructions in Code changes if you manually recreate the iOS platform directory.
To run install_ac_cordova_plugin.sh:
| 1. | Put the AppConnectCordovaPlugin_<version number>.zip and install_ac_cordova_plugin_sh files in a convenient directory. |
| 2. | Change to the top-level directory of your app’s Cordova project. |
This directory contains the subdirectories plugins, www, hooks, and platforms, and contains the project’s config.xml file.
| 3. | Run the script. |
For example, if the plugin zip file and the script are also in the top-level directory:
$./install_ac_cordova_plugin.sh -p AppConnectCordovaPlugin_V2_0_0_0.zip
The -p option is the relative or absolute path of the plugin zip file.
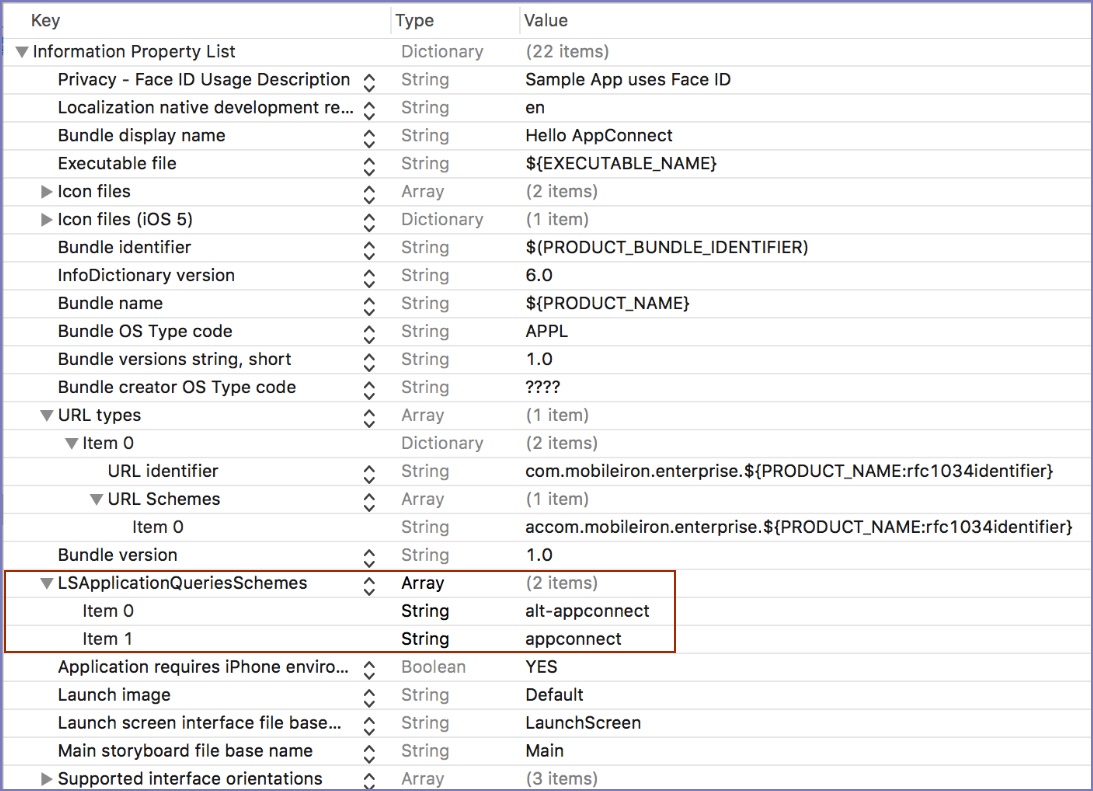
Declare the AppConnect URL schemes as allowed
Declare the appconnect and the alt-appconnectURL schemes in your app’s Info.plist as allowed URL schemes. Your app’s instance of the AppConnect library:
- uses the appconnect URL scheme to communicate with Ivanti Mobile@Work or Ivanti Go.
- uses the alt-appconnect URL scheme to communicate with AppStation.
To allow the appconnect and alt-appconnect URL schemes, add a key called LSApplicationQueriesSchemes as shown in this example from HelloAppConnect’s HelloAppConnect-Info.plist:
Figure 1. AppConnect URL scheme viewed in Xcode
Do the following steps (based on Xcode 7.1):
-
Open the app’s .xcodeproj file in Xcode.
-
Select your app’s Info.plist file.
-
Select Editor > Add Item in the menu.
-
For the Key, enter LSApplicationQueriesSchemes.
-
For the Type, select Array.
-
Select the new key.
-
Select Editor -> Add Item.
-
Set the value of the Item to appconnect.
-
Select the new key again.
-
Select Editor -> Add Item.
-
Set the value of the Item to alt-appconnect.
Add AppConnect-related entries to your Info.plist
Enable screen blurring
The AppConnect library can automatically blur your app’s screen whenever it is not active and remove the blur when the screen becomes active again. This security measure protects the app’s data from being captured in screenshots.
To enable screen blurring, add the key MI_AC_PROVIDE_SCREEN_BLUR to your app’s Info.plist as a Boolean. Set the value to YES.
When you set the Info.plist key MI_AC_PROVIDE_SCREEN_BLUR to YES, the Ivanti server administrators can disable screen blurring by setting a key-value pair on the server for your app’s configuration. The server key is MI_AC_ENABLE_SCREEN_BLURRING with the value false.
If you already implemented screen blurring in your app, remove that code and use the MI_AC_PROVIDE_SCREEN_BLUR plist key. Using the plist key ensures that all AppConnect apps behave consistently.
Allow Face ID
Include Privacy - Face ID Usage Description to your app’s info.plist, with a string value indicating the purpose of Face ID use. For example, add the value AppConnect. If you manually add this key, its name is NSFaceIDUsageDescription.
Server administrators can allow the use of Touch ID or Face ID instead of an AppConnect passcode. Therefore, this Info.plist entry is required on iOS 11 or supported newer versions.
Update Xcode project settings
Running the AppConnect Cordova Plugin installation script created an Xcode project for your app.
In the Xcode project, make sure Enable Bitcode is set to No in Build Options in the Build Settings of the Xcode project’s target.
Initialize the AppConnect library
To initialize the AppConnect library for your app to use, call the following method when your app receives the Cordova 'deviceready' event:
AppConnectCordova.initialize();
After this step, the AppConnect library is initializing. However, the app cannot yet use the other AppConnect Cordova Plugin interfaces.
Wait for the AppConnect library to be ready
The AppConnect Cordova Plugin generates the 'appconnect.isReady' event when the AppConnect library initialization has completed.
Do the following:
| 1. | Add an event handler for the 'appconnect.isReady' event as part of your app’s initialization. For example: |
document.addEventListener('appconnect.isReady', this.onAppConnectIsReady, false);
| 2. | Indicate in the user interface that the app is initializing if the app requires the AppConnectCordova JavaScript interfaces to determine what to do. For example, use an activity indicator (spinner). |
One reason this indication is important involves when to display sensitive data. Do not show any sensitive data until the AppConnect library is ready, because until that time, the app cannot determine whether it is authorized. Only an authorized app should show sensitive data.
| 3. | In the event handler for the 'appconnect.isReady' event: |
| - | Remove the activity indicator after the app receives the 'appconnect.isReady' event. |
| - | Access other AppConnectCordova JavaScript interfaces such as authState(), authMessage(), and config() and take actions appropriate for your app. |
Before accessing AppConnectCordova JavaScript interfaces other than initialize(), always check the isReady() method. Doing so allows you to use the same methods when the app first launches and throughout execution.
| 4. | Handle events that the AppConnect Cordova Plugin generates. |
These events indicate changes to the authorization status, data loss prevention policies, and app-specific configuration. For details, see AppConnect for iOS Cordova Plugin API.
Specify app permissions and configuration in a plist file
If your app is an in-house app, you can specify default values for:
•the data loss prevention policies, such as the Open In policy
•the key-value pairs for your app-specific configuration
Specifically, you can provide a special plist file called AppConnect.plist as part of your in-house app that:
•specifies whether your app should be allowed by default to copy to the iOS pasteboard, use document interaction (Open In), and print.
•specifies app-specific configuration keys and default values.
These default values are used by the Ivanti server to make it easier for the server administrator to set up your app with the correct data loss prevention policies and app-specific configurations. Your app never reads the AppConnect.plist.
When you include the AppConnect.plist in your app:
| 1. | When an administrator uploads your in-house app to the Ivanti server, the server uses this plist file to automatically create server policies that contain your specified data loss prevention policies and app-specific configuration. |
| 2. | The administrator can then edit these policies. |
For example:
| - | If one of your app-specific configuration keys requires a URL of an enterprise server, the administrator provides that value. |
| - | If the administrator requires stricter data loss prevention policies than your app’s default values, the administrator changes the values. |
| 3. | The administrator then applies these policies to the appropriate set of devices. |
| 4. | When your app runs, it receives the data loss prevention policies and app-specific configuration by using the AppConnect for iOS Cordova Plugin APIs, described in AppConnect for iOS Cordova Plugin API. |
For example, to handle app-specific configurations, you use the AppConnectCordova.config() method to get the key-value pairs.
If the administrator later changes the data loss prevention policies or app-specific configuration, your app receives the updates by using the AppConnect for iOS Cordova Plugin APIs.
You can create an AppConnect.plist file using the Xcode project in your app’s ios platform directory. For example:
$HOME/Hello/platforms/ios/HelloWorld/HelloWorld.xcodeproj
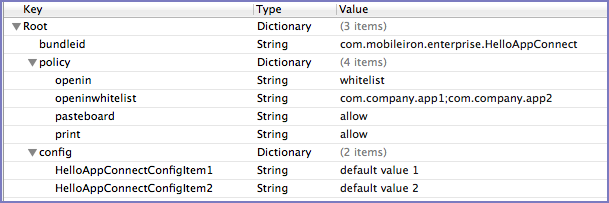
An example of an AppConnect.plist file as viewed in Xcode looks like the following:
Figure 2. AppConnect.plist viewed in Xcode
To set up an AppConnect.plist file using Xcode:
| 1. | Open the .xcodeproj file in Xcode. |
| 2. | Right-click on the project name, such as HelloWorld, in the left pane. |
| 3. | Select New File. |
| 4. | Select Resource. |
| 5. | Select Property List. |
| 6. | Click Next. |
| 7. | Save as AppConnect.plist. |
| 8. | In the Root key of AppConnect.plist, place a key called bundleid with the type String, and set the value to the bundle ID of your app. |
| 9. | In the Root key of AppConnect.plist, create two keys called policy and config, each with the type Dictionary. |
| 10. | In the policy dictionary, create keys called openin, openinwhitelist, openfrom, openfromwhitelist,pasteboard, and print, each with the type String. |
| 11. | Set these keys’ values as given in the following table: |
|
Key |
Possible values and meanings |
|
openin |
This value results in the app receiving a whitelist in the Open In policy API. The whitelist contains the list of all currently authorized AppConnect apps. You do not enter an openinwhitelist key in the plist. See Open In policy API details . |
|
openinwhitelist |
Semicolon separated list of the bundle IDs of the apps with which document interaction is allowed. This key is necessary when the openin key has the value whitelist. |
|
openfrom |
|
|
openfromwhitelist |
Semi-colon separated list of the bundle IDs of the apps from which the app is allowed to receive documents. This key is necessary when the openfrom key has the value whitelist. |
|
pasteboard |
|
|
|
|
| 12. | In the config dictionary, create keys as required for your app. |
| 13. | Optionally, add values for the keys. The values must be String types. |
The value $USERID$ in the example tells Ivanti Endpoint Manager Mobile to substitute the device user’s user ID for the value. Other possible variables are $EMAIL$ and $PASSWORD$. Depending on the Ivanti Endpoint Manager Mobile configuration, custom variables called $USER_CUSTOM1$ through $USER_CUSTOM4$ are sometimes available.
Code changes if you manually recreate the iOS platform directory
The AppConnect Cordova Plugin installation script creates the iOS platform directory for your app if it was not already created. It also modifies main.m in the iOS platform directory to include code that the AppConnect Cordova Plugin requires.
If you delete the iOS platform directory and re-create it without using the script, edit main.m as follows:
| 1. | Add the following line to the import statements: |
#import "AppConnect/AppConnect.h"
| 2. | Change the third argument of the call to UIApplicationMain() to kACUIApplicationClassName. |
The third argument, the principalClassName argument, is the UIApplication class or subclass for the app. The modified statement in the sample app is:
   int retVal = UIApplicationMain(argc, argv, kACUIApplicationClassName,
                                   @"AppDelegate");