Synchronizing Google account data
You can synchronize email, contacts, calendar, and tasks with mail apps on devices managed by MobileIron Core. To enable synchronization, you need to authorize apps to use Google APIs for communication between servers without accessing user information. This requires a service account that makes API calls on behalf of an app, as well as credentials that authenticate the identity of the app.
You create these credentials in the Google Developers Console, and then upload the credentials both to the Google Admin Console and MobileIron Core. You can then configure an Exchange setting to synchronize Google email data (including email, contacts, calendar, and tasks) with managed devices. You can alternatively choose to synchronize only some email data, such as calendar and contacts only, or email alone.
The Exchange setting also allows you to control the Google Apps password through MobileIron Core.
Main steps
Synchronizing Google Apps data involves the following main steps:
- Using OAuth to enable access to Google APIs
- Uploading OAuth credentials to the Google Admin Console
- Linking Google Apps credentials with MobileIron Core
- Setting up your Exchange setting for access to Google Apps data
- Renewing the Google Apps password for a given set of users (optional)
Before you begin
You need a Google administrator account.
Review the following Google documentation:
- https://developers.google.com/admin-sdk/?hl=en_US
- https://support.google.com/googleapi/answer/6158857?hl=en
- https://support.google.com/googleapi/answer/6158849?hl=en#serviceaccounts
Using OAuth to enable access to Google APIs
You must login to the Google Developers Console to enable access to Google APIs from clients using OAuth.
For detailed information, see the Google documentation here:
- https://developers.google.com/identity/protocols/OAuth2
- https://developers.google.com/identity/protocols/OAuth2ServiceAccount
Following are the main steps of this procedure.
Main steps
- Login to https://console.developers.google.com
- In the Google Developers Console, create a new project.
- Enable the Admin SDK and/or APIs.
- Create credentials for the OAuth 2.0 client.
- Create a consent form.
-
Enter the relevant information, as shown in the following table.
Item
Description
Application type
Select web application.
Name
Enter the name of the iOS app.
Authorized JavaScript origins
Enter JavaScript origins here or redirect URIs below (or both).
Cannot contain a wildcard (http://*.example.com) or a path (http://example.com/subdir).
Authorized redirect URIs
Must have a protocol. Cannot contain URL fragments or relative paths. Cannot be a public IP address.
- Download the credentials in the form of a JSON file for the web client.
Uploading OAuth credentials to the Google Admin Console
You must now upload to the Google Admin Console the JSON file you created in Using OAuth to enable access to Google APIs. The JSON files contains the credentials you created for client access.
For detailed information, see the Google documentation here:
| • | https://developers.google.com/identity/protocols/OAuth2 |
| • | https://developers.google.com/identity/protocols/OAuth2ServiceAccount |
Following are the main steps of this procedure.
Main steps
- Go to https://admin.google.com and login with your administrator ID.
- Enable API access.
- Enter the client name and API scope.
- Authorize the JSON file so that clients may access it.
Linking Google Apps credentials with MobileIron Core
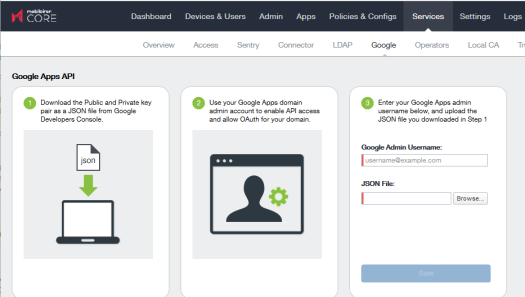
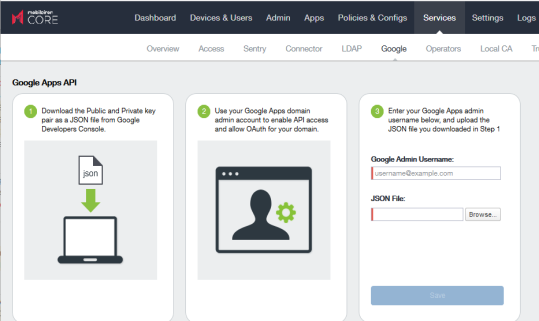
You must upload the JSON credentials file you downloaded from the Google Developers console to link your Google credentials with MobileIron Core. For more information, see Using OAuth to enable access to Google APIs.
Procedure
- In the Admin Portal, go to Services > Google.
- In the Google Admin Username field, enter your Google administrator email address.
-
Next to the JSON File field, click Browse.

- Select the JSON file you downloaded from the Google Developers Console.
-
Click Save.
The results are displayed on the lower left.

- Go to Settings > Preferences.
- Scroll down to the Google Apps API section.
- Click Password Settings.
-
Configure password settings as follows:
- Password length must be: Enter the minimum password length.
-
Require a password change every: Check the box and enter the number of days after which device users must change their password.
NOTE: Password expiration and password length values should match whatever is configured in Google. For example, if you configured a 90 day expiration period in Google with a password length of 8 to 90, then you would configure the same expiration and password length values in MobileIron Core.
- Click Save.
- Optionally, view the Google Apps account status by clicking View Account.
Setting up your Exchange setting for access to Google Apps data
Create an Exchange setting to connect MobileIron Core to Google servers, such that device users will be able to access their email, calendar, and contacts. Apply the Exchange setting to the relevant labels, such that Core pushes the new setting to the correct devices. The Exchange setting must include the Google Apps Password flag, which tells Core to generate a Google Apps password and send it to Google servers.
When sending an event to a device, MobileIron Core checks whether the Google Apps Password flag is toggled on or off. If a Google Apps password is required, but the password has not yet been generated and sent to Google, then Core sends the password to Google first before sending the Exchange setting to the device.
If MobileIron Core cannot find a user on Google, Core logs an error, and does not push the Exchange setting again.
Under some circumstances, you may need to renew the Google Apps password. For more information, see Renewing the Google Apps password for a given set of users.
Note The Following:
- If you intend to distribute an AppConnect email app to devices, such as MobileIron Email+ for iOS, you must add the key email_password with a value of $GOOGLE_AUTOGEN_PASSWORD$ to the AppConnect app configuration for the email app. For more information, see “Configuring an AppConnect app configuration” in the MobileIron Core AppConnect and AppTunnel Guide for MobileIron Core.
- Set the Exchange Username field to $EMAIL$ when using $GOOGLE_AUTOGEN_PASSWORD$ in the Password field and when using Android enterprise managed configurations or AppConnect KVPs.
Procedure
- In the Admin Portal go to Policies & Configs > Configurations.
- Click Add New > Exchange.
-
In the Exchange Setting dialog box, enter the following:
Item
Description
General
Name
Enter brief text that identifies this group of Exchange settings.
Description
Enter additional text that clarifies the purpose of this group of Exchange settings.
Server Address
Enter the address of the mail server, such as m.google.com.
If you are using Standalone Sentry, do the following:
• Enter the address of Standalone Sentry. • Go to Services > Sentry and edit your Standalone Sentry. In the ActiveSync Server field, enter m.google.com. • If you are using load balancers, contact MobileIron Professional Services. For more information about configuring Sentry, see the MobileIron Sentry Guide.
Use SSL
Select to use secure connections.
NOTE: You must use SSL to link to Google Apps. Google Apps Password
When linking to Google Apps, select this option to use the Google Apps password to log in to the Google account you have configured to work with MobileIron Core. This password allows device users to access their mail, contacts, and calendar data on their managed devices.
When selected, Core grays out the ActiveSync User Name and ActiveSync User Password.
This check box only appears if you have configured a Google account with MobileIron Core, as described in Synchronizing Google account data.
ActiveSync User Email
Specify the variable for the email address to be used with this Exchange configuration. You can specify any or all of the following variables $EMAIL$, $USERID$, $PASSWORD$. You can also specify custom formats, such as $USERID$_US. Custom attribute variable substitutions are supported.
Typically, you use $EMAIL$ in this field.
Items to Synchronize
Select the items you want to synchronize with Google Apps: Contacts, Calendar, Email, Tasks.
- Click Save.
- Check the box next to the Exchange setting you created, and select Actions > Apply To Label.
-
Select the labels to which you want to apply the Exchange setting and click Apply.
Renewing the Google Apps password for a given set of users
If there is a communication error when sending a Google Apps password to Google, MobileIron Core. Core tracks the number of attempts to send updated passwords to Google. If it reaches the preset maximum number of attempts to contact Google servers, Core stops trying and the password is set to failure state. At this point, you must manually renew the Google Apps password.
You can renew the Google password for an individual user or a set of users on the Users page in the MobileIron Core Admin Portal. After you generate it, Core pushes the new password to Google when the device checks in.
Procedure
- Go to Devices & Users > Users.
- Select the user or users whose Google password you want to renew.
-
Select Actions > Renew Google Apps Password.
The Admin Portal shows a dialog that lists the users whose Google Apps password you want to renew.
-
Click Renew Google Apps Password.
The Admin Portal sends the request to renew the Google Apps password for the selected users.
- Click Close.