Configuring the Android shared-kiosk mode
To configure the Android shared-kiosk mode, you need to create a staging user role. Then you need to create one kiosk policy for the staging user as well as one or more policies for the shared kiosk users. For example, you can create one policy for managers and another one for employees. Within each policy, you can define the apps that the users, or user group, can access. Then you need to create and add a label to the device. Finally, you need to apply labels to both the staging and shared kiosk policies.
| NOTE: | You define user groups with a user group feature, such as LDAP. You cannot define user groups within the Android shared kiosk mode. |
To configure the Android shared-kiosk mode, do the following:
- Configuring a staging user
- Creating a staging policy for the staging user
- Creating a shared-kiosk-mode policy for the shared kiosk users
- Creating and Adding labels to Android shared kiosk policies
- Applying a label to the staging policy
- Applying a label to a shared kiosk policy
Configuring a staging user
The first step in allowing users to access the Android shared-kiosk mode is to assign a user to the staging role. The staging user must have the same login as the person in your organization who registered MobileIron@Work during the initial setup of the software. Also, this user needs to have the Google Device Account role. MobileIron suggests that you make this user name easy to distinguish by using a name such as "staging-user."
| NOTE: | A Google Device Account applies only to Managed Google Play Accounts and new managed devices. The device account allows the staging user to enroll large numbers of managed devices, that is more than ten devices, without applying the limits imposed by Google. |
Procedure
- In Admin Portal, go to Devices & Users. Then select Users.
- Select the check box next to a user.
- From Actions, select Assign Roles. The Assign Role(s) screen displays.
- Select the check box next to Use Google Device Account (for Android enterprise device only).
- Click Save.
Creating a staging policy for the staging user
You need to create a policy that is dedicated to the staging user. This policy is not active until you apply a label to the staging policy.
Procedure
- In Admin Portal, go to Policies & Configs > Policies.
- Click Add New > Android > Android Kiosk Mode.
- In the New Android Kiosk App Setting Policy dialog box, enter a Name and Description for the policy.
- Select Active for the Status field to enable this policy.
- Scroll down to the Kiosk Settings section:
- Disable Quick Settings
If you select this option, the device does not display the system notification pull-down menu at the top of the shared kiosk screen.
If you enable the following options, the settings are displayed as menu items in the shared-kiosk mode on the device.
- Allow User to Access WIFI Settings. This is an optional setting.
- Allow User to Access Bluetooth Settings. This is an optional setting.
- Allow User to Access Location Settings. This is an optional setting.
- Enter a 4 - 6 digit PIN in the Kiosk Exit PIN field.
You can assign a pin to the staging user kiosk policy. However, it is not mandatory. Without a kiosk exit pin, the staging user cannot exit the kiosk mode .
- Select the Enable Shared Devicecheck box. This is a mandatory setting. By default, the Enable Login (Only for Staging user) radio button is selected. Check that this option is selected.
- Disable Quick Settings
- Scroll up to the Kiosk Branding section, customize the kiosk with a background color and background image if desired.
- Use the pull-down menu below the Background Color field to select the background color of the kiosk screen.
- Click Save.
Creating a shared-kiosk-mode policy for the shared kiosk users
You want to create one or more policies for the shared kiosk user who has access to the apps on the shared device based on their assigned policies. Each shared kiosk policy specifies a different set of apps available to the assigned user or user groups. For example, one policy could be for day-shift workers and a second one for night-shift workers. Also within these policies, you may want to configure branding to customize the device. This policy is not active until you apply a label to the shared kiosk policy.
| NOTE: | You need to install any apps that you wish to include in the kiosk using the App Catalog page before you begin this procedure. You cannot install apps from within the shared-kiosk -mode policy. You can only use the shared-kiosk -mode policy to setup which apps are displayed. |
Procedure
- Go to Policies & Configs > Policies
- Click Add New > Android > Android Kiosk Mode.
- Enter a Name and Description for the policy.
- Select Active for the Status field to turn on this policy.
- Scroll down to the Kiosk Settings section, select:
- Disable Quick Settings
If you select this option, the device does not display the system notification pull-down menu at the top of the shared kiosk screen.
If you enable the following options, the settings are displayed as menu items in the shared-kiosk mode on the device.
- Allow User to Access WIFI Settings. This is an optional setting.
- Allow User to Access Bluetooth Settings. This is an optional setting.
- Allow User to Access Location Settings. This is an optional setting.
- Select the Enable Shared Device check box and then click the Enable Logout radio button. This is a mandatory setting.
- Use the arrows next to the Logout user if session exceeds field to select the number of hours before a shared kiosk user is automatically logged out of the kiosk device. This is an optional setting.
- Disable Quick Settings
-
In the Choose Apps section, select the app or apps that will be available to the shared kiosk user.
NOTE: The built-in apps must be enabled in Device Owner mode. This may not be the case with all manufacturers. - Add the permitted apps to the Kiosk Mode Allowed App section.
- Click +Add in the Built-in Apps to add apps such as the Built-in Camera or Built-In Dialer to the Kiosk Mode Allowed Apps.
- Add apps from the Built-in Apps section by clicking +Add.
- Add apps from the App Catalog Apps section by clicking +Add.
-
Add apps manually by entering a Package ID in the Manually Add Apps with Package ID field. Then click +Add.
The order that the apps appear in the Kiosk Mode Allowed Apps section, reflects how they appear on the user screen. To change the position of an app on the screen, change its position in the Kiosk Mode Allowed Apps list by selecting it and dragging it up or down.NOTE: To hide an app, select an app in the Kiosk Mode Allowed Apps section and click the eye icon. To ensure the selected app is reinstalled when the user logs out, clearing user session and data, select the Enable force reinstall on Logout icon (which resembles a sheet of paper). You may want to select this icon for apps that contain sensitive data and for apps that do not support managed app configurations.
- Scroll up to the Kiosk Branding section, customize the kiosk with a banner, background color, or background image as desired.
- Click Save.
Creating and Adding labels to Android shared kiosk policies
After you create the staging policy and one or more shared kiosk policies, you need to create and add a filtered label to the policies to push the configuration to the target devices. You must create a label for the staging user and each of the shared kiosk users.
Procedure
- Go to Devices & Users > Labels.
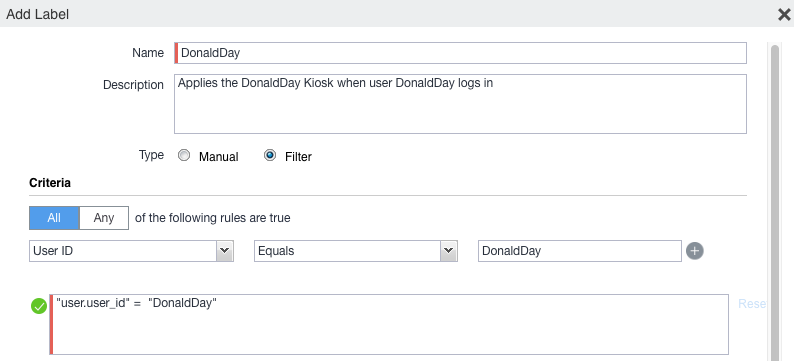
- Click Add Label.The "Add a label" page is displayed.
- Enter a name and description of the label.
- Click the Filter radio button.
-
Create a rule for the label based on the type of user logged into the device. In the Criteria section, use the Field, Operator, and Value fields (or enter the rule in the Type search expression here field):
- Field: Enter the user id as "user.user_id".
- Operator: Enter "Equals" or some other operator to return a single username.
-
Value: Enter the user account name
Here is an example of a rule for a staging user:
"user.user_id" = "<StagingUsername>" AND common.retired = "false"
See the following image for an example of a rule for a kiosk user:
For more information about field definitions, see Device field definitions.
- Click Save.
-
Apply this label to the related policy. See the following sections.
NOTE: The Display Name field on the "Add a label" page changes to reflect the user logged in. This is how the Filtered Label distinguishes which Kiosk Policy is applied.
Apply labels to Android shared kiosk policies
After you create the staging policy and one or more shared kiosk policies, you need to apply a label to the policies to push the configuration to the target devices.
| NOTE: | You must assign mutually exclusive labels to the staging and shared kiosk policies. In other words, the labels cannot resolve to a device that could be assigned to both policies at the same time. If that situation occurs, the policy with the higher priority is assigned to the device. |
Applying a label to the staging policy
The label must contain local users or LDAP user group information (or some way of associating the target users). These are the users that will use the policy.
Procedure
- Go to Policies & Configs > Policies.
- Select the check box next to the staging policy.
- Select Actions > Apply to Label. The Apply to Label dialog box opens.
- Select the check box next to the label.
- Click Apply.
Applying a label to a shared kiosk policy
The label must contain local users or LDAP user group information. These are the users that will use the policy.
Procedure
- Go to Policies & Configs > Policies.
- Select the check box next to the shared kiosk user policy.
- Select Actions > Apply to Label. The Apply to Label screen dialog box opens.
- Select the check box next to the label.
- Click Apply.
- If needed, repeat the procedure to assign an additional label to another shared kiosk policy.