Join Azure and Core for Windows 10
This section describes how to set up Azure and Core platforms to share data about device compliance. Administrators use shared compliance information to set up rules for blocking access to applications (Office 365, for example) until the device is in compliance.
Prerequisites for joining Azure and Core
We recommend you have met the following prerequisites before starting this section:
Join Azure and Core work flow
This section describes the overall work flow for joining Azure and Core for Windows 10 devices:
Set up Azure to join with Core
The first step is to Set up Azure to join with Core.
To set up Core with Microsoft Azure Intune, see Azure Tenant.
These steps can change without notice. Contact Microsoft for the most up-to-date instructions.
Add the MDM application
Follow this procedure to add the Mobile Device Management (MDM) application to Azure.
- Log into the Microsoft Azure portal.
- In the left panel, click Azure Active Directory.
- Click Mobility (MDM and MAM).
- Click + Add application.
- Select the generic On-premises MDM application.
-
Enter a unique name that can easily be remembered to associate with MDM sign up and then click Add.
The app with the name you selected is added to a list of apps in the directory it was assigned.
Note the following information:
- Only one MDM vendor can be associated at a time.
- If you add Intune, only Microsoft can remove the app manually.
- You can have multiple on-premise MDM apps at the same time, but make sure these apps' user scopes do not overlap.
- _MDM is used only for cloud customers.
-
Complete the steps in Configure the application.
Configure the application
This procedure describes how administrators configure the settings required to connect to their instance of Core.
- Open the MDM app you created.
-
On the Configure page, enter the URL of your Core instance into the following fields:
- MDM DISCOVERY URL
- MDM TERMS OF USE URL
- Add /EnrollmentServer/Discovery.svc after .com in the MDM DISCOVERY URL field.
- Add mifs/aad after .com in the MDM TERMS OF USE URL field.
-
In the MDM user scope field, select All to apply configuration to all users. Select Some if you want to a specify a group (Additional fields will display.)
Applying the configuration to None will negate using this app to any users in the directory and will bypass using Core for MDM management.
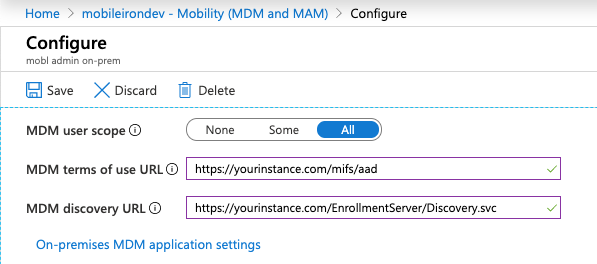
- Click the On-premises MDM application settings link.
- In the Overview tab, click Application ID URI and in the new page, click Edit to enter the URL of your Core instance.
- In the left panel, click Authentication.
- Add a new entry of redirect URIs, select the web type, enter the URL of your Core instance for redirect URIs, and then click Save.
- Copy the Application (client) ID. You will enter this into the Azure Client ID field in Core (see Set up Core to join with Azure).
- In the left panel, click Certificates and Secrets.
- To add a new key, click +New client secret.
-
Copy and save the new key. You will enter this into the Azure Key field in Core.
Note the following:
- This key is also called a "client secret key" to the Application Client ID.
- Select a 1- or 2-year activation period for the key.
- The key is not visible until the configuration is changed.
- The key is only visible after you save the configuration for the first time.
- You can generate a new key, for any reason, using the same steps.
- In the left pane, click API permissions. Note that under Permissions, the AAD Graph Read / Write device permissions field is selected.
- Click +Add permissions.
- Select Azure Service Management.
- In the Azure Service Management page, click Delegated permissions.
- In the Permissions section, select the user_impersonation check box and then click Add permission.
- Complete the steps in Set up Core to join with Azure.
Set up Core to join with Azure
The second step to join Azure with Core.
- Log into the Core Admin Portal.
- Select Settings > System Settings > Windows > Advanced Menu.
-
Select Enable Microsoft Azure Menu.
You do not need to turn on the Enabling Custom SyncML Menu option to work with Azure. However, if it was already turned on, do not turn it off as it might be required for other features in Core.
- Click Save.
- Click the Systems Settings tab.
- In the left navigational pane, go to Microsoft Azure and expand the section. Alternately, find the Microsoft Azure tile on the Systems Settings page.
- Click Autopilot & Device Compliance for Windows. The Autopilot & Device Compliance for Windows page opens.
- Select the Enable Azure Device Compliance check box. New fields display below.
- Enter the appropriate information for:
- Azure Domain ID - The name of your Azure tenant.
Azure Client ID - the Client ID you noted from your Azure Configuration.
- Azure Key - the key you noted from your Azure Configuration.
-
Click Save.
You can edit the information at any time.
- Provide your device users with the steps in Register devices in AAD and MDM.
- Complete the steps in Manage device compliance.
Manage device compliance
Finally, now that the device is managed, Core can begin to report compliance to Azure.
- Administrators can set up rules in Core to determine if a device is out of compliance.
- Core then sends that information to Azure, when a device becomes out of compliance.
- If an administrator sets up rules in Azure, they are put in place when the device is out of compliance.
Azure Compliance Setting
The Trust Level, in Azure, indicates if a device is compliant or not.
- Compliant: the device is compliant
- Managed: the device has fallen out of compliance