Registration methods
Registering a device designates it for management by Core.
Before you begin
Setting the registration PIN code length for device user registration
The following registration methods are available:
The process resulting from these methods may vary by device OS.
Admin invites users to register
This does not work for Connected Cloud.
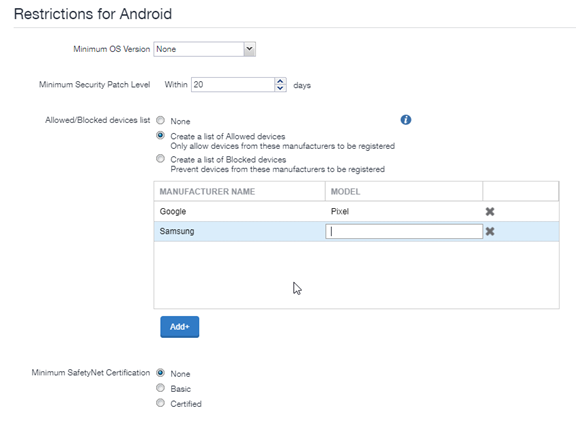
Registration restrictions for Android devices
From the Device Registration page, you can specify conditions that Android devices must meet to qualify for registration. You can limit Android devices by operating system (OS) version, security patch level, or by manufacturer and model.
Before you begin
-
Complete Registration methods.
Procedure
-
From the Settings > System Settings > Users & Devices > Device Registration page, scroll down to the Restrictions for Android section. Choose from these optional filter settings:
Figure 1. Registration restrictions for Android devices
-
Minimum OS version: Select a minimum OS version from the drop-down menu from Android 5.0 through 11.0 or supported newer versions. The default is None.
-
Minimum Security Patch Level: Enter an integer specifying within how many days a device can be non-compliant for the minimum security patch level before rejecting the device. The default is None.
-
Allowed/Blocked devices list: The options are:
-
None: The default. Do not create an Allowed or Blocked devices list.
-
Create a list of Allowed devices: Only allow devices of these makes and models to be registered.
-
Create a list of Blocked devices: Prevent devices of these makes and models to be registered.
To enter specific manufacturers and models, click Add+ to open text fields in the Manufacturer Name and Model columns. Enter allowed or restricted device information.
-
-
Click Save.
Disabling the QR code and registration URL
Users register additional devices
Once a device has been registered, an authorized user can use the user portal to register additional devices without administrative help. This is often used with adding devices for users who do not require assistance.
- Users must have the User Portal role assigned, with the Device Registration option enabled.
- The user needs to know the following information for the device:
- phone number (if any)
- country
- platform
Admin registers ActiveSync devices