Registration methods
Registering a device designates it for management by Core.
Support for Android 5.0 and 5.1 has ended. Core server will still allow existing registered devices with Android 5.0 / 5.1 to run.
Before you begin
Setting the registration PIN code length for device user registration
The following registration methods are available:
-
- In-app registration
- Customized registration using a URL or a QR Code
- Customized registration using SAML IdP
- Users register additional devices
- Admin registers ActiveSync devices
- Registering an Apple TV
-
The process resulting from these methods may vary by device OS.
Admin invites users to register
In-app registration
For iOS devices
-
-
-
In iOS 13, the option to "Allow Always" was removed from the iOS Settings app. Instead, a dialog box displays requesting device users to enable tracking when the Mobile@Work app is running. Mobile@Work opens iOS Settings where device users can choose "Ask Next Time" or "Never". Ivanti recommends device users to enable tracking. This change applies to all versions of iOS 13 or supported newer versions. Mobile@Work for iOS does not track device users' location without consent.
For macOS devices
-
Applicable to macOS 11.0 or supported newer versions.
-
Once completed, the mac device is a supervised device.
Procedure
For macOS device registration in the self-service portal, a device user must perform the following steps:
-
Log in with their credentials.
-
In the Install Management Profile page, the device user grants permission for the download of the profile. The profile is downloaded to the device user's local system.
-
Double-click the downloaded profile (macenroll.mobileconfig) to make it visible in the device user's System Preferences. There is limited time for the device user to install the profile before it becomes invalid.
-
Go to System Preferences > Profiles.
-
Click Install to install the management profile.
-
Continue and finish the installation procedure. Enter the system password when prompted.
Administrator tasks
-
- For iOS devices, you must enable the MDM profile in the Admin portal.
- Go to Settings > System Settings.
- Expand iOS and select MDM. The MDM page displays.
- Select the Enable MDM Profile check box.
- Click Save.
-
-
- Set up the registration email template, see Customizing registration messages
-
Schedule email reminders, see Customizing registration messages
- Send the email invitation to device users.
Registration restrictions for Android devices
From the Device Registration page, you can specify conditions that Android devices must meet to qualify for registration. You can limit Android devices by operating system (OS) version, security patch level, or by manufacturer and model.
Before you begin
-
Complete Registration methods.
Procedure
-
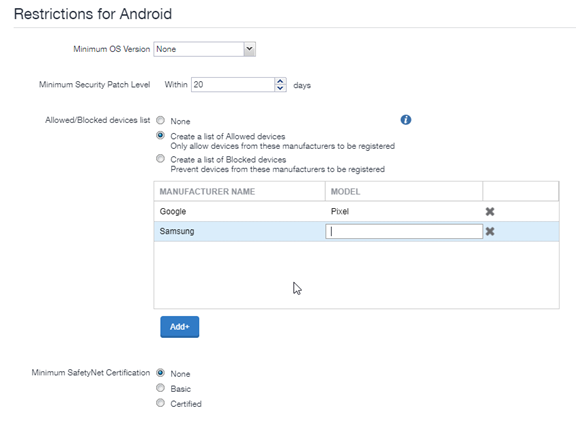
From the Settings > System Settings > Users & Devices > Device Registration page, scroll down to the Restrictions for Android section. Choose from these optional filter settings:
Registration restrictions for Android devices
-
Minimum OS version: Select a minimum OS version from the drop-down menu from Android 6.0 or supported newer versions. The default is None.
-
Minimum Security Patch Level: Enter an integer specifying within how many days a device can be non-compliant for the minimum security patch level before rejecting the device. The default is None.
-
Allowed/Blocked devices list: The options are:
-
None: The default. Do not create an Allowed or Blocked devices list.
-
Create a list of Allowed devices: Only allow devices of these makes and models to be registered.
-
Create a list of Blocked devices: Prevent devices of these makes and models to be registered.
To enter specific manufacturers and models, click Add+ to open text fields in the Manufacturer Name and Model columns. Enter allowed or restricted device information.
-
-
Click Save.
Customized registration using a URL or a QR Code
As a convenience, instead of device users entering registration credentials, you can setup an infrastructure to use a QR Code or URL link to automatically enter the registration credentials. This feature is applicable for iOS and macOS devices.
Before you begin
The company administrator must set up an infrastructure to generate a web page containing a QR Code or URL link from the credentials generated by UEM (see Implementing infrastructure for QR code with device PIN.)
-
In the case where the web page generated by the company is viewed on a computer, a QR Code would be appropriate to present. When constructing the QR code, it should contain a URL and follow this format:
mirp://<server host name>&user=<Username>&pin=<PIN>
Example: mirp://your.server.rock.com&[email protected]&pin=4444
It is recommended that the web page created by the admin to provide a QR code also provides the instructions to download the app from the iTunes App Store or Google Play and the instructions to scan the QR code.
- In the case where the web page is viewed on the device where Mobile@Work is being registered, a URL link would be appropriate.
Implementing infrastructure for QR code with device PIN
The below procedure works for iOS devices and utilizes the PIN code as part of the registration.
1. Enable the PIN code registration
- Go to Settings > Users & Devices > Device Registration.
-
Select the appropriate field for the type of Android device:
- For unmanaged Android devices, change the In-App registration requirement to Registration PIN.
- For managed Android devices, change the Zero Touch and Samsung Knox Mobile Enrollment field OR the Managed Devices / Device Owner (afw#, QR code, NFC) field to Registration PIN.
2. Enable the QR code integration
- Go to Settings > Users & Devices > Device Registration.
- Click on Templates tab > Registration Templates.
- Select your language and then click the Edit button.
-
In the Registration Email section, PIN field, replace the default text with this code:
<li>Registration PIN: <i>$PASSCODE$</i> (valid for $PASSCODE_TTL$ hours)
<p>
Or Scan the QR Code:
</p>
<P>
<img id='barcode'
src="https://api.qrserver.com/v1/create-qr-code/?data=mirp%3A%2F%2F$SERVER_URL$%26user%3D$USER_ID$%26pin%3D$PASSCODE$"
width="200"
height="200" />
</P>
-
Click Save.
When this code has been added, administrators can directly register a device from the Device Registration screen in Core and / or the device user can initiate the registration from the e-mail invitation.
Registering using a web page on a desktop computer
Below is a sample implementation where the web page is viewed on a desktop computer.
Procedure
- Core administrator sends device user an email with a link to the company's webpage.
-
In the email, the device user clicks on the link.
The link opens to the company web page displaying a QR code on it.
- On the user's device, the user goes to the iTunes App Store or Google Play and downloads Mobile@Work.
-
User launches the phone's camera.
The Scan QR Code page may open. Device users will need to allow access to the device camera for scanning the QR code. Tap on Open Settings, slide the camera on, then return to Mobile@Work.
-
User scans the QR code that is on the web page.
The Mobile@Work login page opens with the username, server address and PIN/password fields populated.
If the PIN field is not automatically populated, the device user will need to manually enter it.
- User taps Go or Register and continues the registration process.
Note the following:
- On launching the Mobile@Work app, the user can tap on the QR code icon (to the right of the user name field), and launch the in-app camera. This camera can then be used to scan the QR code and continue with the registration process.
- On devices running iOS 11.0 or later, the native camera can be used to scan the QR code. Upon scanning the QR code, the device user is prompted to launch Mobile@Work. Tapping on the prompt launches Mobile@Work with the device user’s credentials filled in. The device user can then tap Go or Register to continue with the registration process.
- On devices running iOS 10, the native camera lacks the ability to scan QR codes. To work around this, the device user can launch the Mobile@Work app, tap on the QR code icon (to the right of the user name field), and launch an in-app camera. This camera can then be used to scan the QR code and continue with the registration process.
Registering using a web page on an iOS device
Below is a sample implementation where the web page is viewed on an iOS device.
Procedure
- Administrator sends device user an email with a link to the company's web page.
-
In the email, the device user taps on the link.
The company's web page opens displaying two links.
- Device user taps on the first link and downloads the Mobile@Work app from the iTunes App store or from Google Play.
-
Device user taps on the second link, the Mobile@Work login page opens with the username, server address and PIN/password fields populated.
If the PIN field is not automatically populated, the device user will need to manually enter it.
-
User taps Go or Register and continues the registration process.
In iOS 13, the option to "Allow Always" was removed from the iOS Settings app. Instead, a dialog box displays requesting device users to enable tracking when the Mobile@Work app is running. Mobile@Work opens iOS Settings where device users can choose "Ask Next Time" or "Never". Ivanti recommends device users to enable tracking. This change applies to all versions of iOS 13 or supported newer versions. Mobile@Work for iOS does not track device users' location without consent.
Disabling the QR code and registration URL
Customized registration using SAML IdP
As a part of the registration process, device users log into a third-party identity provider (IdP), such as Ping. Once the authentication is successful, the device user is prompted to download the profile, completing the registration process.
Before you begin
You must have SAML enabled. See "Configuring SAML/IdP support" in the Core System Manager Guide.
Procedure
-
Enable SAML in the System Manager.
-
Configure an identity provider.
- Go to the Admin portal > Settings > Users & Devices > Device Registration page.
- In the Apple Web-based Registration Requirement field, select SAML-based registration. If this field is not selected, there will be no change in the registration.
Once SAML on iReg or DEP is set, SAML configuration from the System Manager can be either disabled or deleted. You must first de-select the "SAML-based registration" check box in the Device Registration page in Core before you can disable the IdP SAML connection in the System Manager.
-
Click Save.
Users register additional devices
Once a device has been registered, an authorized user can use the user portal to register additional devices without administrative help. This is often used with adding devices for users who do not require assistance.
- Users must have the User Portal role assigned, with the Device Registration option enabled.
- The user needs to know the following information for the device:
- phone number (if any)
- country
- platform
Admin registers ActiveSync devices
Registering an Apple TV
You can register an Apple TV to Core only through Apple Configurator.
Before you begin
The Apple TV must be connected to your corporate network. You can do this by configuring Wi-Fi on the Apple TV or connecting the Apple TV to your Ethernet.
Procedure
- Follow the instructions in Distributing MDM Profiles with Apple Configurator.
Using the Apple TV Assistant to import the MDM profile results in an error message. Cancel out of the Apple TV Assistant.
You can do the following when you manage an Apple TV with Core:
- View device information.
- Distribute Wi-Fi profiles to the Apple TV.
- Retire the device.
Registration via user portal