User portal overview
The Core Mobile@Work self-service user portal (SSP) is a platform whereby device users can manage their own devices. This section addresses the settings an administrator can create and maintain a self-service user portal.
- Benefits of the user portal
- Impacts of using the user portal
- User portal authentication options
- About registering devices in the user portal
- About changing device ownership in the user portal
- Associating a certificate with a user-provided certificate enrollment setting
-
-
The user portal allows your users to:
- Access Core device management actions such as wipe and lock
- View their device audit/history logs
- View details of their registered devices
- Register devices, including QR code and SMS/email options
- Reset the user PIN
- Change device ownership from company-owned to user-owned or the reverse
-
Upload, as well as view, replace, and delete user-provided certificates
These certificates are used, for example, for S/MIME or for authenticating to internal servers.
-
- Designate their device as "Untrusted" in risky public spaces and redesignate them as "Trusted" when in a safe area again.
One of your decisions when you distribute Core management is whether or not to enable your users to manage one or more device actions such as locking or unlocking a device. Your users access the actions you assign them through the user portal.
To enable users to manage their devices, you assign them roles to perform any or all of the following actions:
- Wipe their device
- Lock their device
-
-
- Retire their device
- Register their device
- Change device ownership
-
The Trust and unTrust options do not require a role. Registered devices are Trusted devices by default.
The Device Registration role replaces the MyPhone@Work Registration role. The MyPhone@Work Registration role is removed. The old user portal, MyPhone@Work, was available only through Core 8.0.1.
Benefits of the user portal
Giving users the ability to perform device management tasks:
- Distributes mobile device management
- Gives your users more control of their devices
- Adds efficiency to device registration by saving administrators’ time as well as wait time that device users might experience
Impacts of using the user portal
When you enable users to manage their own devices, you need to:
- Define which users have access to which device management actions
- Provide your users with the information they need to use the user portal
- Consider how changing device ownership from company-owned to employee-owned or vice-versa may impact:
- The policies and configurations that are applied to the device.
iBooks that are available on the device.
Devices are impacted when they check-in with Core depending on the labels to which company-owned or employee-owned devices are applied.
User portal authentication options
You can allow device users to authenticate to the user portal with:
-
A user name and password
These are the credentials a device user uses to register a device with Core.
-
An identity certificate from a smart card
This authentication method is supported only on desktop computers. It is not supported with:
- Mobile devices
- Firefox
You can allow one or both of these authentication mechanisms. You make your selection in the Core System Manager GuideCore System Manager Guide. For information about how to configure the user portal authentication options, see “Advanced: Portal authentication” in the Core System Manager Guide.
About registering devices in the user portal
To allow device users to register devices in the user portal, you must assign those users the Device Registration role in the Admin Portal in Devices & Users > Users.
Configuring the Per-User Device limit
You can configure a global per-user device limit, and optionally, custom device limits for specific LDAP Groups. Users will be limited to register only the number of devices specified in Settings > System Settings > Users & Devices > Registration > Per-User Device Limit.
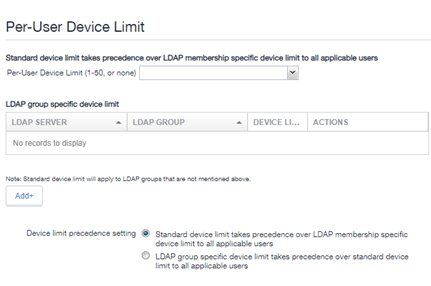
Procedure
To configure standard device limits and LDAP group-specific device limits, follow these steps:
-
In the first drop-down menu, select a default per-user device limit of 1-50, or none.
-
If you would like to create different per-user device limits for selected LDAP groups, click Add+. The Add LDAP Group Specific Device Limit menu opens.
-
From the Select LDAP Server drop-down menu, select the LDAP server that contains the LDAP group you want to include.
-
From the Select LDAP Group drop-down menu, select the Group to include.
-
From the Select Device Limit Per User drop-down menu, select the per-user device limit for that LDAP group.
-
Click Add to save your changes.
-
The LDAP group you selected appears in the LDAP group specific device limit table, where you can copy, edit, or delete it.
Registration PIN
Users who can register devices can also request and receive device registration PINs. To allow users to request a registration PIN, PIN-based registration must be selected in Settings > System Settings > Users & Devices > Device Registration. Any option that includes Registration PIN will enable device users to obtain a PIN in the user portal.

- Even though a PIN is generated, device users will not be prompted to enter a PIN if the device platform does not require PIN for registration.
-
About changing device ownership in the user portal
To allow device users to change device ownership through the user portal, you must assign those users the Change Device Ownership role in the Admin Portal in Devices & Users > Users.
Users cannot assign ownership of a device during device registration in the user portal. Device ownership is automatically set to company-owned. Once users have registered their devices through the user portal, they can change the ownership of the device from company-owned to user-owned or the reverse.
Associating a certificate with a user-provided certificate enrollment setting
When the user uploads a certificate, the user chooses a configuration to associate with the certificate. The configuration refers to a user-provided certificate enrollment setting that you configured. When you configure a user-provided certificate enrollment setting, you specify a display name. The user portal presents the display name in its list of configurations for the user to choose.
For example, you might create a user-provided certificate enrollment setting for S/MIME signing, another for S/MIME encryption, and another for server authentication. Each setting has a display name:
- S/MIME signing
- S/MIME encryption
- Authentication
When the user uploads a certificate, they see these display names as configurations, and they choose the one for the certificate. The user can upload the same certificate or different certificates for each configuration.
If you have not created at least one user-provided certificate enrollment setting, the user portal disables the option for the user to upload a certificate.
See also:
About uploading certificates in the user portal
On a desktop computer, device users can upload their own certificates in the user portal. They can use these certificates for different purposes, such as:
- S/MIME signing
- S/MIME encryption
- Authenticating to servers, such as internal servers that support apps.
From Core release 10.8.0.0 or supported newer versions, users can upload files with multiple aliases and friendly names.
This capability is available in the user portal on desktop computers, but not on mobile devices.
About generating a one-time PIN for resetting a secure apps passcode
Configuration requirements to allow the user portal to generate a one-time PIN
Configuring the user portal to generate a one-time PIN
About getting Entrust derived credentials