Introduction
The Ivanti EPMM V2 API is a RESTful API you use to send HTTPS requests to get data from and provide data to Ivanti EPMM.
Prerequisites for using the V2 API
Using the Ivanti EPMM V2 API requires:
•Ivanti EPMM login credentials for users with the necessary user roles to make the various API calls. You will send these credentials using basic authentication. See Authentication.
•familiarity with making REST API calls using the HTTPS protocol
•familiarity with JSON
Note: You cannot send API calls from the address bar of a browser because this API does not prompt you for credentials if you send a call from the address bar. You can use plugins like Poster for FireFox, and Postman or Advanced REST Client for Chrome, to test calls while you are coding calls into your application.
Authentication
The Ivanti EPMM V2 API requires basic authentication to authorize API calls. Each API call requires that the credentials you use for basic authentication belong to a user who has been assigned the necessary role to make that particular call. See Assigning admin roles to a user for how to assign required roles to Ivanti EPMM users, and the “Required Role” section of each API call description to determine the required role for each API call.
GDPR Consideration
If the API user selected to authenticate API calls is associated with a GDPR profile, then Ivanti EPMM obfuscates the specified fields in the GDPR profile that certain API calls return.
The calls include:
Typical fields include:
•User ID
•Person name
•Email address
•Phone number
•IMEI
•Serial Number
•ICCID
•IMSI
•MEID
Assigning admin roles to a user
To assign admin roles to a user:
| 1. | Log in to Ivanti EPMM and then click Admin. |
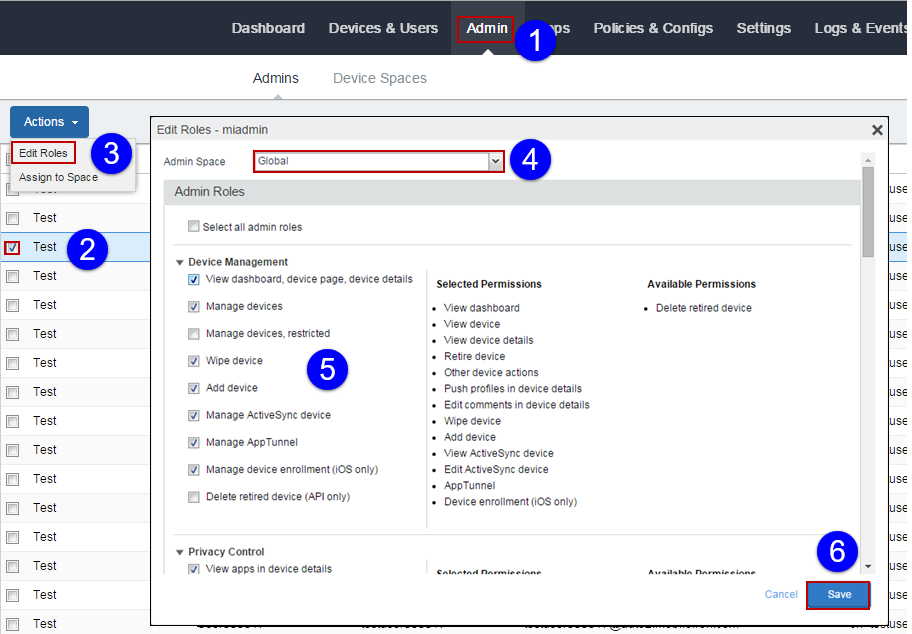
| 2. | Select a user. |
| 3. | Select Edit Roles. |
| 4. | Select a device space to which to assign the admin user. |
| 5. | Use the check boxes to select the roles needed to make the desired API calls. See the “Required Role” section of each API call description to determine the required role for each API call. |
| 6. | Click Save. |
JSESSIONID and CSRF_NONCE Required for Multipart Calls
All multipart calls require JSESSIONID and CSRF_NONCE tokens to guard against CSRF attacks. If an API call fails due to authorization, then get a JSESSIONID and CSRF_NONCE as described below and retry the call with these tokens.
JSESSIONID and CSRF_NONCE are not required in releases after 11.1.0.0.
Obtaining the JSESSIONID
To obtain the JSESSIONID, run the following call:
curl -c cookies.txt -XPOST \
'https://[Ivanti EPMM]/mifs/j_spring_security_check' \
--header 'Origin: https://[Ivanti EPMM]' \
--header 'Content-Type: application/x-www-form-urlencoded' \
--header 'Referer: https://[Ivanti EPMM]/mifs/login.jsp' \
-d "j_username=USER_NAME&j_password=PASSWORD&spid="
This call returns the JSESSIONID in the response, stored in cookies.txt.
Obtaining the CSRF_NONCE
To obtain the CSRF_NONCE, run the following call:
curl -XGET \
'https://[Ivanti EPMM]/mifs/admin/vsp.html' \
--header 'Origin: https://[Ivanti EPMM]' \
--header 'Content-Type: application/x-www-form-urlencoded' \
--header 'Referer: https://[Ivanti EPMM]/mifs/j_spring_security_check' \
--header 'Cookie: JSESSIONID=SESSION_ID_FROM_REQUEST_1' \
-d "j_username=USER_NAME&j_password=PASSWORD&spid=" | grep "csrf"
This call returns the CSRF_NONCE as part of the response, and extracts it to a file, csrf.
Using the JSESSIONID and CSRF_NONCE
Include the tokens in your call as headers, as shown below:
--header 'CSRF_NONCE: CSRF_NONCE_GENERATED_IN_REQUEST_2_ABOVE' \
--header 'Cookie: JSESSIONID=JSESSIONID_TOKEN_GENERATED_IN_REQUEST_1_ABOVE' \
Sample Script to Generate JSESSIONID and CSRF_NONCE
The sample script below generates the JSESSIONID and CSRF_NONCE.
Syntax:
sh JSESSIONID_CSRF_TOKEN_GENERATOR.sh https://HOST_NAME USER_NAME PASSWORD
Script:
#!/bin/sh
# Storing the command line arguments as variables
HOST=${1:-<missing>}
USERNAME=${2:-<missing>}
PASSWORD=${3:-<missing>}
echo "Host: $HOST"
echo "Username: $USERNAME"
echo "Executing commands..."
echo
# Executing the below curl command to generate the JSESSIONID
JSESSIONID=$(curl -XPOST -i -s "$HOST/mifs/j_spring_security_check" --header "Origin: $HOST" --header 'Content-Type: application/x-www-form-urlencoded' --header "Referer: $HOST/mifs/login.jsp" -d "j_username=$USERNAME&j_password=$PASSWORD&spid=" | grep "JSESSIONID" | awk -v FS="(=|;)" '{print $2}')
echo "JSESSIONID: $JSESSIONID"
# Executing the below curl command to generate the CSRF NONCE using the JSESSIONID from the above command output
CSRFNONCE=$(curl -XGET -s "$HOST/mifs/admin/vsp.html" --header "Origin: $HOST" --header 'Content-Type: application/x-www-form-urlencoded' --header "Referer: $HOST/mifs/j_spring_security_check" --header "Cookie: JSESSIONID=$JSESSIONID" -d "j_username=$USERNAME&j_password=$PASSWORD&spid=" | grep "csrfNonce" | awk -v FS="(\"|\")" '{print $2}')
echo "CSRFNONCE: $CSRFNONCE"
echo
echo "*** Script execution completed ***"
echo
Sample Output:
Host: https://[Ivanti EPMM]
Username: admin
Executing commands...
JSESSIONID: 6ABCDEFBA3D1663B496813730A01B640
CSRFNONCE: 5ABCDEF0B6C13E12AC6B72F3B6D4C0B2
*** Script execution completed ***
Making API Calls to Connected Cloud
When making API calls to Connected Cloud, prepend the URI with “rest/”. For example, if the call is “api/v2/devices/search_fields” in Ivanti EPMM, it would be “rest/api/v2/devices/search_fields” in Connected Cloud.
HTTP response status codes
The Ivanti EPMM V2 API can return the following HTTP response status codes:
|
Response code |
Description |
|
200 |
Success. |
|
400 |
Request error. |
|
401 |
Authentication failed. The request must contain a valid user ID and password for the target Ivanti EPMM instance. |
|
404 |
Page not found. Check the spelling of the URL. |
|
405 |
Invalid HTTP method. |
|
500 |
Internal server error. Ivanti EPMM encountered an internal error while processing the request. |
Response Language
The API supports JSON responses.
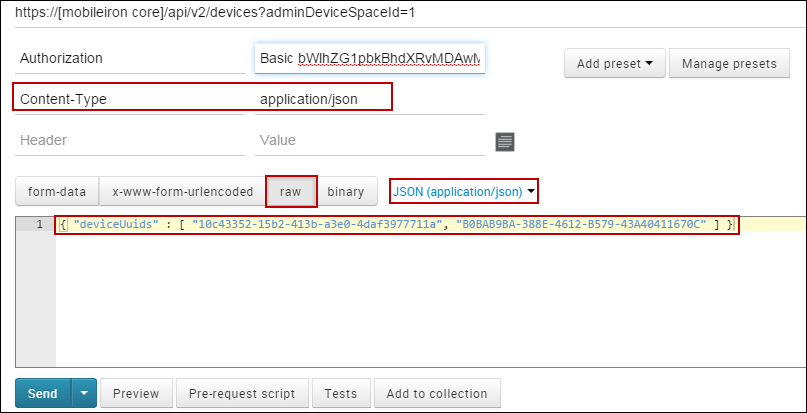
Using Postman to Test API Calls
If you encounter difficulties using Postman to test API calls, try sending a Content-Type header as application/json, and using the raw/JSON (application/json) input method to input your JSON object into the code field. For example, the API call described in Delete devices requires that you send a Content-Type header as application/json.