Allow or block iOS device access to specific URLs
Beginning with MTD for Ivanti EPMM 11.10.0.0 release, you can designate web sites as Safe (allow without warnings) or Phishing (block and provide warning) from an access control list (ACL) you type in or import via a custom Comma Separated Values (CSV) file. Allow or block webites, individually or in bulk, to customize your device user's experience to fit your company policies. You can provide access to company Intranet and other approved websites that might otherwise generate a warning message as "risky." Conversely, you can block the websites that may be restricted by company policy, for example Facebook or LinkedIn.
Creating an Access Control List
Procedure
-
The access control list page is accessible from the Policy tab or the Manage tab of the MTD threat management console:
- Click the Policy tab. Scroll down to Custom Category List for Phishing/Safe, and click the Manage List link. Or,
- Click the Manage tab. The General page opens. From the options along the top row, select Access Control.
The Access Control Lists page opens.
Figure 1. Access Control lists page

-
In the Select List to edit section, click Create New List. You are prompted to give the list a name. Click Save.
-
In the Add Site to List section, enter either a domain name or a full URL.
Optional: If you would like to see the access control category a website is assigned to, use the Site Category Checker. Enter the URL or domain into the field and click Check to see the default category assignment. -
In the drop-down field to the right of the site you entered, select either Safe or Phishing to assign the custom threat category to the list.
-
Click Add. The URL displays in the table below, along with the default threat category, and the Custom category you assigned it. The table also includes an Actions column, where you can click the trash icon to delete the entry.
Figure 2. websites customized as "Safe" or "Phishing"
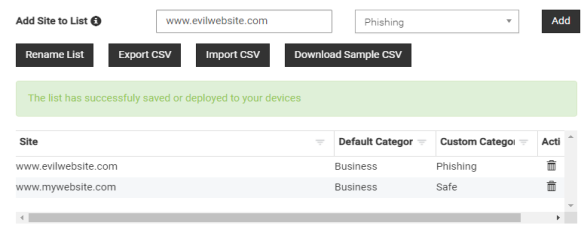
-
Click Save
Managing Access Control Lists
You also have the following ACL management options:
- Delete an ACL list – Select the list from the Select List to edit menu and click Delete List.
- Rename an ACL list – Select the list from the Select List to edit menu and click Rename List. You are prompted to enter a new name. Click Save to keep the change.
- Export your ACL list to a CSV file – Select the list from the Select List to edit menu. Click Export CSV. A comma-separated values (CSV) file created from your ACL is downloaded to your local Downloads folder.
- Download a sample CSV file to copy – Select the list from the Select List to edit menu. Click Download Sample CSV. The sample CSV file is downloaded to your local Downloads folder.
- Delete a URL from an ACL list – To delete a single entry from an ACL list, select the list from the Select List to edit menu. Click the table row with the URL you wish to delete. Click the can icon for the row to delete the URL.
As with any change, be sure to Save and deploy to your devices.