Installation, Configuration, and Maintenance
This section covers the installation, configuration, and maintenance of the RDB database.
Upgrade Scenarios
The Reporting Database 2.3.x.x installer removes Monitor, therefore the upgrade choreography differs depending on if you would like to keep using Monitor. If you would like to keep using Monitor and upgrade to Reporting Database 2.3.x.x, then, before installing Reporting Database 2.3.x.x, see the section, "Retaining Monitor 2.1.x.x or 2.2.x.x and Upgrading to Reporting Database 2.3.x.x" in the Reporting Database Release Notes.
Installing the Reporting Database
To install the Reporting Database appliance on VMware:
Procedure
- If you have not done so already, create a VM that meets Ivanti's recommended specifications.
- Place the ISO distribution in an existing vSphere datastore.
-
In the vSphere Client, select the Edit Settings option for the VM you created.
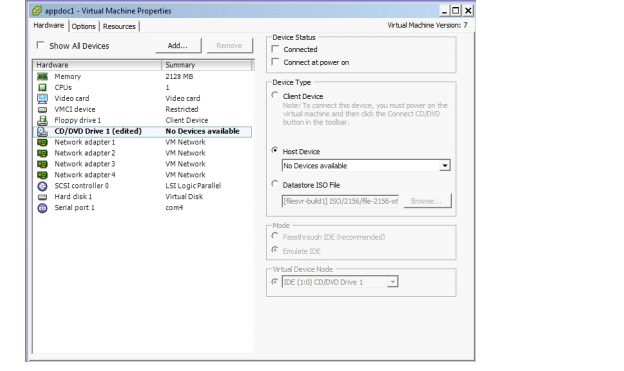
- Select Datastore ISO File.
- Click Browse to select the Reporting Database ISO distribution. Make sure that the Connected and Connect at power on options are selected in the Virtual Machine Properties.
- Select Host Device.
- Click OK.
- Power on the VM. The VM automatically installs and reloads after a few minutes, and the installation program starts.
The following table summarizes the prompts and entries.
| Prompt | What to do | |
|
1 |
Welcome to the Mobileiron Reporting Database Installation Program
To boot from your hard disk, type:<ENTER> Note: System will boot from the local hard disk in 30 seconds if no key is pressed. |
Enter vm-install. The package installation process starts and continues for several minutes. |
|
2 |
Welcome to the Configuration Wizard Use the ‘-’ character to move back to the previous field Continue with configuration dialog? [yes/no] |
Enter yes. Scroll through the displayed license agreement. |
|
3 |
Do you accept the End User License Agreement? [yes/no] |
Enter yes. |
|
4 |
Provide the company name, contact person name and email Company name: |
Enter the company name. The company name you enter will serve as the default enterprise name used in SMS and email communication. |
|
5 |
Contact person name: |
Enter the name of the member of your organization who will serve as the contact point for Ivanti communications. |
|
6 |
Contact person email: |
Enter the email address for the contact person. |
|
7 |
The enable secret is a password used to protect access to privileged EXEC and configuration modes. This password, after entered, becomes encrypted in the configuration. Enter enable secret: |
Enter the password you want to assign. The password must be between 6 and 20 characters. |
|
8 |
Enter enable secret (confirm): |
Re-enable the secret password. |
|
9 |
Administrator User Name: |
Enter the user name for the first administrative user. Important: Do not use root. |
|
10 |
Administrator Password: |
Set the password for the administrator. This password must contain at least 8 characters and include numerals and capital letters. |
|
11 |
Administrator Password (confirm): |
Re-enter the administrator password. |
|
12 |
Available network interfaces:
Select the interface that will be used to connect to the management network. |
Enter the letter of the physical interface you want to use. |
|
13 |
IP Address: |
Enter the IP address that you created for the Reporting Database. It will be associated with the physical interface you selected in the previous step. |
|
14 |
Netmask: |
Enter the netmask for use with the IP address you just entered, for example, 255.255.255.0. |
|
15 |
Default Gateway: |
Enter the default network gateway for the RBD. |
|
16 |
External Hostname (Fully-Qualified Domain Name): |
Enter the Fully-qualified domain name for the RDB. Devices will not connect to Reporting Database from the internet, so an internal hostname is OK here. |
|
17 |
Name Server 1: |
Enter the IP address of the primary name server to be used by the RDB. |
|
18 |
Name Server 2: |
Enter optional secondary and tertiary name servers as needed. Leave the fields blank and press Enter to skip specifying additional name servers. |
|
19 |
Enable remote shell access via SSH [yes/NO]: |
Enter yes to enable remote access via SSH. |
|
20 |
Enable remote shell access via Telnet [yes/NO]: |
If you want to enable Telnet access, enter yes. We recommend that you enter no. |
|
21 |
Configure NTP? [yes/NO]: |
Enter yes to configure an optional reliable time source. We recommend that you configure at least one time source, to ensure proper synchronization of time-based tasks. |
|
22 |
NTP Server 1: |
|
|
23 |
The following configuration command script was created: Commit Changes [yes/no]: |
Review the displayed command script, and enter yes. |
|
24 |
Configuration complete. Please type ‘reload’ at the CLI prompt to reboot the system and access the portal. |
Enter reload. |
|
25 |
System configuration may have been modified. Save? [yes/no] |
Enter yes. |
|
26 |
Configuration saved. Proceed with reload? |
Enter yes. The installation script continues, displaying status on the console. This may take several minutes. |
|
27 |
************************************* Mobileiron Reporting Database CLI |
|