OAuth for Sentry on MobileIron Core
OAuth is supported with Standalone Sentry for Office 365. The following scenarios must be compliant for OAuth to function correctly:
-
The email client must support OAuth (iOS Native Mail, iOS Email+ and Android Email+)
-
UEM must push an OAuth configuration to the email client
-
UEM must enable Sentry for OAuth
Configuring Sentry on MobileIron Core for OAuth
You must configure Sentry to enable OAuth and provide the endpoints.
Before you begin
-
Verify that you have Sentry 9.12 and MobileIron Core 11.0.
Procedure
-
Login to MobileIron Core with admin credentials.
-
Click Services > Sentry.
-
Click Add New > Standalone Sentry.
-
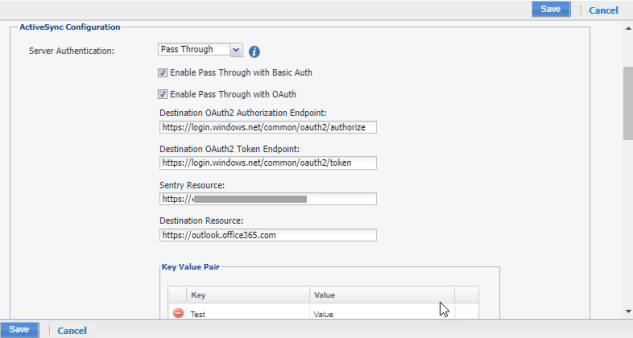
Select Enable ActiveSync and enter the following details for OAuth.
-
Select Pass Through for Server Authentication.
-
Select Enable Pass Through with OAuth.
-
Destination OAuth2 Authorization Endpoint: "https://login.windows.net/common/oauth2/authorize"
-
Destination OAuth2 Token Endpoint: "https://login.windows.net/common/oauth2/token"
-
Sentry Resource: https://<SentryHostName>
-
Destination Resource: https://outlook.office365.com/
If Active Sync servers are not added by default, then configure Active sync server as outlook.office365.com.
-
-
Click Save.
Configuring OAuth for email through Sentry on MobileIron Core
After the iOS Email+ application is installed the configuration must be pushed to the device.
Before you begin
-
Verify that you have installed iOS Email+ application.
Procedure
-
Login to MobileIron Core with admin credentials.
-
Click Services > Sentry.
-
Click Add New > Standalone Sentry.
-
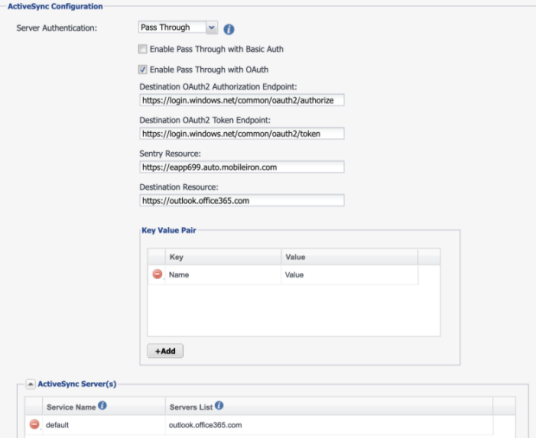
Select Enable ActiveSync and enter the following details for OAuth.
-
Select Pass Through for Server Authentication.
-
Select Enable Pass Through with OAuth.
-
Destination OAuth2 Authorization Endpoint: "https://login.windows.net/common/oauth2/authorize"
-
Destination OAuth2 Token Endpoint: "https://login.windows.net/common/oauth2/token"
-
Sentry Resource: https://<SentryHostName>
-
Destination Resource: https://outlook.office365.com/
If Active Sync servers are not added by default, then configure Active sync server as outlook.office365.com.
-
-
Click Save.
Configuring iOS native email configuration with OAuth
Before you begin
-
Verify that you have enabled "Use OAuth for Authentication" for iOS 5 and later versions.
Procedure
-
Login to MobileIron Core with admin credentials.
-
Click Policies and Configs.
-
Click Edit on the exchange configuration.
-
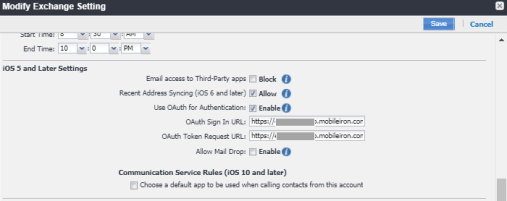
Enable Use OAuth for Authentication.
-
Under iOS 5 and Later Settings, enter the following details:
OAuth Sign In URL: https://<SentryHostName>/proxyservice/oauth2/authorize
OAuth Token Request URL: https://<SentryHostname>/proxyservice/oauth2/token
-
Click Save.
Configuring Android and iOS Email+ with OAuth
For more information on configuring Android or iOS Email+ for OAuth, see Email+ Product Documentation.
KVPs for Email+ Configuration
For OAuth, ensure to set "eas_min_allowed_auth_mode" to "modern_auth" and provide the modern_auth_authority_url and modern_auth_resource_url for appropriate OAuth configuration:
-
eas_min_allowed_auth_mode: modern_auth
-
modern_auth_authority_url: https://<SentryHostname>/proxyservice
-
modern_auth_resource_url: https://<SentryHostname>
-
email_login_certificate = tu1_<CertificateName>_Mi4man22.pfx you enrolled (select from the dropdown)
-
email_exchange_host =<sentry_address>