SNMP
Simple Network Management Protocol (SNMP) is a protocol used for network management for collecting information about network entities, such as servers and devices, on an Internet Protocol (IP) network. Various third-party SNMP systems are available that provide SNMP-based management and tools.
Sentry provides the following SNMP capabilities:
•Link up and down traps
Sentry sends these two SNMP traps (events) to a specified SNMP trap receiver using the SNMP v2c protocol.
•An SNMP server can request information from Sentry related to these MIBs:
| - | The HOST-RESOURCES_MIB |
| - | disk I/O (UCD-DISKIO-MIB) |
•Support for SNMP v2c and v3 protocols to pull MIB information from Sentry to the SNMP server.
It is recommended to use v3 protocol if you transmit information across unsecured links.
Use the SNMP screen to manage SNMP trap receivers.
Configuring SNMP on Sentry
The following provides the general workflow to configure SNMP:
- Configuring the SNMP trap receiver server to which Sentry sends SNMP traps.
- Enabling the SNMP service with the v3 protocol from whom Sentry accepts requests.
- Enabling the SNMP service with the v2c protocol between Sentry and your SNMP server.
Configuring the SNMP trap receiver server
Configure the server to which Sentry sends SNMP traps. This server can also get MIB information from Sentry.
Procedure
- Log into Sentry.
- Go to Settings > SNMP to open the SNMP details pane.
- Click Add to open the Add SNMP Trap Receiver window.
- Edit the fields, as necessary.
Refer to the SNMP table for details. - Click Apply > OK to save the changes.
Add SNMP trap receiver field description
The following table summarizes fields and descriptions in the Add SNMP Trap Receiver window:
|
Fields |
Description |
|
Server |
Enter the IP address or server name for your SNMP trap receiver. For example: |
|
Port |
By default, port 162 is configured. Edit this field if you are using a different port. |
|
Community |
Enter the string which names the SNMP community on your SNMP trap receiver. |
|
Version |
Sentry sends SNMP traps using SNMP protocol v2c. |
|
Admin State |
Select Enable to enable the SNMP service for this SNMP server. |
Editing a trap receiver
To edit an SNMP trap receiver, navigate to Settings > SNMP in the Standalone Sentry System Manager.
Procedure
- In the Standalone Sentry System Manager, navigate to Settings > SNMP.
- In the SNMP screen, select the link for the trap receiver you want to edit:
- Make your changes.
- Click Save.
Deleting SNMP trap receiver servers
To delete one or more SNMP trap receiver, navigate to Settings > SNMP in the Standalone Sentry System Manager.
Procedure
- In the Standalone Sentry System Manager, navigate to Settings > SNMP to open the SNMP details pane.
- Select one or more of the servers you want to delete.
Click the box next to Server to select all servers in the list. - Click Delete > Yes.
Enabling the SNMP service with the v3 protocol
Set up the SNMP v3 user from whom Standalone Sentry accepts requests. In addition, you can enable or disable sending traps to any configured SNMP trap receiver.
Procedure
- Log into Standalone Sentry System Manager.
- Go to Settings > SNMP to open the SNMP details pane.
- In the SNMP Control section, select Enable for SNMP Service to enable the SNMP service on Standalone Sentry.
-
Go to the Protocol option and verify that v3 is selected.
The v3 option is selected, by default.Figure 1. SNMP service
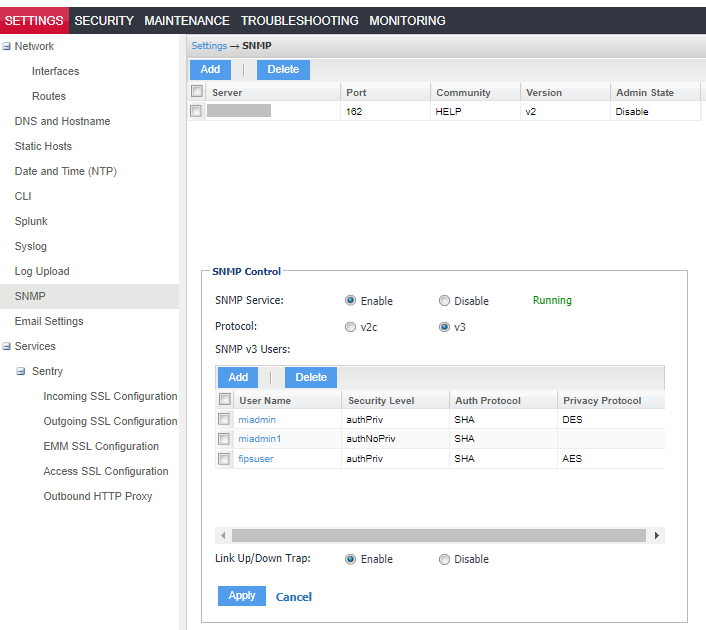
- Click Add to open the Add SNMP v3 User window.
- Enter the SNMP v3 user fields, as necessary.
- Click Save to add this user to the SNMP v3 Users table.
- Go to Link Up/Down Trap.
- Select Enable.
Select Disable to stop Sentry from sending SNMP traps to any SNMP trap receiver. - Click Apply > OK to save the changes.
Refer to the SNMP v3 User field description for details.
SNMP v3 User field description
The following table describes the SNMP v3 user fields.
|
Fields |
Description |
|
User Name |
Enter the username without any spaces (example: miuser). |
|
Security Level |
Select asecurity level for authentication. The options are: •noAuthNoPriv: Without Authentication or Privacy. •authNoPriv: With Authentication and without Privacy •authPriv: With Authentication and with Privacy |
|
Auth Protocol |
Select an authentication protocol. This can be selected only if the Security Level is selected as authNoPriv or authPriv. |
|
Auth Password |
Enter a password for authentication. The password must contain at least characters. |
|
Privacy Protocol |
Select a privacy protocol. This can be selected only if Security Level is selected as authPriv. |
|
Privacy Password |
Enter a privacy password with minimum of 8 characters. |
Deleting SNMP v3 users
The following describes how to delete one or more SNMP v3 users.
Procedure
| 1. | Log into Sentry. |
| 2. | Go to Settings > SNMP to open the SNMP details pane. |
| 3. | Go to the SNMP Control group. |
| 4. | Select one or more of the users you want to delete. |
Click the box next to User Name to select all users in the list.
| 5. | Click Delete > Yes. |
Enabling the SNMP service with the v2c protocol
Set up the SNMP v2c communication between Sentry and your SNMP server. You also enable or disable sending traps to any configured SNMP trap receiver.
Procedure
- Log into Sentry.
- Go to Settings > SNMP to open the SNMP details pane.
- Go to the SNMP Control section > SNMP Service.
- Select Enable to enable the SNMP service on Standalone Sentry.
- Go to the Protocol option and select v2c.
- Change the value of Read Only Community if necessary.
The standard SNMP community string name is public. This is the community string that the SNMP server uses to pull MIB information from Sentry. - Go to the Link Up/Down Trap option and select Enable.
Select Disable to stop Sentry from sending SNMP traps to any SNMP trap receiver. - Click Apply > OK to save the changes.
Editing the Read Only Community string
The community string is available for v2 protocol. The default community string for the SNMP is set to public. To change this string, navigate to Settings > SNMP in the Standalone Sentry System Manager.
Procedure
| 1. | In the Standalone Sentry System Manager, navigate to Settings > SNMP. |
| 2. | Edit the default string. |
| 3. | Click Apply. |