Installing Standalone Sentry ISO on a VM
The following provide the steps for installing the Standalone Sentry ISO on a virtual machine (VM):
Installing Standalone Sentry ISO on VMware
This section provides instructions on how to download the Standalone Sentry ISO to VMware.
Procedure
|
1.
|
Place the ISO distribution in an existing vSphere datastore. |
|
2.
|
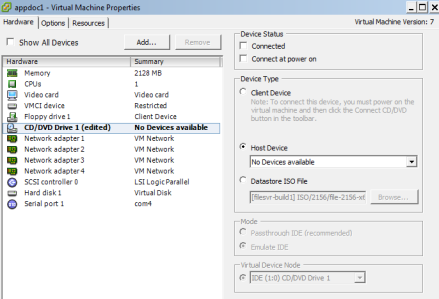
In the vSphere Client, select the Edit Settings option for the VM you created. |
Figure 1. Virtual machine in VMware
|
3.
|
Select Datastore ISO File. |
|
4.
|
Click Browse to select the Sentry ISO distribution. |
|
5.
|
Make sure the “Connected” and “Connect at power on” options in the Virtual Machine Properties screen are selected. |
The VM automatically installs and reloads after a few minutes, and the installation program starts. See Using the setup wizard to complete Standalone Sentry installation for the next steps.
Installing Standalone Sentry ISO on Hyper-V
This section provides instructions on how to download the Standalone Sentry ISO to Hyper-V.
Procedure
|
1.
|
Log into your Windows server. |
|
2.
|
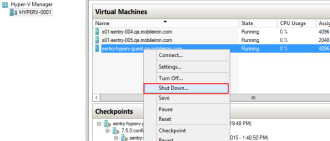
From a web browser, download the ISO to the VM datastore. |
Figure 2. Virtual machine in Hyper-V manager
|
3.
|
In the Hyper-V Manager, select the Virtual Machine (VM) and shut it down by right clicking on the VM and clicking Shutdown. |
|
4.
|
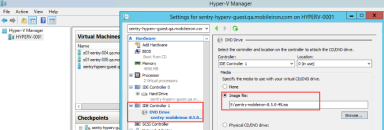
Right-click on the VM and click on Settings. |
Figure 3. Location of the image file
|
5.
|
Click on DVD Drive and select Image file. |
|
7.
|
Right-click on the VM and click on Start to start the installation. |
See Using the setup wizard to complete Standalone Sentry installation for the next steps.
Installing Standalone Sentry ISO on OpenStack KVM
OpenStack instances cannot be deployed using an ISO. The steps included here also describe how to create a disk format that is compatible with OpenStack from the Standalone Sentry ISO.
Before you begin
Download the Standalone Sentry image from the download site.
Procedure
|
1.
|
Login to the OpenStack dashboard. |
|
2.
|
Create an image from the Standalone Sentry ISO: |
|
a.
|
Click Project/Compute/Images > Create Image. |
Image Name: Enter, sentryversion#MasterISO (Example: sentry920MasterISO).
Image Description: Enter a description (Example: Image used to create the Sentry image).
Browse: Navigate to the location of the ISO image that you previously downloaded and upload the image.
Format: Enter, ISO.
Use the default values for all other options.
Once the image is created, the status changes to Saving. After a few minutes, refresh the page and the status should change to Active.
|
3.
|
Create an instance using the image you created: |
|
a.
|
Click Project/Compute/Instances > Launch Instance. |
Instance Name: Enter a name for the instance (Example: sentrytest1)
Select Boot Source: Select Image.
Create New Volume: Select NO.
Available: Click the up arrow next to image you just created from the Standalone Sentry ISO.
The image is moved under Allocated.
Available: Click the up arrow next to the flavor type.
The image is moved under Allocated.
Available: Click the up arrow next to the network name.
The image is moved under Allocated.
|
e.
|
Use default values for all other sections. |
|
f.
|
Click Launch Instance. |
After the Status shows Active for the instance, proceed to the next step.
|
a.
|
Click Project/Compute/Volumes > Create Volume. |
Volume Name: Enter a name. (Example: sentryMastervol1).
Size: 5
Use the default values for all other sections.
|
5.
|
Attach the volume to the instance: |
|
a.
|
Select the check box next to the volume (sentryMastervol1) you just created. |
|
b.
|
For Edit Volume, select Manage Attachments from the drop-down menu. |
|
c.
|
For Attach To Instance, select the Standalone Sentry instance (sentrytest1) you previously created. |
|
6.
|
Login to the console of the Standalone Sentry instance (sentrytest1) and start the Standalone Sentry install: |
|
a.
|
Click Project/Compute/Instances > Name of the Standalone Sentry instance (sentrytest1) |
|
b.
|
Go to the Console tab and click the Send CtrlAltDel button. |
|
c.
|
From the Boot menu, enter openstack-install, and click Enter. |
Standalone Sentry installation starts.
After installation is completed, the Standalone Sentry instance restarts and returns to the installation boot menu.
The instance creation is not yet done. Follow the next steps to create the Standalone sentry instance with the extracted volume.
|
7.
|
Create an image using the volume (sentryMastervol1) for the Standalone Sentry instance: |
|
a.
|
Click Project/Compute/Volumes and select the check box next to the volume (sentryMastervol1). |
|
b.
|
Click the down arrow next to Edit Volume and select Upload to Image. |
Image Name: Enter sentryversion#MasterIMG (Example: sentry920MasterIMG).
Disk Format: Enter Raw.
After the upload is done, click Images to view the newly created image.
|
8.
|
Delete the instance (sentrytest1): |
|
a.
|
Click Project/Compute/Instances, and select the check box next to the instance (sentrytest1). |
|
b.
|
Click Delete Instances. |
|
9.
|
Delete the image created from the Standalone Sentry ISO, the Standalone Sentry instance, and the volume: |
|
a.
|
Click Project/Compute/Instances, and select the check box next to the instance (sentrytest1). |
|
b.
|
Click Delete Instances. |
|
c.
|
Click Project/Compute/Instances, and select the check box next to the volume (sentryMastervol1). |
|
e.
|
Click Project/Compute/Instances, and select the check box next to the ISO image (sentry920MasterISO). |
|
f.
|
Click Delete ISO Images. |
|
10.
|
Launch the Standalone Sentry instance. |
|
a.
|
Go to Images, and select the newly created Standalone Sentry image (sentry920MasterIMG). |
|
b.
|
Click Launch to create a new Standalone Sentry instance. |
|
c.
|
For Volume, select No. |
The instance created here does not required a volume.