Installing and Configuring the Connector OVA
If you are not installing and configuring the MobileIron Cloud Connector OVA:
•Skip ahead to Deploying MobileIron Connector in AWS if you are deploying Connector in AWS.
•Skip ahead to Connector Requirements if you are not installing the Connector OVA and you are not deploying Connector in AWS.
Requirements
•For VMWare ESX/ESXi, use one of the following:
| - | VMware ESX/ESXi 5.x, with datastore created (Do not install a host OS; boot from the Connector ISO.) |
| - | VMWare ESX v6.5 |
•For Hyper-V, use one of the following:
| - | Microsoft Hyper-V Server 2012 |
| - | Microsoft Hyper-V Server 2012 R2 |
•64-bit VM
•4 GB Memory
•50 GB Disk
•Two CPUs of 2GHz
•Network adapter (use E1000)
•VM OS Type: Red Hat Linux 5 64 bit. The OS is CentOS v7 and CentOS is a selectable option in ESX v6.0 and 6.5.
•CPU Settings: - Shares: Normal - Reservation: 900MHz - Limit: Unlimited (maximum assigned)
•Memory Settings: - Shares: Normal - Reservation: 1.5GB - Limit: Unlimited (maximum assigned)
Installing the OVA
To install the OVA:
| 1. | Download the Connector OVA package from https://support.mobileiron.com/cloud-connector-vm. |
| 2. | Login into VM client. |
| 3. | Navigate to Deploy OVF template. |
| 4. | Select 1a Select source.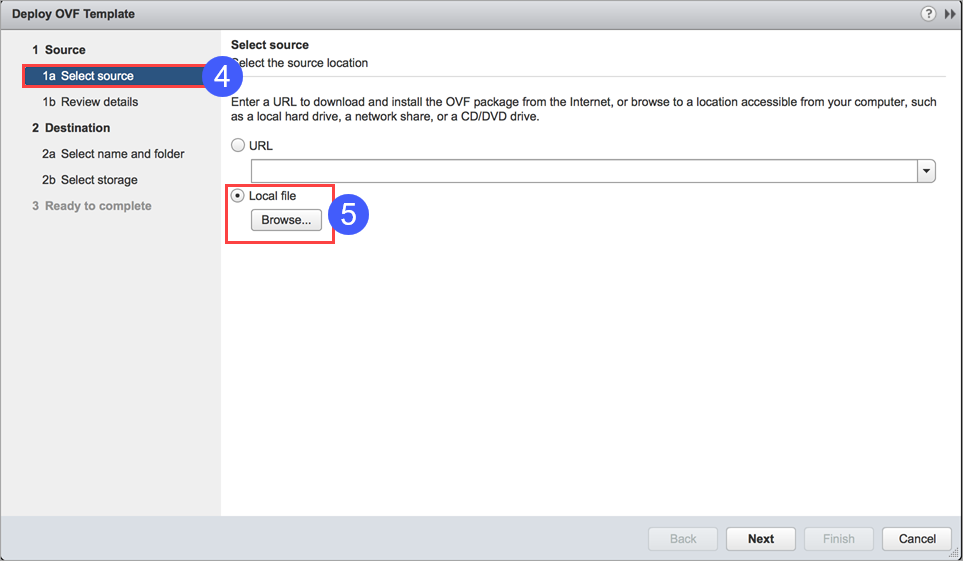 |
| 5. | Select Local file and browse to the ova file you downloaded in step 1. |
| 6. | Once the VM is ready, then use launch console to configure the following: |
| - | System properties/admin account settings. See System properties and SSH admin account setup for guidance. |
| - | Network settings. See System properties and SSH admin account setup for guidance. |
| - | Configuration settings. See Final configuration settings. |
During the configuration, you will be prompted to set the following credentials:
| - | privileged access: provides access to the more important Connector CLI commands |
| - | SSH administrator: provides access to the Connector CLI basic commands |
You will also need to provide the Tenant Admin credentials you received when you signed up for the device management service.
System properties and SSH admin account setup
|
Prompt |
What to Do |
|---|---|
|
End User Licensing Agreement/Terms of Use |
Enter yes to accept. |
|
Enter a privileged access password |
Set a password for privileged access (6-20 alphanumeric characters). |
|
Confirm password |
Re-enter the password you just set. |
|
Administrator user name |
Enter the admin name |
|
Enter administrator password |
Enter the password |
|
Confirm password |
Re-enter the password you just set. |
|
Fully qualified domain name for this system (ex: myhost.myserver.com): |
Enter the fully-qualified domain name for this system. |
|
Default domain: |
Enter the default domain for this system. |
|
Skip ip address settings. If you skip this step DHCP will be user. (yes/no) |
Press <Enter> |
|
IP Address |
Enter the IP address for this system. |
|
Netmask: |
Enter the subnet mask associated with the IP address you just entered. |
|
Skip dns server setting. If you skip this step default DNS servers will be used. (yes/no) [no]: |
Press <Enter> |
|
Default gateway address: |
Enter the default gateway address for this system |
|
DNS name server 1 address: |
Enter the IP address for a DNS name server. |
|
DNS name server 2 address: |
Enter the IP address of another name server, or press Enter "none" and go to step 9 if you have finished entering name servers. |
|
DNS name server 3 address: |
Enter the IP address of another name server, or press Enter if you have finished entering name servers. |
|
Enable remote shell access via SSH (yes/ no): |
Enter yes to enable SSH access. |
|
Enable the NTP service (yes/no): |
Enter yes to enable the optional NTP service and begin specifying time sources. |
|
NTP server 1 hostname or address: |
Enter the hostname or IP address of a time source. |
|
NTP server 2 hostname or address: |
Enter the hostname or IP address of another time source, or press Enter and go to step 15 if you are finished entering time sources. |
|
NTP server 3 hostname or address: |
Enter the hostname or IP address of another NTP server, or press Enter "if you are finished entering NTP servers |
|
Specify an HTTP proxy (yes/no): |
Enter yes to set up an HTTP proxy or enter no to skip this step. |
|
Enter a time in24 hour format in UTC timezone to |
Enter the time at which you would like the service to check for Connector software updates. Example, to specify 2 pm as the time to check for updates, enter 14:00. If updates are found, they will be applied automatically. |
Final configuration settings
|
Prompt |
What to do |
|---|---|
|
Apply this configuration? |
Enter yes. The settings you entered are applied. After several minutes, a SUCCESS message indicates that Connector installation is complete. Next, the Connector registration process begins. |
|
Enter your Tenant Admin Username: |
Enter the Tenant Admin username you received when you signed up for the device management service. |
|
Password: |
Enter the Tenant Admin password. |
Troubleshooting a failed installation
If Connector registration fails, the following message displays:
You must register this Connector. You may do this at any time by running the following command (You will be prompted for your Tenant Admin Credentials): Confirm your Tenant Admin credentials and restart the registration process with the following steps: 1. Enter the following command: 2. enable 3. Enter the privileged password you set. 4. Enter the following command if you are ready to register your Connector: connector register
See Maintenance and Troubleshooting for useful troubleshooting commands and techniques.