Installing and Configuring the Connector OVA
If you are not installing and configuring the Ivanti Neurons for MDM Connector OVA:
-
Skip ahead to Deploying Connector in AWS if you are deploying Connector in AWS.
-
Skip ahead to Connector Requirements if you are not installing the Connector OVA and you are not deploying Connector in AWS.
Requirements
-
For VMware ESX/ESXi, use one of the following:
-
VMware ESX/ESXi 5.x, with datastore created (Do not install a host OS; boot from the Connector ISO.)
-
VMware ESX v6.5 or 7.0.
-
-
For Hyper-V, use one of the following:
-
Microsoft Hyper-V Server 2012
-
Microsoft Hyper-V Server 2012 R2
-
Microsoft Hyper-V Server 2016
-
-
64-bit VM
-
4 GB Memory
-
50 GB Disk
-
Two CPUs of 2GHz
-
Network adapter (use E1000)
-
VM OS Type: Red Hat Linux 5 64 bit. The OS is CentOS v7 and CentOS is a selectable option in ESX v6.0, 6.5, and 7.0.
-
CPU Settings: - Shares: Normal - Reservation: 900MHz - Limit: Unlimited (maximum assigned)
-
Memory Settings: - Shares: Normal - Reservation: 1.5GB - Limit: Unlimited (maximum assigned)
Installing the OVA
Install the OVA as follows:
-
Download the Connector OVA package from https://support.mobileiron.com/cloud-connector-vm.
-
Login into VM client.
-
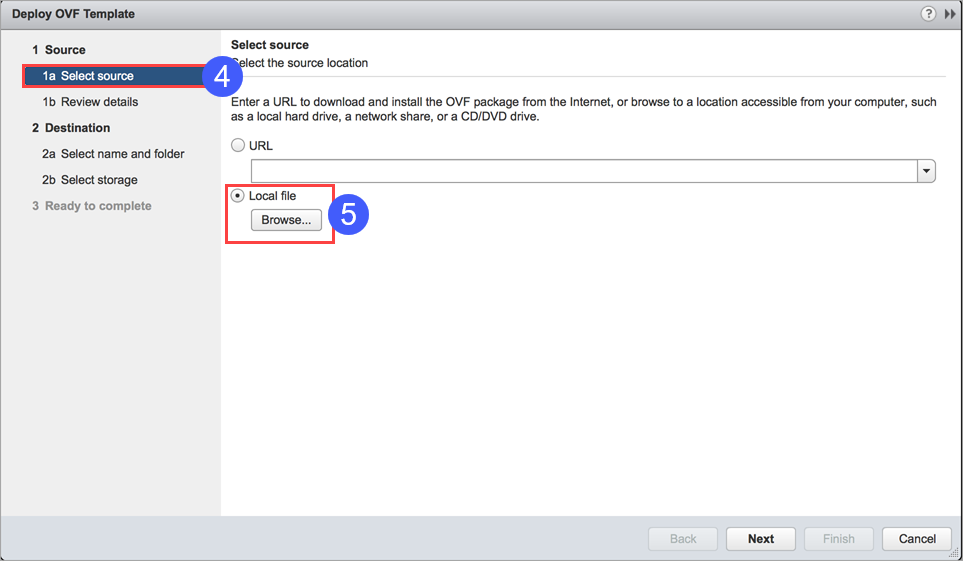
Navigate to Deploy OVF template.
-
Select 1a Select source.

-
Select Local file and browse to the ova file you downloaded in step 1.
-
Once the VM is ready, then use launch console to configure the following:
-
System properties/admin account settings. See System properties and SSH admin account setup for guidance.
-
Network settings. See System properties and SSH admin account setup for guidance.
-
Configuration settings. See Final configuration settings.
During the configuration, you will be prompted to set the following credentials:
-
privileged access: provides access to the more important Connector CLI commands
-
SSH administrator: provides access to the Connector CLI basic commands
You will also need to provide the Tenant Admin credentials you received when you signed up for the device management service.
-
-
System properties and SSH admin account setup
|
Prompt |
What to Do |
|---|---|
|
End User Licensing Agreement/Terms of Use |
Enter yes to accept. |
|
Enter a privileged access password |
Set a password for privileged access (6-20 alphanumeric characters). |
|
Confirm password |
Re-enter the password you just set. |
|
Administrator user name |
Enter the admin name |
|
Enter administrator password |
Enter the password |
|
Confirm password |
Re-enter the password you just set. |
|
Fully qualified domain name for this system (ex: myhost.myserver.com): |
Enter the fully-qualified domain name for this system. |
|
Default domain: |
Enter the default domain for this system. |
|
Skip ip address settings. If you skip this step DHCP will be user. (yes/no) |
Press <Enter> |
|
IP Address |
Enter the IP address for this system. |
|
Netmask: |
Enter the subnet mask associated with the IP address you just entered. |
|
Skip dns server setting. If you skip this step default DNS servers will be used. (yes/no) [no]: |
Press <Enter> |
|
Default gateway address: |
Enter the default gateway address for this system |
|
DNS name server 1 address: |
Enter the IP address for a DNS name server. |
|
DNS name server 2 address: |
Enter the IP address of another name server, or press Enter "none" and go to step 9 if you have finished entering name servers. |
|
DNS name server 3 address: |
Enter the IP address of another name server, or press Enter if you have finished entering name servers. |
|
Enable remote shell access via SSH (yes/ no): |
Enter yes to enable SSH access. |
|
Enable the NTP service (yes/no): |
Enter yes to enable the optional NTP service and begin specifying time sources. |
|
NTP server 1 hostname or address: |
Enter the hostname or IP address of a time source. |
|
NTP server 2 hostname or address: |
Enter the hostname or IP address of another time source, or press Enter and go to step 15 if you are finished entering time sources. |
|
NTP server 3 hostname or address: |
Enter the hostname or IP address of another NTP server, or press Enter "if you are finished entering NTP servers |
|
Specify an HTTP proxy (yes/no): |
Enter yes to set up an HTTP proxy or enter no to skip this step. |
|
Enter a time in24 hour format in UTC timezone to |
Enter the time at which you would like the service to check for Connector software updates. Example, to specify 2 pm as the time to check for updates, enter 14:00. If updates are found, they will be applied automatically. |
Final configuration settings
|
Prompt |
What to do |
|---|---|
|
Apply this configuration? |
Enter yes. The settings you entered are applied. After several minutes, a SUCCESS message indicates that Connector installation is complete. Next, the Connector registration process begins. |
|
Enter your Tenant Admin Username: |
Enter the Tenant Admin username you received when you signed up for the device management service. |
|
Password: |
Enter the Tenant Admin password. |
Troubleshooting a failed installation
If Connector registration fails, the following message displays:
You must register this Connector. You may do this at any time by running the following command (You will be prompted for your Tenant Admin Credentials): Confirm your Tenant Admin credentials and restart the registration process with the following steps: 1. Enter the following command: 2. enable 3. Enter the privileged password you set. 4. Enter the following command if you are ready to register your Connector: connector register
See Maintenance and Troubleshooting for useful troubleshooting commands and techniques.