App Catalog
This section contains the following topics:
- Licensing for app features
- Switching between list and grid view
- Adding Google Play Store app for Android Enterprise
- Adding an app from a public store
- Adding an In-house app
- Delegating device permissions for Android Enterprise In-house apps
- Displaying the provisioning profile status for iOS in-house apps
- Updating provisioning profile for iOS in-house apps
- Deploying in-house apps to Google Play
- Adding a web app for Android Enterprise devices
- Adding a web app for iOS devices
- Using Advanced Search
Use the App Catalog page to manage your app catalog. The app catalog lists the mobile apps you have made available for your users. These include apps that users can download from public app stores and apps you intend to distribute using Ivanti Neurons for MDM (in-house apps). AppConnect-enabled apps, GoClient for iOS, and M@W for macOS are also available as business apps on the App Catalog page, thereby simplifying the process of importing them for configuration and distribution. In MAM-Only devices, iOS users will be prompted to select the certificate to authenticate access to these apps when they open the app catalog.
M1 chipset MacBooks by Apple supports iPhone and iPad VPP apps. Only the administrator can push the supported iPhone and iPad VPP apps. This option is not available for users to install from App Catalog.
For the Ivanti Neurons for MDM tenants with Android devices, if Android enterprise is not enabled by the end of March 2021, administrators will not be able to search for apps with the names. Communication on this change is displayed with a banner message when accessing the App Catalog page. This banner message continues to be displayed till Android enterprise is enabled on these tenants and until the 'Don't show this again' checkbox option is not selected.
- Silent App Install method is not available for public macOS apps. The macOS apps can also be deployed through Apple Apps and Books via device-based licenses and through the Silent App Install method on enrollments.
- While uploading the Go app to Ivanti Neurons for MDM server, if there is a need for you to select the Convert to managed app option, then you also need to enable the Install on Device option.
- App Catalog and app installation are not supported for Sonim XP5s devices.
- Android does not allow apps with active admin privileges to be uninstalled. To uninstall such an app, go to Device Settings > Security > Device Administrators and disable the Device Administrator privileges. Then, uninstall the app.
- In-house Android apps cannot be uploaded if the app is compressed or obfuscated.
- Public apps are not supported on Shared iPads.
- Due to a limitation from Apple, for Business-to-Business (B2B) iOS apps available in the App Catalog, descriptions and screenshots of the apps are not available in the Details tab.
- When you search for an app in the App Catalog or Admin portal, the search results will be based on App Name, Comment, Description, Display Version, and What's New. If the searched app data matches with any of these fields, it will be displayed as a search result.
Licensing for app features
The following App Catalog features require additional licensing:
- Silent app install/uninstall: Silver license
- Per-app configuration: Gold license
- AppConnect custom configuration: Gold license
- Android Enterprise custom configuration: Silver license
If an Android device is in kiosk mode:
Only in-house apps can be installed while the device is in Kiosk Mode. You can install public apps, but the device must exit Kiosk Mode before those apps can be installed. Also, you can limit the apps available for use on devices in Kiosk Mode to only the apps that are approved or Allowlisted by your company. On devices using Android 4.1, If an approved app launches an app not included on the Allowlist, that app will launch and then be quickly minimized. On devices using Android 5.0, the unapproved app launched from a Allowlisted app will remain available.
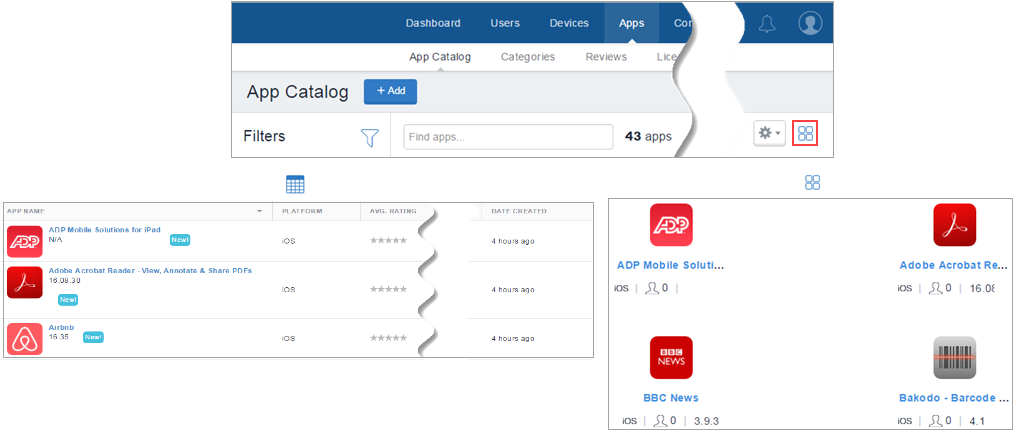
Switching between list and grid view
Click the List or Grid icon on the right side of the App Catalog screen.
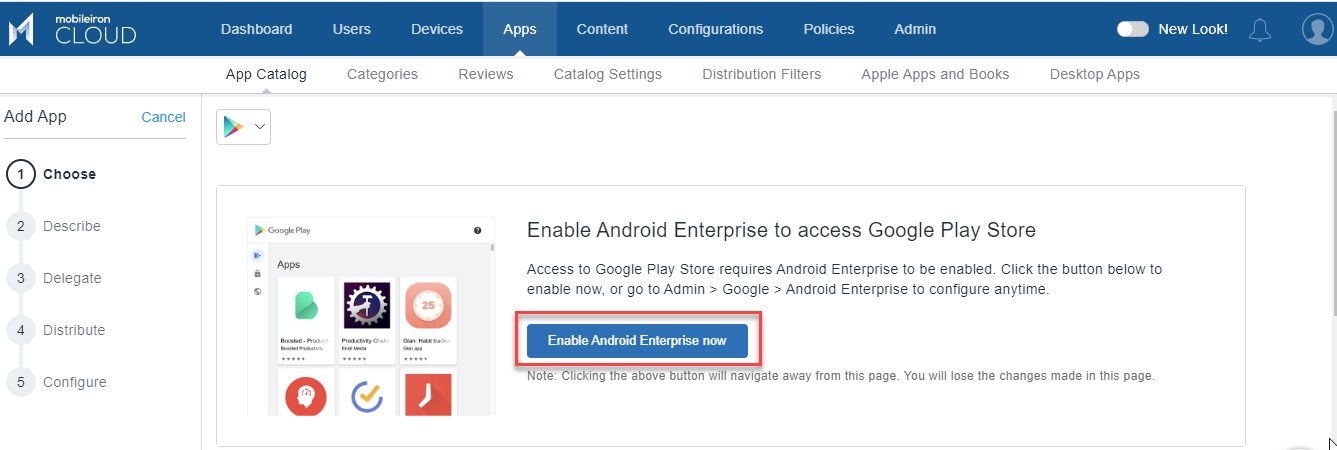
Adding Google Play Store app for Android Enterprise
- You can add an app from a Google Play Store to the app catalog and make it available to the users. To add an app from Google Play Store in Android Enterprise, it is required to approve an app to be included in the app catalog.
- The Google Play Store layout for Android Enterprise devices has a home page for migrated devices which is managed from Core and has a quick link to Ivanti Neurons for MDM that displays all the applications that are managed from Ivanti Neurons for MDM. Starting from Ivanti Neurons for MDM release 80, when you migrate Android Enterprise devices from Core to Ivanti Neurons for MDM, only the applications that are common between Core and Ivanti Neurons for MDM App Catalog are listed in the work profile Google Play Store of the device. You can click on the Ivanti Neurons for MDM button to view the list of all the applications that are available from Ivanti Neurons for MDM App Catalog.
The Google Play Store layout for Android Enterprise devices has a home page for migrated devices which is managed from Core and has a quick link to Ivanti Neurons for MDM that displays all the applications that are managed from Ivanti Neurons for MDM. Starting from Ivanti Neurons for MDM release 80, when you migrate Android Enterprise devices from Core to Ivanti Neurons for MDM, only the applications that are common between Core and Ivanti Neurons for MDM App Catalog are listed in the work profile Google Play Store of the device. You can click on the Ivanti Neurons for MDM button to view all the applications that are available in Ivanti Neurons for MDM App Catalog.
Prerequisite
-
You must enable Android Enterprise to access and add Google Play store applications to the App catalog.
Procedure
-
Go to Apps > App Catalog.
-
Click Add (top left).
Select Google Play from the drop-down list to search for an app in the Google Play Store. Google Play iFrame is displayed when Android enterprise is enrolled.
- Search for the app in the Search field and click on the app.
- Click APPROVE to approve the app to be available for the users. A confirmation window is displayed with the details of the access provided to the app. Click APPROVE.
- Select any of the following options to handle new app permission request:
- Click SAVE.
An approved app can later be unapproved by clicking UNAPPROVED.
|
Option |
Description |
|---|---|
|
Approval Settings |
|
|
Keep approved when app requests new permissions |
Allows users to install updated app |
|
Revoke app approval when this app requests new permissions |
Removes the app from the store until it is re-approved. |
|
Approval Settings |
|
|
Add Subscriber |
Enter the email address to add subscribers to email notifications when the apps you have approved request new permissions. |
Adding an app from a public store
You can add an app from a public store to the app catalog and make it available to the users.
Procedure
-
Go to Apps > App Catalog.
-
Click Add (top left).
-
Choose the app you want:
-
Select the public app store.
-
Enter the name of the app.
-
Select the app from the list.
-
Click Next.
-
-
Describe the app for users:
-
Add or remove categories.
-
Enter an optional description.
-
Click Next.
-
- Define app distribution:
-
Select a distribution option.
- The device is a supervised iOS device for new app installs and app updates.
- The device is a iOS non-supervised device for app updates.
- The users who have enrolled in the Apps and Books program.
- The device is a Samsung Knox device and the silent installation option below has been selected.
- Click Next
- Select a promotion option:
-
Not Featured
-
Featured List
-
Banner
- Click Done.
Use the following guidelines to complete the options:
|
Setting |
What To Do |
|---|---|
|
Install on Device |
Select this option to start installation immediately after registration. The user will be prompted to confirm installation of the app except under the following conditions: For iOS public apps, when installed for the first time in the device, the App Catalog displays 'Reinstall' button that allows the user to install the app again. The reinstall is performed if app version on device is different from the version on iOS app store. |
|
Do not show app in end user App Catalog |
Select this option if you do not want the user to see the app in the app catalog on the device. |
|
Set App Install Priority |
Select High, Medium or Low to set the priority of the app installation during user onboarding. Only high priority apps gets installed during user onboarding . |
|
Suspend app repush after a set number of failed attempts (iOS only) |
Switch the toggle switch to ON to suspend the re-push of app after a set number of failed re-push attempts using the following settings: Stop repush after - Enter the number of failed re-push attempts after which the re-push should be stopped. The values entered should be within 1 to 999 failed attempts and try again after - Enter the number of hours required after the failed re-push to action the re-push again. The values entered should be within 3 to 48 hours. |
|
This option does not apply to public apps. |
|
|
(iOS and macOS only) Enable Per-App VPN for this app |
Select this option to use a Per-App VPN configuration with this app. Select the Per App VPN configuration to be used from the drop-down list. For macOS, select Tunnel Per App VPN configuration only. |
|
(iOS only) Prevent backup to iCloud and iTunes |
Select this option to keep data related to this app from being backed up to iCloud and iTunes. |
|
(iOS only) Remove apps on un-enrollment |
Select this option to remove this app once the device is no longer managed by Ivanti Neurons for MDM. |
|
(iOS only) AppConnect Custom Configuration |
For AppConnect-enabled app, enter the keys and values that specify your custom configuration preferences. See the documentation for the app for available keys. |
|
iOS 7+ Managed App Settings |
Enter keys and values defined for this app as an iOS 7+ managed app. See the documentation for the app for information on supported keys. |
Android Enterprise apps will have different options.
When you search for a Windows app in the App Catalog, you can search the app that matches closely by using the App Name or AppStore ID options from the drop down list:
- App Name - Select this option and provide the App Name
- AppStore ID - Select this option and provide the AppStore ID
The search by AppStore ID does not support Win32 store apps (app ids starting with 'X').
Adding an In-house app
You can upload an in-house app to the app catalog with the following file formats. A large file could take several minutes to upload. The number of in-house application versions is limited to 100. If that number is exceeded, the Ivanti Neurons for MDM system purges the oldest versions of the application. The status of the application upload and purge is listed and is visible from the Audit Trails page.
MIP app inventory returned by Mobile@Work may be incorrect for few apps. Mobile@Work may fail to detect the installation status of apps that are not installed in default location. For such apps, adding the detection script will help in identifying the right state of the app on the device. Mobile@Work determines the presence of the app if the exit code of the detection script is 0. For any other exit codes, the app will be determined as not installed. Based on the apps detected, Mobile@Work prepares the inventory report for the device.
- IPA (iOS)
- MIP (Packager macOS app)
- PKG (macOS)
- APK (Android)
- APPX, APPXBUNDLE, EXE, and MSI (Windows)
For applications such as PKG with scripts or DMGs having PKG with scripts, the Mobile@Work for macOS can only detect a successful install request. It will not report if the app has been deleted or if the scripts that were installed were removed. Therefore, the Ivanti Neurons for MDM server will be unable to resend an install command. If the connection is disconnected while downloading the apps, retry the app installation by doing a check-in. For MIP apps, even if the app is removed from the device installed by PKG or DMG having PKG with script in it, Mobile@Work will not the install the MIP app if the entry of the PKG exists in the receipts folder of the client device.
Procedure
-
Go to Apps > App Catalog.
-
Click Add (top left).
-
Drag the app file to the dotted box, or click Choose File to select it from your file system and click Confirm.
-
Click Next (lower right).
-
Describe the app for users and configure prerequisite apps:
-
Add categories.
-
When adding a macOS package, if the package file contains more than one app (for example, Microsoft Office and Cisco AnyConnect packages), then the selected primary apps will be used to identify that the package is installed. Per-app VPN, if configured, will be applied to these apps.
-
Enter an optional description.
- MSI product code: When uploading the MSI apps, the product code of the MSI app is auto-populated in this field.
-
Override URL: Enter an optional App Source URL Override to allow downloading the app from a different source or to allow obtaining large files, such as
- For iOS apps, the app Override URLs must be in HTTP or HTTPS format only.
- For
- For macOS apps, the URL should end with the extension, which is .pkg.
- Command Line (Windows 32-bit MSI apps only): Enter an optional Command Line switch to specify additional information that are not part of the package while deploying the MSI files. For example, to write installation logs to an output file, you can enter "/log output.txt" in this field. This creates the output.txt file in the C:\Windows\System32 folder. By default, the Command Line option /qn for silent installation is auto-populated during MSI app upload.
- .EXE for Win32 only: Installed through Bridge using the Admin PowerShell mode. The Bridge functionality will be automatically used, if available.
- Update version to maintain consistency between the Display Version and Bundle Version
- Installer (.EXE) location
- Installer command line parameters: argument to silently run the file (for example, /SILENT or /VERY SILENT) is mandatory
- Installer run as user: to install using user's credentials, select 'Run as User' option
- For Packager macOS apps, configure prerequisite apps (optional). See Understanding Packager in-house macOS apps for an overview of prerequisite app functionality.
- Launch URL: Enter the custom URL for launching the app in AppStation. Required only when adding non-AppConnect apps for distribution in a MAM-only deployment with AppStation and is applicable only for iOS apps.
- Configure app delegation.
- Click Next.
- Click Next.
The package name of the MSI app to be uploaded should not be added as part of Command Line arguments. If added, the upload will be restricted until the app's package name is removed from the Command Line arguments. A list of all the supported Command Line options is provided under the additional link. This link will be visible in the app's View and Edit mode.
Once you delegate a prerequisite app and it becomes a prerequisite app for the app from the non-default space, you cannot un-delegate that app unless you remove the prerequisite relationship first.
-
- (Optional) Add screenshots of the app.
- (Optional) Add or replace icons for the app (iOS, MacOS, and Windows apps).
- Click Next.
- For Packager macOS apps, define or select installation scripts to run before and/or after app installation. Select one or both of the following scripts by typing in the search box or clicking the link to see the list of scripts. Click Next.
- Pre Install Scripts - Enter the script name to select the script to run before app installation. The pre-install scripts will be run or retried till the script execution success status is received from the client. Only after that, the app install command is sent. You can view the script run status in the device details page in the Logs tab.
- Post Install Scripts - Enter the script name to select the script to run after app installation.
- Uninstall Scripts: Enter the script name that server sends to a device when it detects that an app is no longer distributed to the device.
- Detection Scripts: Enter the script name that server sends to a device to detect an app. The result of the detection script of the app overrides the default inventory result of the app on the device. Irrespective of whether the App is distributed to the device or not, the detection script of all apps will be sent to the device to evaluate the existence of the apps on the device.
- Define app distribution:
- Select a distribution option.
- Expand the Advanced Options & App Configuration section.
- Use the following guidelines to complete the options:
- The device is a supervised iOS device.
- The device is a Samsung Knox device and the silent installation option below has been selected.
- Click Next.
- Select a promotion option:
- Not Featured
- Featured List
- Banner
- Click Done.
A sample detection script is shown below:
#!/bin/bash
app_name="Name of the App"
count="$(system_profiler SPApplicationsDataType | grep "$app_name" -c)"
echo "$app_name count $count"
if [ $count -ge 1 ]
then
echo "$app_name is installed"
else
echo "$app_name is not installed"
exit 1
fi
exit 0
You can create the scripts in the Admin > All Scripts page. If you upgrade the app, you can choose to copy the scripts from the older app and run the scripts for the upgraded app. If you skip this section, you can configure scripts by editing the app later.
|
Setting |
What To Do |
|
Install on Device |
Select this option to start installation immediately after registration. The user will be prompted to confirm installation of the app except under the following conditions: |
|
Do not show app in end user App Catalog |
Select this option if you do not want the user to see the app in the app catalog on the device. |
|
Set App Install Priority |
Select High, Medium or Low to set the priority of the app installation during user onboarding. Only high priority apps gets installed during user onboarding . |
|
Suspend app repush after a set number of failed attempts (iOS only) |
Switch the toggle switch to ON to suspend the re-push of app after a set number of failed re-push attempts using the following settings: Stop repush after - Enter the number of failed re-push attempts after which the re-push should be stopped. The values entered should be within 1 to 999 failed attempts and try again after - Enter the number of hours required after the failed re-push to action the re-push again. The values entered should be within 3 to 48 hours. |
|
Select this option if you do not want the user prompted to confirm installation on Samsung Knox devices. |
|
|
(iOS and macOS only) Enable Per-App VPN for this app |
Select this option to use a Per-App VPN configuration with this app. Select the Per App VPN configuration to be used from the drop-down list. For macOS, select Tunnel Per App VPN configuration only. |
|
(iOS only) Prevent backup to iCloud and iTunes |
Select this option to keep data related to this app from being backed up to iCloud and iTunes. |
|
(iOS only) Remove apps on un-enrollment |
Select this option to remove this app once the device is no longer managed by Ivanti Neurons for MDM. |
|
(iOS only) AppConnect Custom Configuration |
For AppConnect-enabled app, enter the keys and values that specify your custom configuration preferences. See the documentation for the app for available keys. |
|
iOS 7+ Managed App Settings |
Enter keys and values defined for this app as an iOS 7+ managed app. See the documentation for the app for information on supported keys. |
Understanding Packager in-house macOS apps
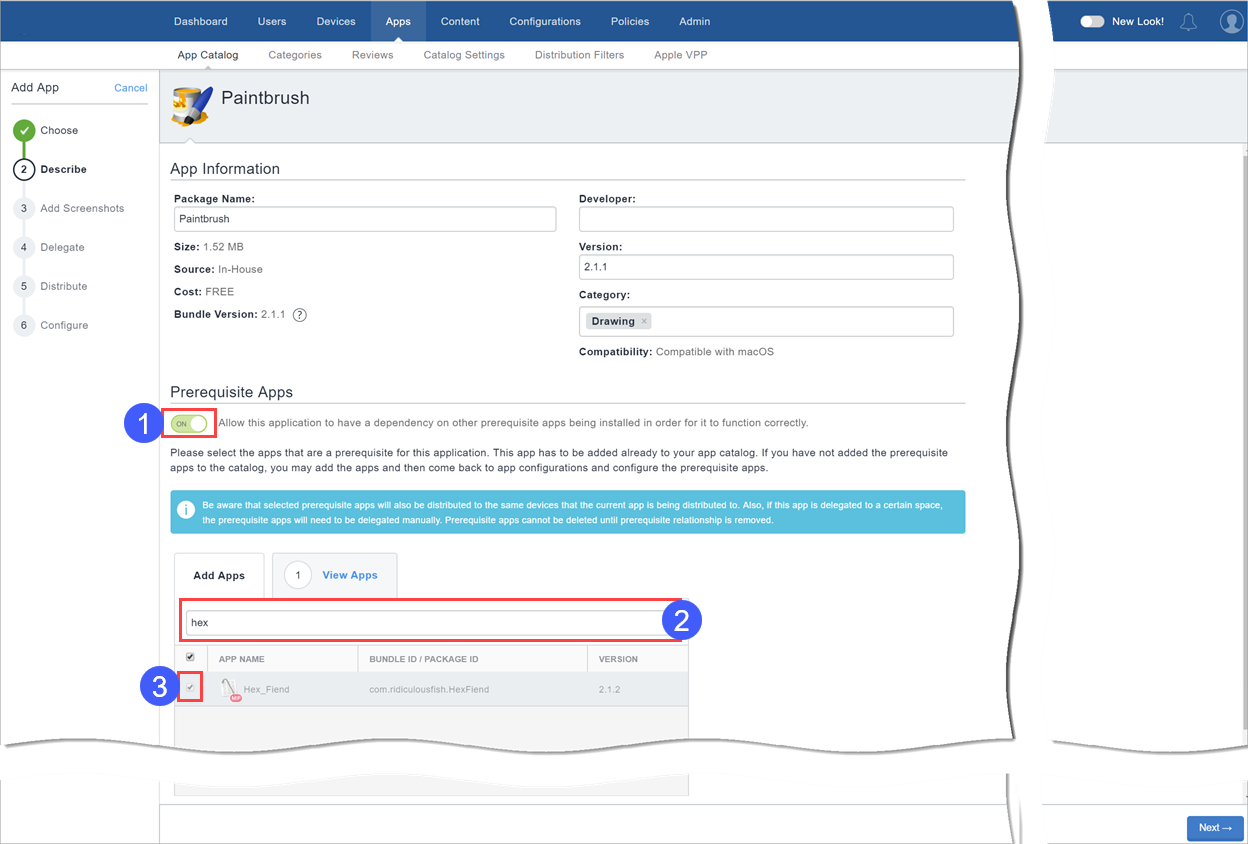
When importing Packager in-house macOS apps, the admin can enable, , the Prerequisite Apps feature to search for,
  , and select,
  , prerequisite apps that must be installed on clients before the app the admin is importing can be installed.
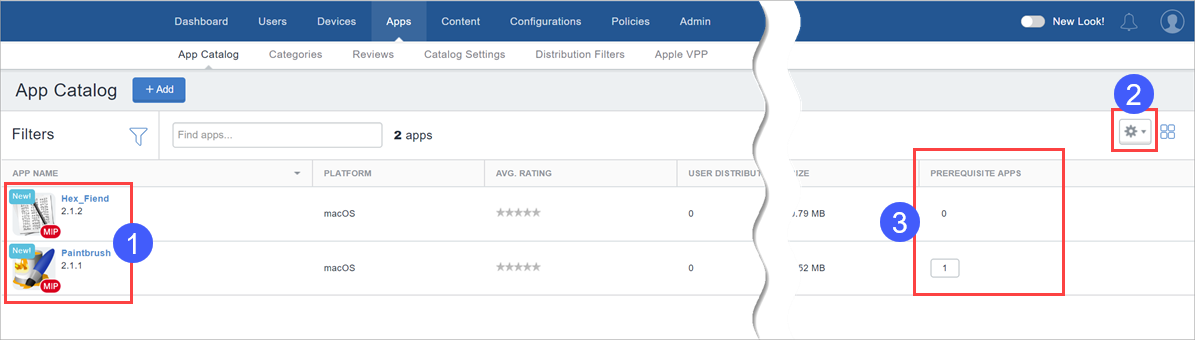
Once imported, the Packager macOS in-house app appears in the app catalog with the  badge displayed, , below. You can then use the column settings,, to add the PREREQUISITE APPS column, , to see at a glance the apps with dependencies, that is, that have prerequisite apps.
- You can search for and select MIP, non-MIP, and public apps (Apps and Books and macOS App Store public apps) as prerequisite apps.
- Users need to accept Apps and Books license for Apps and Books prerequisite apps to install silently.
- For non-Apps and Books public prerequisite apps, administrators need to explicitly distribute the public apps and the user has to install the public apps. The public apps (Apps and Books and non-Apps and Books apps) have to be imported into the App Catalog in order to show up in the prerequisite apps list. The Source column indicates the type of prerequisite app.
- MDM check-in is required to install a non-MIP in-house app that has non-MIP prerequisite apps.
- Users need to manually install public non-Apps and Books prerequisite apps.
- If the Apps and Books token is removed or if the license is exhausted, then the Apps and Books apps selected as the prerequisite apps, and thereby the main app, are not installed. The administrator has to follow a best practice to inform the users in advance in any of these cases for Apps and Books apps.
Prerequisite apps are also available as independent apps for download by the user when they are distributed explicitly. If the user tries to uninstall a prerequisite app:
- The next device check-in ensures that the prerequisite app is installed again.
- The prerequisite app is uninstalled if there are no dependent main apps installed on the same device.
- If the prerequisite app is not distributed explicitly, then the prerequisite app will be uninstalled along with the main app.
- If the prerequisite app is distributed explicitly, then the prerequisite app stays on the device.
- If the prerequisite app has a dependent app, then the prerequisite app stays on the device.
Turning off the Prerequisite Apps feature
When interacting with apps with dependencies and prerequisite apps, for example, when updating, deleting, or delegating such apps, you will encounter system prompts coaching you about how the app's dependency or prerequisite status may impact the actions you seek to perform. For example, when you try to turn off the Prerequisite Apps feature for an app, the following prompt appears:
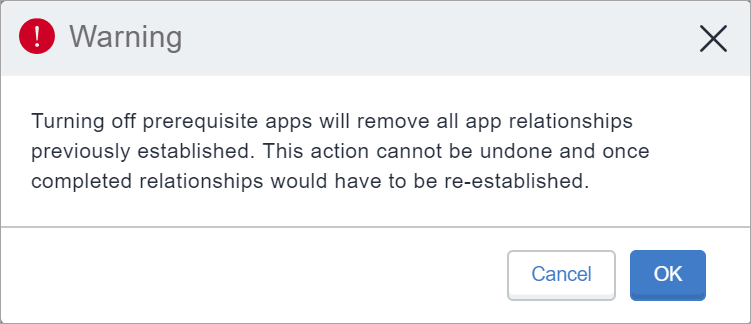
- If you turn off the Prerequisite Apps feature for an app, details about the prerequisite apps are cleared. This includes automatic delegation and un-delegation of prerequisite apps from sub-spaces.
- In Apps@Work, the install button does not appear for dependent apps whose prerequisite apps are not already installed on the harboring client.
- On the user devices, when a user tries to install an in-house app with dependencies, the prerequisite apps will be installed (if not already installed) first followed by the main app, which may take a few minutes. The list of dependent apps are displayed to the user along with the status of their installations.
Delegation and un-delegation of prerequisite apps from spaces
- Prerequisite apps tied to an app (the main app) are automatically delegated when the main app is delegated to a subspace.
- If the main app is un-delegated from a sub-space, the prerequisite apps are also un-delegated where prerequisite apps are not explicitly distributed. However, the prerequisite apps that are tied to more than one main app are not un-delegated.
- If the prerequisite apps are explicitly delegated, then they are not automatically un-delegated.
Delegating device permissions for Android Enterprise In-house apps
Delegated permissions can be assigned to in-house apps that can be applied to Android Enterprise managed devices.
Procedure
- Go to Apps > App Catalog.
- In the App catalog, select an app to which you wish to delegate device permissions.
- Click the App Configurations tab.
- In the Delegated Permissions (In-house Android enterprise app), select the required permissions for the apps:
- Configure third-party app runtime permissions
- Hide and suspend third-party apps
- Manage certificates
- Manage app configurations
- Manage blocking app-uninstallation
- Manage Enabling System apps
- Manage Certificate Selection (not supported in AMAPI mode)
- Manage Retention of Un-Installed apps (not supported in AMAPI mode)
- Manage Network Log Collection(not supported in AMAPI mode)
- Manage Security Log Collection (not supported in AMAPI mode)
- Manage Installation of existing apps (not supported in AMAPI mode)
- Install and remove packages (not supported in AMAPI mode)
- Configure the distribution options, selecting from Everyone with App, No One, or Custom.
- Click Save.
Only COSU deployment uses AMAPI. Refer to the AMAPI section for more information.
Install and remove packages option is available on all supported Android Device Owner mode devices (7.0 or later). Other delegated permissions are applicable only to Android 8.0 or later.
Displaying the provisioning profile status for iOS in-house apps
Display provisioning profile status on the App Catalog page for the iOS in-house apps. The tool tip next to the profile name displays the number of days for expiry of the profile. This status can be useful to check when the provisioning profiles are expiring for the in-house apps.
The status is useful for troubleshooting apps that are not installing due to profile being expired. The apps would install but would not open or launch if there is no appropriate provisioning profile.
Procedure
- Go to Apps > App Catalog.
- Click the gear icon on the top right to display the columns.
- Select Provisioning Profile to display the column for the list of apps on the App Catalog page.
The Provisioning Profile details are also available on the app details page under the Provisioning Profile Settings section.
Updating provisioning profile for iOS in-house apps
Provisioning profile is applied to a specific iOS in-house app. The Provisioning Profile details of an app are available on the app details page. A Provisioning Profile which is not expired is required in an iOS in-house app to launch on the device. If it is expired, you can update a provisioning profile by uploading the profile in the app details page.
Procedure
- Go to Apps > App Catalog.
- Click ton the app for which the provisioning profile update is required. The app details page is displayed.
- Click Edit.
- In the Provisioning Profile section, click Choose File.
- Select the provisioning profile file (.mobileprovision file extension) to be uploaded and click Save.
Deploying in-house apps to Google Play
Upload your in-house apps to the Google Play Private channel and import them into Ivanti Neurons for MDM for deployment to Android enterprise enabled devices.
Procedure
-
Log into Goople private apps console: https://play.google.com/apps/publish.
-
Click All Applications in the left menu.
-
Click Create new application and enter a name for the application.
-
Click Upload APK to upload the .apk file you generated.
-
Click Store Listing:
- Enter a short description and a full description.
-
Upload screenshot for all tabs.
-
Upload a high resolution icon.
-
Upload a feature graphic icon (graphic.png)
-
Enter the required information for Categorization, Contact details, and Privacy policy.
-
Complete the questionnaire for an app rating.
-
Click Pricing & Distribution.
If all the required information has been entered Ready to Publish is displayed a the top of the page. -
Go to the Apps tab In the Ivanti Neurons for MDM.
-
Click Refresh Available Catalogs to sync your private apps.
It may take several hours to publish your app.
Adding a web app for Android Enterprise devices
A web app is a link to any website, which gets installed on the device as a shortcut. Web apps behave in a similar manner as any other app, which means the web app can be distributed on the same criteria as an app. It appears in the app catalog and can be installed by users as any other app. However, web apps can have only a single version, and the silent install is not supported. Web apps use web clips and get installed on device as configurations, but behave as apps.
Set up a web clip as an app in the app catalog to make the web app available in the app catalog for the users. The web clip can be defined as a configuration, but a configuration can only be distributed by an administrator. Users can choose to install the web app on their devices or opt out, whereas users have no option to opt out of a web clip configuration.
In Android enterprise, a web app is an embedded form of web app that runs over Google Chrome inside the Work Profile. It can be combined to a VPN or SSO solutions in Android enterprise. After a web app is created, the app works like any other Android app, which you can distribute as required. Web apps require Chrome to be installed on Work Profile on Company Owned Device in order to run.
If there are any issues with using this feature, administrators can contact Support.
Procedure
-
Go to Apps > App Catalog.
-
Click + Add (top left).
- Select Google Play from the drop-down list to search for an app in the Google Play Store. Google Play iFrame is displayed if Android enterprise is enrolled.
-
Click Web apps.

-
Describe the app for users:

-
App title or name.
-
App URL.
- Display type for the web app.
-
Upload icon, which can be a 512px square PNG or JPEG image.
- Click Create. Wait for the app to be published to iFrame. It can take a few minutes. You can close it and return later.
-
After the web app is published, import the app to app catalog for distribution. Click the web app icon.
- Scroll down and click Select.
- Add categories and an optional description.
- Click Next.
-
Select one of the following options for App Delegation:
-
Delegate this app to all Spaces.
-
Do not delegate this app to all Spaces.
-
Click Next.
-
Select a distribution option for the application.
-
Click Finish.
After adding a web app, you can edit the web app whenever required. To do so:
-
In the App Catalog page, click the name of the existing web app.
-
Click Edit to edit the web app fields.
Adding a web app for iOS devices
A web app is a link to any website, which gets installed on the device as a shortcut. Web apps behave in a similar manner as any other app, which means the web app can be distributed on the same criteria as an app. It appears in the app catalog and can be installed by users as any other app. However, web apps can have only a single version, and the silent install is not supported. Web apps use web clips and get installed on device as configurations, but behave as apps.
Set up a web clip as an app in the app catalog to make the web app available in the app catalog for the users. The web clip can be defined as a configuration, but a configuration can only be distributed by an administrator. Users can choose to install the web app on their devices or opt out, whereas users have no option to opt out of a web clip configuration.
If there are any issues with using this feature, administrators can contact Support.
Procedure
-
Go to Apps > App Catalog.
-
Click + Add (top left).
-
Click Web apps.
-
Describe the app for users:
-
App Name.
-
App URL.
-
Platform Type.
-
App Icon.
-
Add or remove categories.
-
Full Screen - Select to display the web app as a full screen application.
-
Removable - Select to make the web app removable.
-
Click Next.
-
Select one of the following options for App Delegation:
-
Delegate this app to all Spaces.
-
Do not delegate this app to all Spaces.
-
Click Next.
-
Select a distribution option for the application.
-
Click Finish.
Editing a web app
After adding a web app, you can edit the web app whenever required.
Procedure
-
In the App Catalog page, click the name of the existing web app.
-
Click Edit to edit the web app fields.
Slow roll out applications
The Slow roll out setting lets administrators to automatically roll out new version of applications to devices gradually. The option Use slow roll out distribution method, is available when you roll out the subsequent release of the application. The Ivanti Neurons for MDM administrative portal lets you edit applications even when the slow roll out is paused.
Once the slow roll out is set for one release, it is applicable for the subsequent releases with the same percentage that you last set. You can pause the distribution of an application if the distribution is set to 100%. However, if you set the distribution target to 100%, you must manually set the distribution target percentage for the next version as the UI resets the percentage to 0%.
Procedure
| 1. | Go to App Catalog, Apps, select one of the distribution mode options. |
| 2. | Select the option Custom % of devices in selection summary (Slow Rollout). |
| 3. | From the Slow rollout settings, drag the slider in Specify distribution target%. |
| 4. | Click Confirm, and then click Done. The status of the latest app version is displayed. The App Catalog page indicates the SLOW ROLL OUT status in the table. |
If you cannot perform tasks on the App Catalog page, it might be that you do not have the required permissions. You need the App & Content Management role.
Using Advanced Search
You can use the Advanced Search option to search for an app based on rules to identify and view the apps with specific criteria. These rules can be constructed using the applicable operators, including the "equals", "is less than", "is greater than", "is equal to", and "is not equal to" operators. The rule options can be nested together using the ANY (OR) or ALL (AND) options. The apps matching the rules are displayed below the section.
The custom attributes values used in Search are case sensitive.
Procedure
- From the App Catalog page, click the Advanced Search link. The Advance Search wizard opens.
- Click one of the following options:
- Any-if the apps must match at least one of the rules
- All-if the apps must match all the rules
- Create a rule that defines the search criteria. Example: APNS Capable is equal to Yes.
- (Optional) Click + to create additional rules.
- Click Search. The list of apps matching the search criteria are displayed.
Loading the search queries
You can view the list of saved search queries.
Procedure
- Click Advanced search and then click the folder icon. The list of the created search queries are displayed in the Loaded Query section and the following details are displayed:
- Query Name - The name of the loaded query.
- Query Content - Displays the content on the rules defining the search query.
- Actions - Select the action to be performed on the query.
- Click Load Query in the Actions column to view the list of apps matching the criteria defined in the loaded query.
- Click Delete to delete a loaded query.
Related topics