Creating a new app
Before you can upload new releases for an app, you must create an application, or App. This works as a container to gather all information about the app and all app releases.
On your system, the +New App button may not be visible to you.
To create a new app:
-
Click +New App. The Please select platform pop-up menu opens.
-
Select either iOS or Android. The Please select Target Type pop-up menu opens.
If an option or a button isn’t visible, then the option is not enabled on your system.
-
Select the Target Type from the drop-down menu. The target type sets the app store the app will be assigned to, the metadata set, and publishing options.
Android options include:
- Google Play
- MobileIron Core
- Microsoft Intune
- VMware AirWatch
iOS options include:
- MobileIron Core
- Microsoft Intune
- VMware AirWatch
- Apple App store
-
When you select a target type, either the New Android App or the New iOS App window opens.
Figure 1. An iOS New App menu
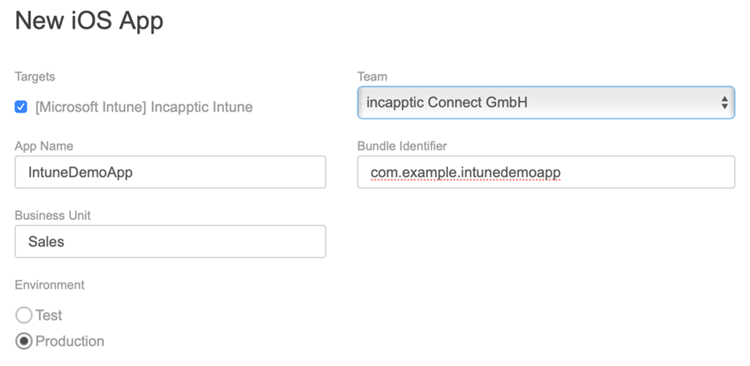
The New App menu has the following fields and settings:
Table 14. Apps page fields and settings Apps page element
Applicable to
Description
Targets MobileIron Core, VMware AirWatch, and Microsoft Intune Check the target or targets where you want to publish the app.
For certain targets, you might have the option to assign more than one target. This is the case when you are running multiple instances of one target, for example, multiple MobileIron Core systems. The assigned targets can be modified after app creation.
App Name All apps Provide a descriptive name. Avoid special characters, as they may be rejected by Apple or google. Business Unit Optional You may want to track the business unit an app is assigned to. This feature can be useful for reporting. Environment All apps Select either Test or Production. This information is for information only and is used to aid differentiation. It has no impact on the process or the app handling. If your user is granted the permission to create apps, the following additional technical fields will display:
Apps element Applicable to Description
Google Play: All app releases need to be signed with the same keystore as the previous release of the app, otherwise Google Play will reject the app.
Table 15. Post-permission fields and settings Apps element
Applicable to
Description
Team iOS Defines the certificate and the signing account for the app.
Apple App Store: For iOS apps, you may need to choose between one or more App Store accounts (for public apps) or your company’s Enterprise account (for internal apps).
Keystore Android Defines the certificate and the signing account for the app.
Google Play: All app releases need to be signed with the same keystore as the previous release of the app, otherwise Google Play will reject the app.
Bundle Identifier
iOS
Describes the identifier of the app. It should be set according to Apple recommendations.
Package Name
Android
Describes the identifier of the app. It should be set according to the Google recommendations.
-
Click Create.
At this point, Android and iOS actions differ:
-
iOS: The Ivanti incapptic Connect system connects to Apple’s Developer Portal. It checks if the app with that Bundle Identifier is already assigned to your development team. In that case, it compares the entered name with the name at Apple and gives you the option to change the name in incapptic. If the Bundle Identifier is not yet registered at Apple it will be automatically created.
-
Android: The app is created in the Ivanti incapptic Connect system. To register a new app for Google Play, you must do that via the Google Play console.