System backup
Use this option to testing connectivity to the backup server, scheduling daily backups, and performing an immediate backup.
An Ivanti EPMM system backup does not include the Splunk forwarder configuration within Ivanti EPMM. Therefore, after the system is restored, you must manually configure Splunk forwarder.
Ivanti recommends restricting access to port 22 or SSH from the internal corporate network only. This service is intended for Ivanti Standalone Sentry System Manager and must have strictly controlled access.
This section contains the following topics:
- Prerequisites for configuring system backups
- Enabling backups
- System backup status
- Configuring system backup settings
- System Backup Configuration group
- Running an immediate system backup
- Restore a system backup
- Create local backup
- Restore System
Prerequisites for configuring system backups
This section lists the prerequisites for configuring system backups.
- Sufficient disk space at the destination to store the archive
- Protocol-specific requirements described in the following table:
|
Protocol |
Prerequisites |
|
NFS |
Port 2049 open from Ivanti EPMM to the NFS server. The NFS option assumes that user authentication is not required for the specified server. Therefore, Ivanti recommends using IP ACLs to restrict NFS mounts to Ivanti EPMM. |
|
SCP |
Port 22 open from Ivanti EPMM to the backup location. |
|
FTP |
Port 21 open from Ivanti EPMM to the FTP server. |
|
CIFS |
Ports 137 (UDP), 138 (UDP), 139 (TCP), and 445 (TCP) open from Ivanti EPMM to the Windows share server. SMB v2.0 through the latest version as supported by Ivanti. |
Enabling backups
Procedure
To enable the configured backup schedule:
- Log into System Manager.
- Go to Maintenance > System Backup.
- Go to the System Backup Control group.
- Select Enable for the System Backup option.
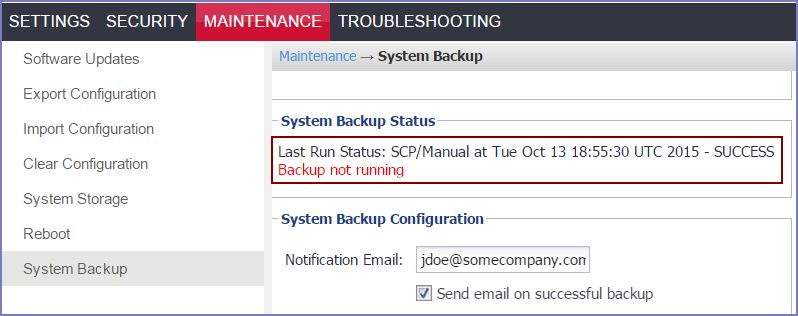
System backup status
Use the Use the Maintenance > System Backup Status group to track status of the backup. Starting a backup, activates the Backup is running indicator in the System Backup Status section. When it completes, a brief status message displays the following information:
- Date and time of the backup
- Backup type (LOCAL, FTP, NFS, CIFS, or SCP)
- Whether the backup was scheduled (automatic) or run now (manual)
- Whether the backup was successful
Figure 1. System Backup window
Ivanti EPMM executes a set of validations to verify that the backed up database is not corrupted. If any of the validations fail, the status message indicates that the backup failed. The same validations occur whenever a backup is attempted. For example, the validations occur when backing up Ivanti EPMM in a High Availability environment
System backup email notifications
Email notifications about a successful or failed backup contain the following information:
- The time of the success or failure
- The size of the backup
- Time taken to perform the backup
- Backup type (FTP, SCP, NFS, or CIFS)
- Backup server IP address or name
- Path of backup location on the backup server
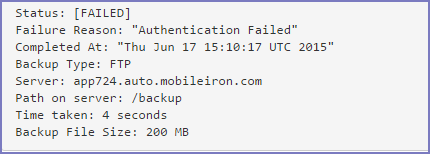
- The reason for a backup failure
Possible failure reasons given are:
- Mount fail
- Server not available
- Authentication failure
- Not enough disk space on the server
- Not enough disk space on Ivanti EPMM
- Failed to access the directory
Use this information to take actions to ensure the success of subsequent backups. For example, if you are notified that you are out of disk space on your backup server, you can remove old files from the backup server.
Example
The following are examples of emails for successful and failed backups:
Figure 2. Successful backup email example
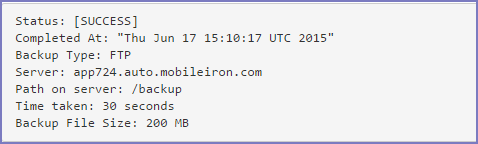
Figure 3. Unsuccessful backup email example
Configuring system backup settings
Complete the following steps to configure the destination and schedule for backups:
Procedure
- Log into System Manager.
- Go to Maintenance > System Backup.
- Scroll to the System Backup Configuration group.
- Modify the fields, as necessary. Refer to the System Backup Configuration group table for more information.
- Click Test Connectivity. A message displays indicating whether the connectivity test succeeded or failed.
- Click Save > OK if the connectivity test succeeded. If the connectivity test failed, check the server information you entered, correct, and retry.
System Backup Configuration group
The following table summarizes fields and descriptions in the System Backup Configuration group:
|
Fields |
Description |
|
Notification Email |
Enter the email address that should receive backup/restore notifications. By default, notifications are sent only if the backup fails. |
|
Send email on successful backup |
Select this option to include notifications for success in addition to notifications for failure. |
|
Start time (GMT) |
Select the time (GMT) at which a daily backup should occur, based on the system time set in the System Manager. |
|
Only Backup the System Locally |
Select this option if you want to create a system backup that you can download onto your local machine. Creating and storing a backup locally is useful before installing an Ivanti EPMM update. If you select this option, the backup server fields are disabled. See Create local backup. |
|
Backup using |
Select from the following protocols:
The selected protocol determines which of the following fields display. |
|
Server |
Enter the domain name or IP address for the server to be used. For example:
|
|
User |
Enter the user name for the account to be used. For CIFS, you might also need to specify the domain (e.g., MYDOMAIN\myuserid). |
|
Password |
Enter the password for the account to be used. |
|
Password |
Confirm the password for the account to be used. |
|
Server Path |
Enter any additional path necessary to specify the location on the host server. For example, if you want to write backups to the Backups/Ivanti EPMM folder on the specified server, you would enter /Backups/Ivanti EPMM in this field. Be sure to include the leading forward slash (/), or the backup will fail. |
Running an immediate system backup
To start an immediate system backup:
Procedure
- Log into System Manager.
- Go to Maintenance > System Backup.
- Scroll down to the Run System Backup Now section.
- Click Run.
Backup filename format
The name of the resulting file has the following format:
< Ivanti EPMM_FQDN>-backup-YYYY-MM-DD--HH-MM-SS.tgz
where < Ivanti EPMM_FQDN> is the fully-qualified domain for Ivanti EPMM.
Viewing backup logs
You can view system backup logs on demand and download them like other system logs,
Procedure
- Log into System Manager.
- Go to Troubleshooting > Logs.
- Go to the View Module Logs section.
- Click the SystemBackup link.
Restore a system backup
You can restore a system backup (data and configuration) or reset the existing Ivanti EPMM to the factory default state if the following requirements are met:
- The Ivanti EPMM version used to create the backup must be used to restore the backup.
- Confirm that the location of the backup file is easily accessible to ensure that the upload process does not time out. Uploading the file should complete within 15 minutes.
Restoring a system backup
To restore a system backup:
- Log into System Manager.
- Go to Maintenance > System Backup.
- Scroll down to the Restore System section.
- Click Choose File.
- Select the backup file.
- Click Restore. When the process is complete, a message displays prompting you to reboot.
- If prompted to save the configuration, click Yes.
- If you chose to configure a second Ivanti EPMM instead of resetting the original, power down the original to prevent IP conflicts.
- Select Maintenance > Reboot > Reboot.
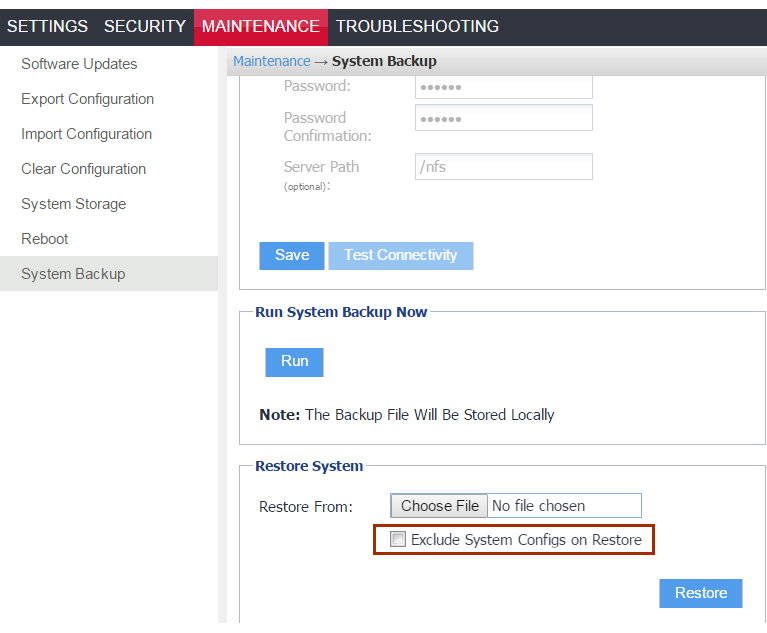
Restoring only data
Some situations call for restoring the data from a backup without restoring the system configuration. These situations include:
- confirming that expected data is included in backups
- disaster recovery
To address these situations, use the Exclude System Configs on Restore option.
Figure 4. Restore System window
Restoring a system in this manner does not provide a replacement Ivanti EPMM. You can use this restored system to view data or as the basis for a replacement system.
Create local backup
You can either schedule a backup or run an immediate backup of your Ivanti EPMM instance and store it locally. Creating and storing a backup locally is useful before installing an Ivanti EPMM update.
Configuring local backup
You can run an immediate backup or set up a scheduled backup using the follow these steps to create a local backup.
Procedure
- Log into System Manager.
- Go to Maintenance > System Backup.
- Go to the System Backup Configuration group.
- Scroll to the Backup Location Preferences section.
- Check Only Backup the System Locally.
-
Do one of the following actions:
- From Start Time (GMT), select an hour (GMT time) to run the backup at a specified time.
- In Run System Backup Now, click Run to run the backup immediately.
- Click Save.
- After the backup is run, click Download Backup in System Backup Status.
Restore System
Use a locally downloaded file on your desktop to restore the system or one that has been copied to a remote file server.
Do not revert to earlier versions of Ivanti EPMM using a snapshot after enabling mutual authentication. Doing so may necessitate re-enrolling devices.
To restore the system:
Procedure
- Log into System Manager.
- Go to Maintenance > System Backup.
- Scroll to the Restore System group.
- Select Exclude System Configs on Restore.
- This allows you to restore the backup to a new system without effecting the existing system. This can also be used to test a backup and restore procedure without effecting the main system. If do not select to Exclude System Configs on Restore the system will reboot to the IP and host configuration that was in the backup file.
- Select Restore to upload your backup file and add it to the system.
- When you are prompted reboot, go to Maintenance > Reboot and click Reboot.