Deployments with IDP
About IDP
Securing intranet work application and resource traffic is vital to protecting your network from hostile outside intrusion. You can add levels of application security to your remote access network by integrating a Ivanti Connect Secure system with a Juniper Networks Intrusion Detection and Prevention (IDP) Sensor. The IDP device may provide the following types of protection in this solution (some forms of protection depend upon the specific configuration):
The IDP sensor monitors the network on which the IDP system is installed. The sensor's primary task is to detect suspicious and anomalous network traffic based on specific rules defined in IDP rulebases.
The IDP device provides the following types of protection (some forms of protection depend upon the specific configuration):
•Protects against attacks from user to application and from application to user (from a server-side endpoint)
•Detects and blocks most network worms based on software vulnerabilities
•Detects and blocks non-file-based Trojan Horses
•Detects and blocks effects of spyware. adware, and key loggers
•Detects and blocks many types of malware
•Detects and blocks zero-day attacks through the use of anomaly detection
An IDP Sensor can send logs to one Ivanti Connect Secure device only. However, the Ivanti Connect Secure device can receive logs from more than one IDP Sensor.
You do not need a special license from ivanti to enable interaction between Ivanti Connect Secure and the IDP.
Using the Ivanti Connect Secure admin console, you can configure and manage interaction attributes between it and an IDP, including the following:
•Global configuration parameters such as the IDP hostname or IP address, the TCP port over which the sensor communicates with Ivanti Connect Secure, and the one-time password Ivanti Connect Secure and IDP use to authenticate with one another.
•Dynamically changing the IDP configuration from Ivanti Connect Secure and alerting the IDP of changes in the IP address pool available to remote users.
•Various levels of attack severity warnings.
The IDP sits behind Ivanti Connect Secure on your internal network and monitors traffic flowing from Ivanti Connect Secure into the LAN. Any abnormal events detected by the IDP Sensor are reported to Ivanti Connect Secure, which you configure to take appropriate action based on the severity level of the reported events. The IDP Sensor performs reporting functions in addition to any normal logging the IDP has been configured to undertake.
You can use an IDP Sensor on the Ivanti Connect Secure cluster, if the cluster is configured with a virtual IP (VIP) address.
IDP Deployment Scenarios
The two most likely deployment scenarios are as follows:
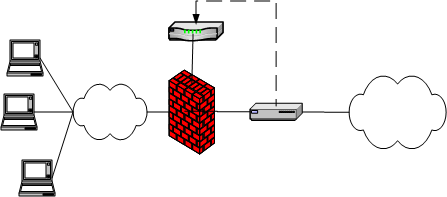
•Customer use of Ivanti Connect Secure for extended enterprise access and IDP for security of all perimeter traffic including but not limited to traffic from Ivanti Connect Secure. Ivanti Ivanti Connect Secure and IDP Topology Scenario 1 illustrates this scenario, in which Ivanti Connect Secure is deployed in the DMZ or on the LAN and the IDP is deployed in-line behind the firewall and in front of the LAN.
Ivanti Ivanti Connect Secure and IDP Topology Scenario 1
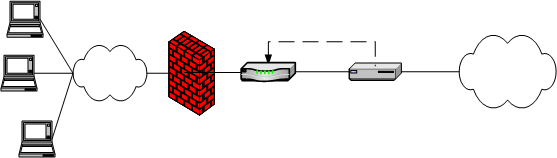
•In the second deployment scenario, IDP is only used to protect traffic that comes through Ivanti Connect Secure but not in-line with other perimeter traffic. Figure 315 illustrates this deployment scenario.
Ivanti Connect Secure and IDP Topology Scenario 2
Configuring Ivanti Connect Secure to Interoperate with IDP
The IDP Sensor is a powerful tool to counter users who initiate attacks. Integration with Ivanti Connect Secure allows you to configure automatic responses as well as manually monitor and manage users.
To configure the system to interoperate with an associated standalone IDP Sensor, you must first ensure the IDP has been configured according to the instructions described in the Signaling Setup appendix of IDP Series Concepts and Examples Guide, Version 5.1rX.
Once the IDP Sensor has been set up, you can specify the events you want the IDP to watch for and the actions that Ivanti Connect Secure takes once a particular event has been noted and reported.
There are two locations on Ivanti Connect Secure where you can specify actions to be taken in response to users that perform attacks:
•Sensor Event policies page-Define the policy on this page to generate an automatic response to users who perform attacks.
•Users page-Manually identify and quarantine or disable users on the System > Status > Active Users page, which lists users who have performed attacks.
Interaction Between the IC Series and IDP
Ivanti Connect Secure reads attack information as it is being sent by the IDP sensor. Ivanti Connect Secure receives the source and destination IP addresses and port numbers of the attacking host and the resource against which the attack was launched, along with the attack identifier, severity of the attack, and the time at which the attack was launched.
Ivanti Connect Secure incorporates and displays the attack information received from the IDP sensor on the System > Status > Active Users page. Based on the attackers IP address and port number, the system can uniquely identify the user's session.
You can choose automatic or manual actions for attacks detected by the IDP sensor. For manual action, you look up the information available on the Active Users page and decide on an action. For automatic action, you configure the action in advance when you define your IDP policies.
Identifying and Managing Quarantined Users Manually
When the system quarantines a user based on an attack, you can display and manage the states by locating the user link in the System > Status > Active Users page.
•A small warning icon displayed in front of the username.
•The hyperlinked username.
•An enabled Quarantined option button on the specific user's page. If the user is not quarantined, the option button is disabled.
You can manage quarantined users from either the admin GUI or by logging in as a user with administrative rights on the local authentication server.
To manage quarantined users:
1.Identify quarantined users at System > Status > Active Users.
2.Locate the quarantined user from the Authentication > Auth. Servers > System Local on the admin GUI or from the Admin Users window on the local authentication server. You must be logged in to the local authentication server as an administrator user in order to see the Admin User option.
3.Click the username link. The user page opens, showing a number of options. See Managing Quarantined Users
4.Click Disabled to disallow a user from authenticating.
5.Click Quarantined to leave a user in a quarantined state. The Quarantined option is only enabled if the user is already quarantined.
The system assigns quarantined users to the quarantined role, regardless of their login realm.
6.Click Save Changes.
7.To re-enable previously quarantined or disabled users, select Authentication > Auth. Servers > Select Server > Users and click the link for the given user.
You can also disable users from this location.
8.Click Enabled to release the user from quarantine.
9.Click Save Changes.
All Sensor events are logged at System > Log/Monitoring > Sensors > Log. (Deprecated for 21.x)