Security Hardening
Security Enhanced (SELinux, CSRF for Enduser, CSP, Key Management) Support
This feature constraints access to the ICS Linux system (ICS Linux applications) with the minimal set of resources they need.
1.In the serial console, enter 13 to select Security Operations (SElinux, CSP, CSRF for Enduser, Key Management, WAF)
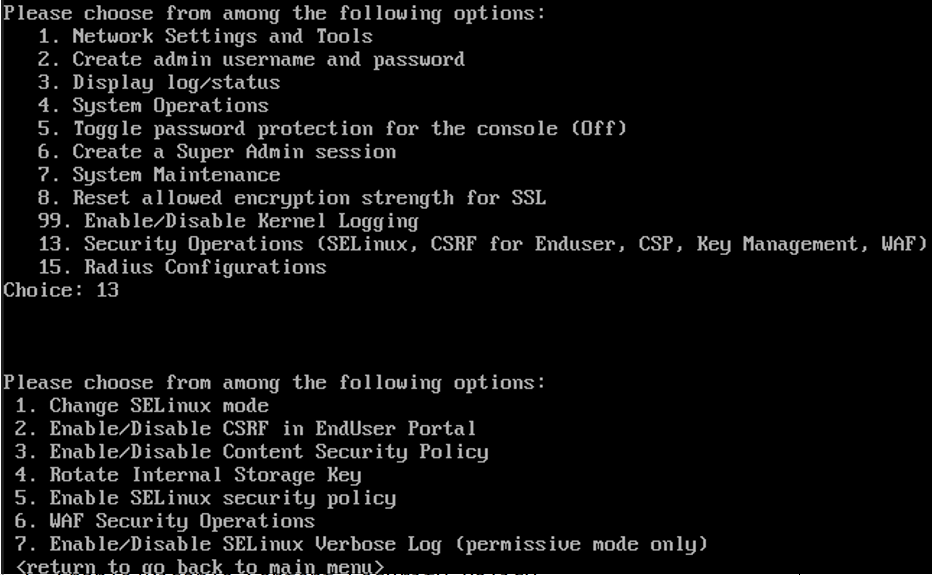
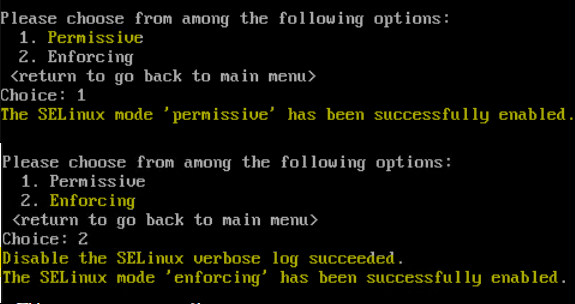
2.Choose the SELinux mode: This feature is enabled by default with system running in enforcing mode. To change the mode enter 1 and choose the following options:
•Permissive: Does not deny any operations but only logs Access Vector Cache (AVC) messages.
• Enforcing: Denies operations based on SELinux policy rules and logs Access Vector Cache (AVC) messages.
SELinux cannot be disabled.
CSRF in EndUser Portal
CSRF (Cross-Site Request Forgery) is a type of web security vulnerability that can be exploited to make a victim's browser perform unwanted actions on ICS webserver. These attacks are mitigated by using CSRF tokens, which help verify that requests originate from the user's intended actions.
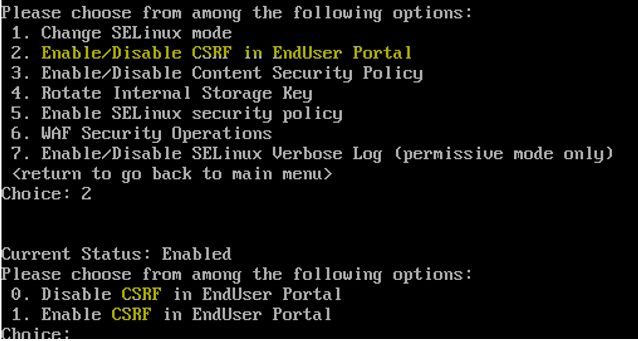
3.Enter 2 to enable/disable CSRF in EndUser Portal.
•Disable CSRF in EndUser Portal: Enter 0 to disable CSRF.
•Enable CSRF in EndUser Portal: Enter 1 to enable and to protect the EndUser portal from CSRF attack.
Content Security Policy
Content Security Policy (CSP) is an added layer of security that helps to detect and mitigate certain types of attacks, including Cross-Site Scripting (XSS) and data injection attacks. These attacks are used for everything from data theft, to site defacement, to malware distribution.
It is strictly recommended to remove any existing CSP header prior to upgrade, from UI System > Configuration > Security > Advanced configuration.

4.Enter 3 to enable/disable Content Security Policy (CSP).
CSP is enabled by default beginning from Release 22.7R2 onwards.
•Disable CSP: Enter 0 to disable CSP.
•Enable CSP: Enter 1 to enable CSP.
CSP Header Sample:
Content-Security-Policy: script-src 'nonce-xxxxxxxxxxxxxxxx' 'strict-dynamic'; object-src 'none'; base-uri 'none';
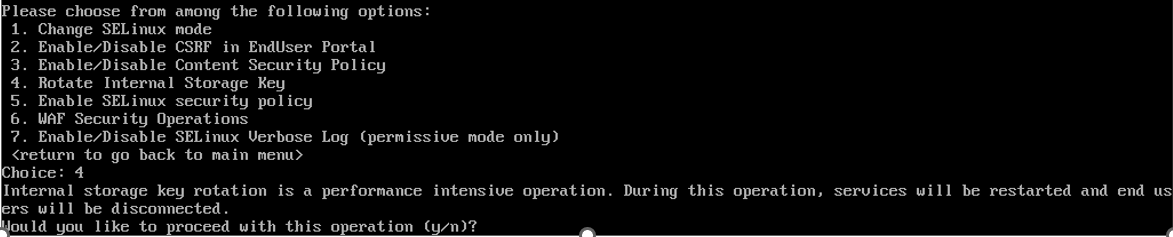
5.Enter 4 to Rotate the Internal Storage Key. This process encrypts "secure” elements like passwords when storing them internally and ensures the encryption key is unique and random for every ICS instance.
6.Enter y to start the internal storage key rotation and after completion services will restart.
SELinux Security Policy
The ICS system provides an Enforcing only SELinux capability, ensuring that even the root user or admin cannot switch SELinux to permissive mode without rebooting the system. Rebooting is considered a significant event and should not occur without being noticed or logged by the ICS administrator. The primary goal of this feature is to ensure that SELinux functions as the exclusive security policy enforcement mechanism for the ICS system. SELinux must operate strictly in Enforcing Mode, making it tamper-proof and preventing unauthorized actions from bypassing or disabling its enforcement.
Upon system boot, a menu is presented to the user with a prompt to determine the SELinux Security Policy. The user has 15 seconds to decide whether to switch to Disable SELinux Security Policy or remain in Enable SELinux Security Policy.
To Enable SELinix Security Policy, perform the following:
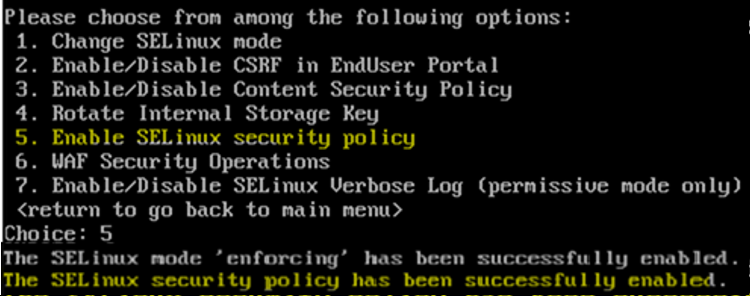
1.In the serial console, enter 13 to select Security Operations (SElinux, CSP, CSRF for Enduser, Key Management, WAF)
2.Enter 5 to enable the SELinux Security Policy.
•Select n (Default) to enables the SELinux security policy.

Or
•Timeout without choosing any option also enables the SELinux security policy.

Or
•Select y to disables the SELinux security policy.

To enable SELinux mode to Permissive or Enforcing follow the steps:
1.In the serial console, enter 13 to select Security Operations (SElinux, CSP, CSRF for Enduser, Key Management, WAF).
2.Choose the SELinux mode: This feature is enabled by default with system running in enforcing mode. To change the mode enter 1 and choose the following options:
3.Enter 1 to enable Permissive mode. (Only after rebooting with disable SELinux Security policy system can go to Permissive mode)
4. Enter 2 to enable Enforcing mode to make SELinux policy tamper-proof and preventing unauthorized actions from bypassing or disabling its enforcement.
5.If you have disabled the SELinux security policy. To re-enable the SELinux security policy. Enter 5 to enable the SELinux security Policy.
Security Enhanced WAF Operation
Configuring Web Application Firewall in UI
Web Application Firewall (WAF) protects web applications by filtering and monitoring HTTP traffic, preventing attacks such as SQL injection, cross-site scripting (XSS), and other web exploits.
To configure WAF on ICS:
1.Select System > Configuration > Security > Web Application Firewall.
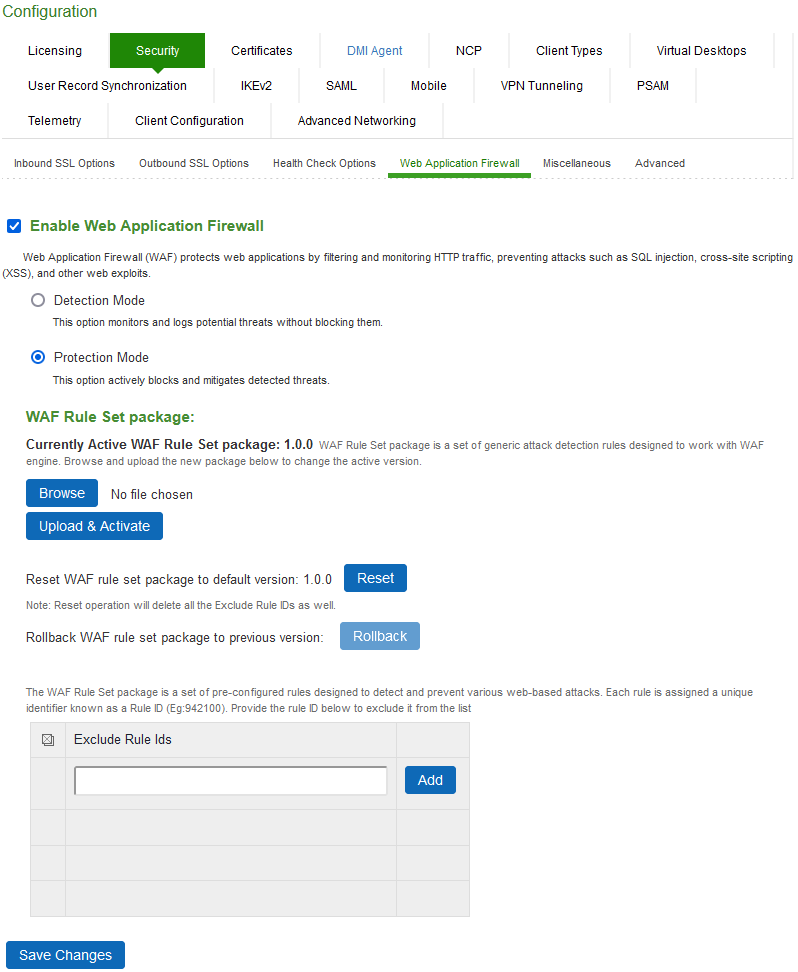
2.Select the required mode.
• If Detection Mode selected, then it monitors and logs potential threats without blocking them.
•If Protection Mode selected, then it actively blocks and mitigates detected threats.
3.Browse to choose the WAF Rule Set Package file and click Upload & Activate. If any new WAF rules packages are released, they will be made available on software download page.
4.Click Reset to restore WAF Rule Set package to its default version.
5.Click Rollback to revert the WAF Rule Set package to previous version.
6.Enter the Rule ID and click ADD to exclude it from the list. Rule ID can be retrieved using log message. A log message is illustrated in detail:
|
Log message Parameters |
Descriptions |
|---|---|
|
2024-12-17 00:54:01 - ive - [127.0.0.1] Root::admin(Admin Users)[ ][] - WAF message: |
Message Header |
| msg: XSS Attack Detected via libinjection | Warning message |
| id: 941100 | Unique Rule ID |
| data: Matched Data: XSS data found within ARGS:txtNewRuleId: <script> | Data comparision |
| severity: 2 | Log severity |
| hostname: | IP Address |
|
uri: /dana-admin/security/wafconfig.cgi |
URI Link |
Configuring Web Application Firewall in Console
This feature constraints access to the ICS Linux system (ICS Linux applications) with the minimal set of resources they need.
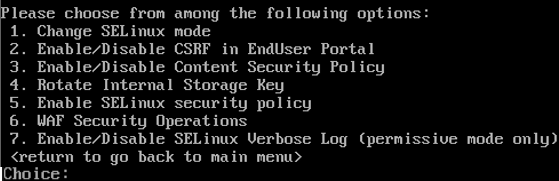
1.In the serial console, enter choice 13 to select Security Operations (SElinux, CSP, CSRF for Enduser, Key Management, WAF) and then choice 6 to enter WAF Security Operations sub menu.

2.Enter 1 to select the required mode. By default WAF is in Protection Mode, enter 0 to change to mode to Detection Mode.
•Detection Mode: monitors and logs potential threats without blocking them.
•Protection Mode: actively blocks and mitigates detected threats.

SELinux Verbose Log
Administrators can toggle SELinux verbose logging to control the detail level of SELinux-related logs. This feature is only available when SELinux is operating in Permissive Mode. It does not work in Enforcing Mode.
Verbose logging provides detailed information on access denials, SELinux actions, and suppressed log entries, helping administrators debug SELinux policy configurations. However, verbose logging reverts to its default disabled state after a system reboot, requiring manual re-enablement.
1.In the serial console, enter choice 13 to select Security Operations (SElinux, CSP, CSRF for Enduser, Key Management, WAF) and then choice 7 to enter Enable/Disable SELinux Verbose Log sub menu.
2.Enter 1 to Enable SELinux Verbose Logging. This allows suppressed/denied access logs to appear for debugging purposes.

3.Enter 0 to Disable SELinux Verbose Logging. This turns off the verbose logging and reduce the verbose entries in logs.

Verbose logging is restricted to Permissive Mode; it does not work in Enforcing Mode.
Permission is denied when Enforcing mode is enabled.


Next Generation Web Server
Web server is used for reverse proxy, load balancing, and caching. It provides HTTPS server capabilities and is mainly designed for maximum performance and stability.
•Reduces the waiting time to load a website.
•Speeds up performance by routing traffic to web servers.
•Acts as an inexpensive and robust load balancer.
•Offers scalability and the ability to handle concurrent requests.
Next Generation Web Server is enabled by default and cannot be disabled from 22.8R2.1 release onwards.
Radius Configuration
This features change the Queue mechanism of Radius auth server request from LIFO to FIFO.
1.In the serial console, enter 15 to select Radius Configurations.
•Enter 1 to change the Radius auth request queue mechanism from LIFO to FIFO.
•To restore back to LIFO enter 2.

Audit Logs
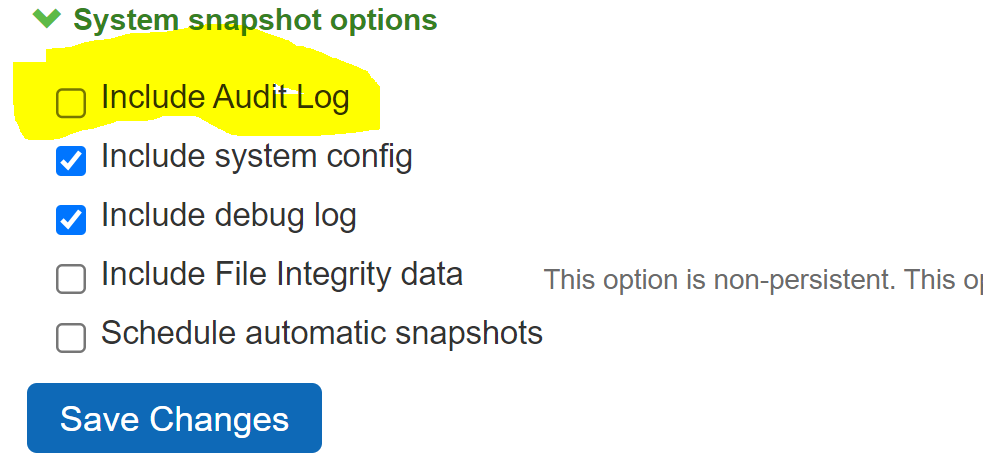
A snapshot of the system state captures details that can help Support Center diagnose system performance problems. The system stores up to ten snapshots, which are packaged into an encrypted "dump" file that you can download and then e-mail to Global Support Center.
To enable Audit Logs:
1.Select Maintenance > Troubleshooting > System Snapshot to display the configuration page.
2.Click the checkbox Include Audit Log under System snapshot options.
Enable SELinux Audit Logs
SELinux audit logs can be very useful for finding out security attacks via SELinux denials and also for debugging purpose.
Sample SELinux denial message
type=AVC msg=audit(1223024155.684:49): avc: denied { getattr } for pid=2000 comm="httpd" path="/var/www/html/file1" dev=dm-0 ino=399185 scontext=unconfined_u:system_r:httpd_t:s0 tcontext=system_u:object_r:samba_share_t:s0 tclass=file
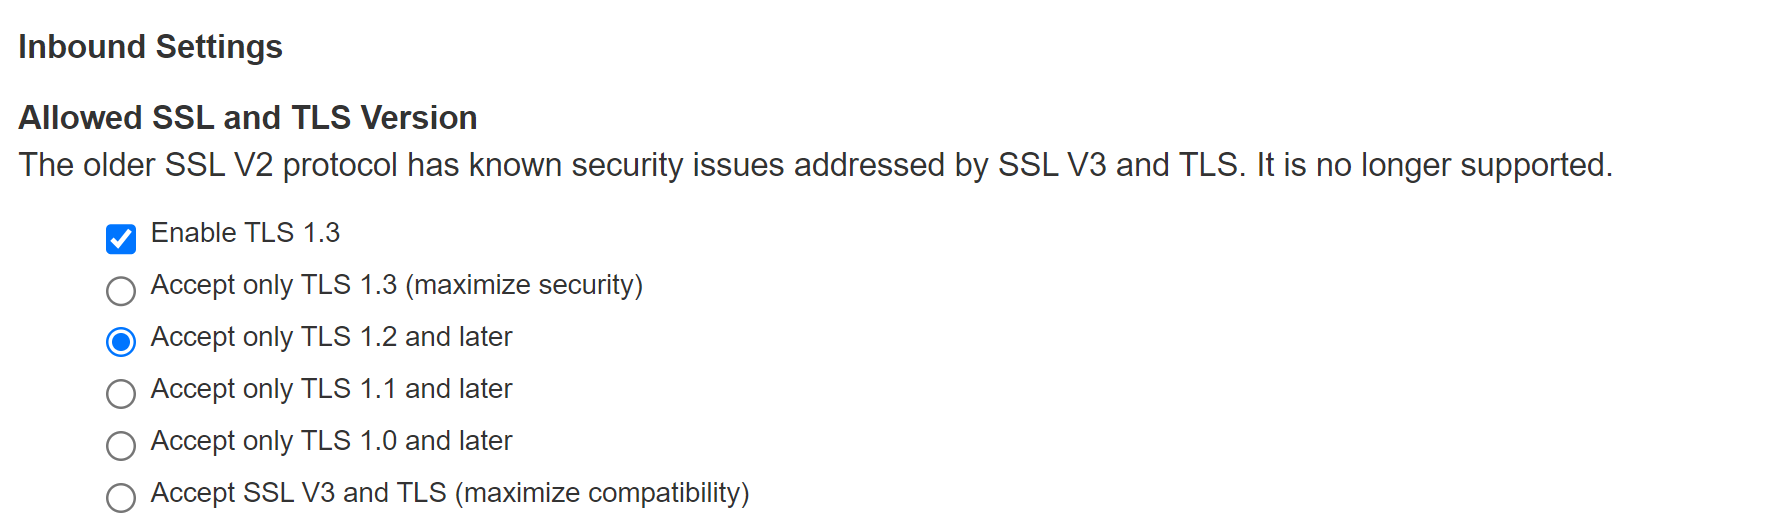
TLS 1.3 Support
To enable TLS 1.3:
1.Select the checkbox Enable TLS 1.3, under Inbound Settings Allowed SSL and TLS Version
TLS for certAuth would be TLS 1.2 even if TLS 1.3 is selected by admin. Note that connection between server and client still would be TLS 1.3. TLS 1.2 is only used for inner TLS (To send as payload in TLS 1.3 packets).
2.While enforcing TLS 1.3 the following Confirm Cipher Change message is displayed.
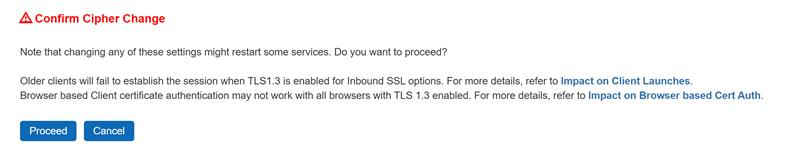
Client certificate authentication may not work on all browsers with TLS 1.3 enabled. For more details, refer to these articles Impact on Client Launchers and Impact on Browser Based Cert Auth.
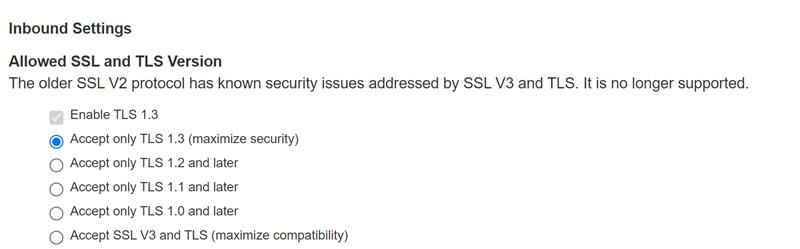
3.On selecting Accept only TLS 1.3 option, only TLS1.3 version and its related ciphers are enabled while other versions and their related cipher suites are rejected.
Release 22.4R2 and later does not support weak ciphers and the following list of ciphers are removed:
•TLS_ECDH_RSA_WITH_AES_128_GCM_SHA256
•TLS_ECDH_ECDSA_WITH_AES_128_GCM_SHA256
•TLS_ECDH_RSA_WITH_AES_128_CBC_SHA256
•TLS_ECDH_ECDSA_WITH_AES_128_CBC_SHA256
•TLS_ECDH_RSA_WITH_AES_128_CBC_SHA
•TLS_ECDH_ECDSA_WITH_AES_128_CBC_SHA
•TLS_ECDH_RSA_WITH_AES_256_GCM_SHA384
•TLS_ECDH_ECDSA_WITH_AES_256_GCM_SHA384
•TLS_ECDH_RSA_WITH_AES_256_CBC_SHA384
•TLS_ECDH_ECDSA_WITH_AES_256_CBC_SHA384
•TLS_ECDH_RSA_WITH_AES_256_CBC_SHA
•TLS_ECDH_ECDSA_WITH_AES_256_CBC_SHA
•TLS_ECDHE_ECDSA_WITH_3DES_EDE_CBC_SHA
•TLS_ECDH_RSA_WITH_3DES_EDE_CBC_SHA
•TLS_ECDH_ECDSA_WITH_3DES_EDE_CBC_SHA
•SSL_RSA_WITH_3DES_EDE_CBC_SHA
•TLS_ECDHE_RSA_WITH_3DES_EDE_CBC_SHA
•SSL_RSA_WITH_RC4_128_MD5
•SSL_RSA_WITH_RC4_128_SHA
•TLS_ECDH_ECDSA_WITH_RC4_128_SHA
•TLS_ECDHE_ECDSA_WITH_RC4_128_SHA
•TLS_ECDH_RSA_WITH_RC4_128_SHA
•TLS_ECDHE_RSA_WITH_RC4_128_SHA