Remote Desktop and Telnet/SSH via HTML5 Access
HTML5 Access is a client-less solution to access Remote Desktops using Remote Desktop Protocol (RDP), or to connect to internal server hosts using Telnet protocols, or to communicate over an encrypted Secure Shell (SSH) session.
Advanced HTML5 Access solution is disabled when FIPS mode is turned ON and is enabled when FIPS mode is turned OFF. FIPS mode is applicable for the entire cluster.
Configuring the HTML5 Access Feature
Creating a HTML5 Access Resource Profile
A HTML5 Access resource profile is a profile that enables users to connect to Remote Desktops or to connect to internal server hosts in the clear using Telnet protocols or to communicate over an encrypted Secure Shell (SSH) session through a Web-based terminal session emulation.
To create a HTML5 Access resource profile:
1.In the admin console, choose Users > Resource Profiles > HTML5 Access.
2.Click New Profile.
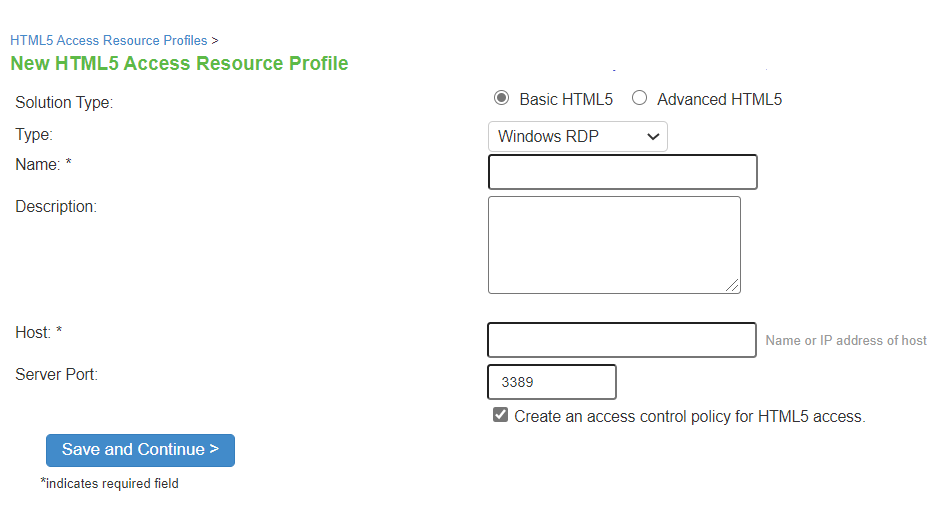
3.Select the Solution Type
•(9.x) Basic HTML5 or Advanced HTML5
Figure: HTML5 Access Resource Profile (9.x)
• (22.x) Advanced HTML5
Figure: HTML5 Access Resource Profile (22.x)
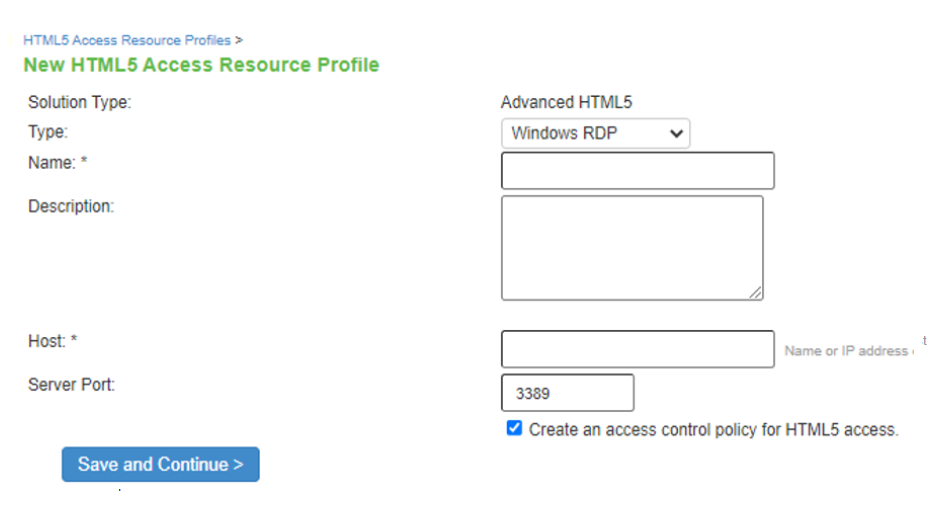
4.From the Type list, specify the session type (Windows RDP or SSH or Telnet) for this resource profile. If you have selected Advanced HTML5 solution type, you can also specify VNC session type.
5.Enter a unique name and optionally a description for the resource profile. (This name becomes the default bookmark's name.)
6.In the Host field, enter the Hostname, IP or user attribute of the server to which this resource profile should connect.
7.In the Server Port field, enter the port on which the system should connect to the server. (By default, the system populates this field with port number 3389 if you select Windows RDP, port number 23 if you select Telnet, port number 22 if you select SSH and port number 5900 if you select VNC.)
8.Select the Create an access control policy for HTML5 Access check box to enable access to the server specified in the Server Port box (enabled by default).
9.Click Save and Continue.
10.In the Roles tab, select the roles to which the resource profile applies and click Add.
The selected roles inherit the autopolicy and bookmarks created by the resource profile. If it is not already enabled, the system also automatically enables the HTML5 Access option in the Users > User Roles > Select Role > General > Overview page of the admin console for all of the roles you select.
11.Click Save Changes.
12.(Optional) In the Bookmarks tab, modify the default bookmark created by the system and/or create new ones. (By default, the system creates a bookmark to the server defined in the Host field and displays it to all users assigned to the role specified in the Roles tab.)
Defining Bookmarks for HTML5 Access Resource Profile
When you create a HTML5 Access resource profile, the system automatically creates a bookmark that links to the host that you specified in the resource profile. The system enables you to modify this bookmark as well as create additional bookmarks to the same host.
FIPS enabled users can create admin/end-user Advanced HTML5 bookmarks. However, Advanced HTML5 feature is still not FIPS compliant.
To define bookmarks for HTML5 Access resource profile:
1.In the admin console, select Users > Resource Profiles > HTML5 Access > Resource Profile Name > Bookmarks.
2.Click the appropriate link in the Bookmark column if you want to modify an existing session bookmark. Or, click New Bookmark to create an additional session bookmark.
Although it is generally easy to create a resource profile session bookmark through the resource profile configuration page, you can choose to create one through the user roles page as well.
3.(Optional.) Change the name and description of the session bookmark. (By default, the system populates and names the session bookmark using the resource profile name.)
The following figure depicts Creating a HTML5 Access Resource Profile - Bookmarks Configuration:
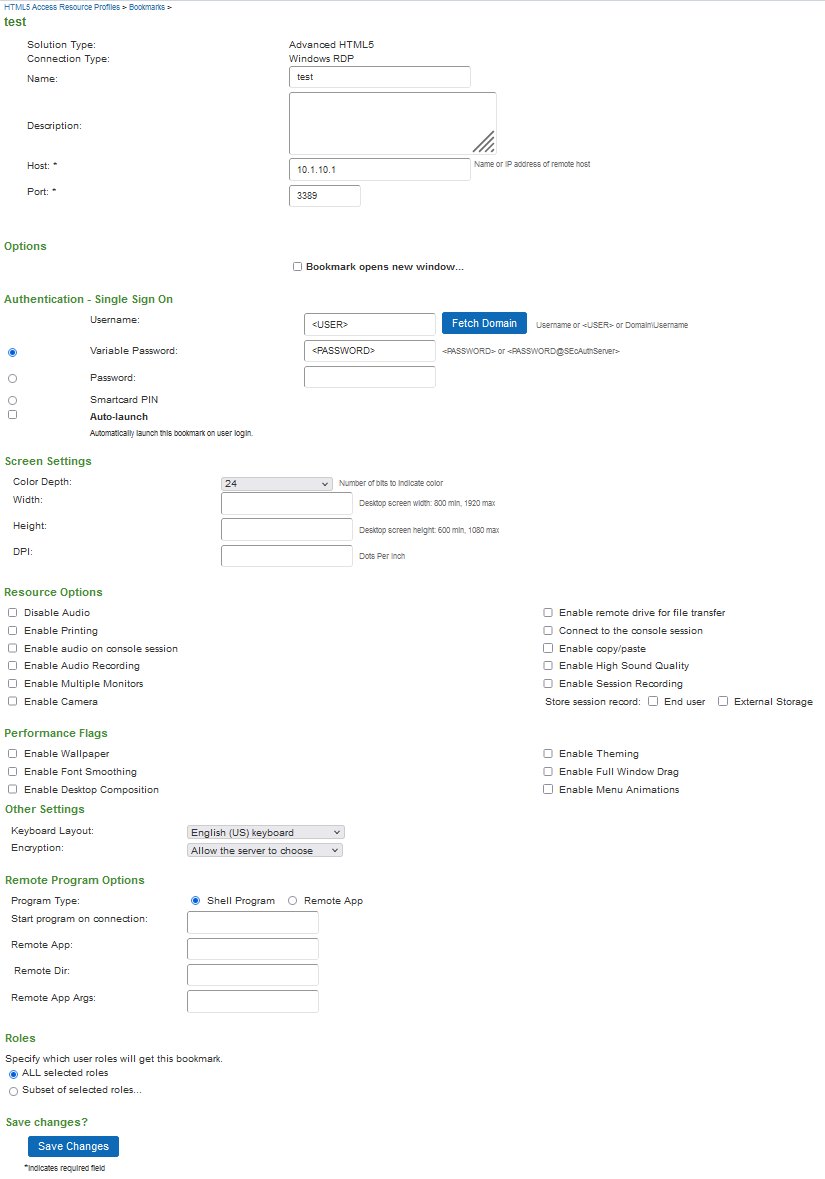
4.Allow users to open the bookmark in a new window by configuring the "Bookmark opens new window…" option and specifying how to display the browser address bar and browser toolbar. In 22.5R2 .1 auto-launch is introduced
5.Pass user credentials from the system to the terminal server so that users can sign onto the terminal server without having to manually enter their credentials. You can do this by configuring options in the Authentication - Single Sign On area of the bookmark configuration page. In 22.5R2.1 Auto-launch feature is introduced to automatically launch the bookmarks on user login.
6.Specify how the terminal emulation window should appear to the user during a terminal session by configuring options in the Screen Settings area of the bookmark configuration page.
7.Allow users to access local resources such as printers and drives through the terminal session by configuring options in the Resource Options area of the bookmark configuration page.
•Disable Audio - To disable sound during the remote session.
•Enable Printing - To grant access to the servers specified in the Resources list.
•Enable audio on console session - To grant access to the servers specified in the Resources list.
•Enable copy/paste - To grant copy/paste capability for particular resource.
•Enable remote drive for file transfer - To grant access to the servers specified in the Resources list.
•Connect to the console session - To grant access to the servers specified in the Resources list
•*Enable Audio Recording - To grant access to the audio recording during the remote session.
•*Enable High Sound Quality - To grant access to the high sound quality.
•*Enable Multiple Monitors - To grant access for multiple monitors connected to the client computer during the remote session.
•*Enable Session Recording - To grant access to the recording of end user sessions.
•*Enable Camera - To grant access to the web camera.
* Options available for Advanced HTML5 solution.
8.Allow users to access specific applications on the terminal server by configuring options in the Remote Program Options area of the bookmark configuration page. In addition, you can use settings in this area to define auto-launch and application directory and arguments options.
9.Specify the roles to which you want to display the session bookmarks if you are configuring the session bookmark through the resource profile pages, under Roles:
•ALL selected roles - Displays the session bookmark to all of the roles associated with the resource profile.
•Subset of selected roles - Displays the session bookmark to a subset of the roles associated with the resource profile. Then select roles from the ALL Selected Roles list and click Add to move them to the Subset of selected roles list.
10.Click Save Changes.
When a user accesses a HTML5 RDP bookmark without SSO to access backend resources, the client prompts for credentials before opening the HTML5 session.
The client does not provide options to change password.
Creating a HTML5 Enduser Bookmark for Remote Desktop
The following figure depicts Creating a HTML5 Enduser Bookmark for Remote Desktop:

1.In the admin console, choose Users > User Roles > Role > HTML5 Access > Options.
The administrator has the option to select the solution type as basic or Advanced HTML for each user role. Basic HTML5 is selected by default.
2.Enable the "User can add sessions" option to enable users to define their own HTML5 Access session bookmarks. When this option is enabled, the Add HTML5 Access Session button appears on the html5access panel the next time a user refreshes the user console.
3.Enable Remote Desktop Launcher to enable users to access HTML5 Access servers through the browse bar on the home page
4.Select the Deny single sign-on for sessions added by user option if you do not want the user Add HTML5 Access Session page to include the Authentication section used for single sign-on. This setting is disabled by default.
5.If you want to allow users to enable access to devices through the bookmarks they create, select from the following options in the Allow users to enable resources defined below section:
•User can Disable Audio - to disable sound during the remote session
•User can Enable remote drive for file transfer - to connect the user's local drive to the terminal server, enabling the user to copy information from the terminal server to his local client directories.
•User can Enable Printing - to connect the user's local printers to the terminal server, enabling the user to print information from the terminal server to his local printer.
•User can Connect to the console session - to connect to the console (admin) session of the RDP server
•User can enable audio on console session - to play the audio only at the server.
•User can enable copy/paste - to enable copy from the rdp session and paste to the clipboard
•*User can enable high sound quality - to enable high sound quality.
•*User can enable audio recording - to enable audio recording of the user session.
•*User can enable session recording - to enable session recording of the user session.
•*User can enable multiple monitor - to enable maximum of four monitors connected to the client computer for the remote desktop connection thereby providing extra desktop space.
•*User can enable camera redirection - to enable web camera redirection.
* Options available for Advanced HTML5 solution.
- With regard to an end user, if the Allow user to add session is enabled, an icon appears in the end user's page to add HTML5 access session. Options are similar to admin bookmark options based on the settings an admin allows a user to change.
- Options indicated with * are available for Advanced HTML5 bookmarks.
6.If you want to allow users to enable performance flags through the bookmarks they create, select from the following options in Allow users to enable performance flags defined below section:
•User can enable wallpaper - to allow users to display a wallpaper background to users.
•User can enable theming - to allow users to set Windows themes in their terminal server windows.
•User can enable font smoothing - to allow users to make text smoother and easier to read. This option only works on Windows Vista computers running RDP clients that are version 6.0 or later.
•User can enable full window drag - to enable users to specify the contents of the Internet Explorer window while they move the windows on their desktops.
•User can enable desktop composition - to allow users to make text smoother and easier to read. This option only works on Windows Vista computers running RDP clients that are version 6.0 or later.
•User can enable menu animations - to enable users to animate the movement of menus.
7.If you want to allow users to enable access to devices through the SSH bookmarks, select from the following options in the SSH-Allow users to enable resources defined below section:
•User can enable STFP - to enable users to establish SFTP connections
•*User can enable Copy/Paste - to enable copy from the session and paste to the clipboard
8.If you want to allow users to enable access to devices through the Telnet bookmarks, select from the following options in the Telnet-Allow users to enable resources defined below section:
•*User can enable Copy/Paste - to enable copy from the rdp session and paste to the clipboard
9.If you want to allow users to enable access to devices through the VNC bookmarks, select from the following options in the VNC-Allow users to enable resources defined below section:
•*User can enable Copy/Paste - to enable copy from the session and paste to the clipboard
•User can track remote cursor locally - to enable rendering remote system cursor locally by the viewer
•User can ignore remote cursor - to enable ignoring the remote cursor
Configuring External Storage
The following figure depicts External Storage configuration.
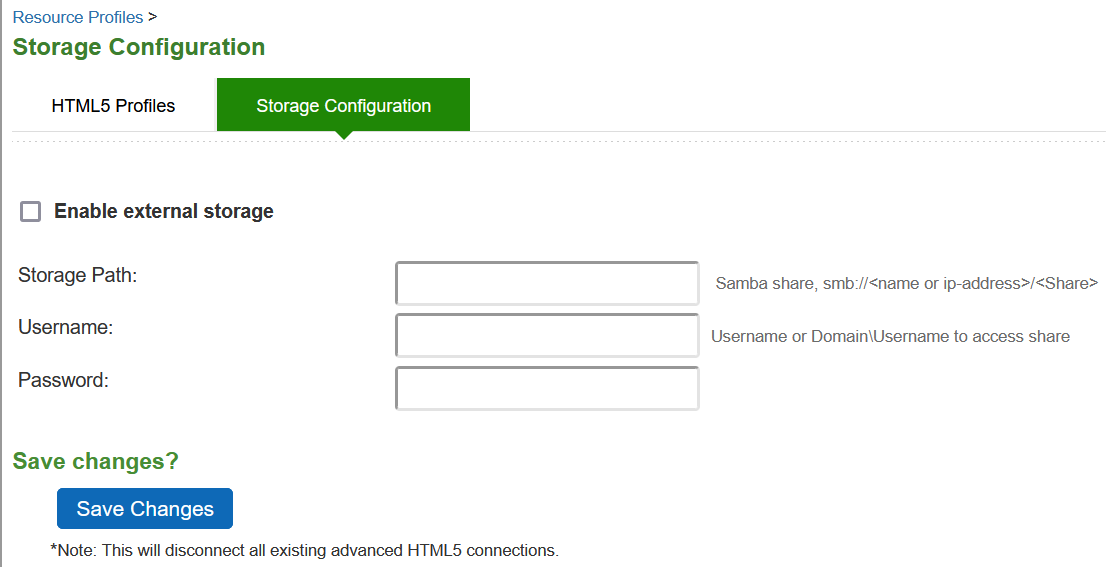
To configure the external storage for session recordings:
1.In the admin console, navigate to Users > Resource Profiles> HTML5 Access > Storage Configuration.
2.Select Enable external storage.
3.Enter the complete storage path to store the session recordings.
4.Enter the Username and Password required to access the location.
5.Click Save Changes.
Defining SSO Options for the Remote Desktop Session
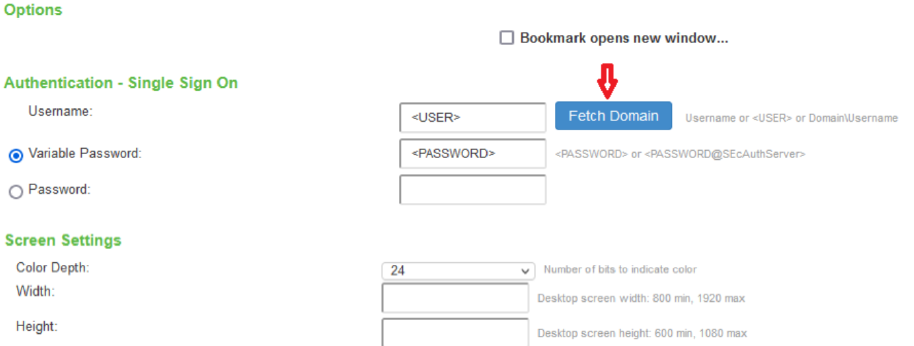
The following figure depicts Defining SSO Options for the Remote Desktop Session (Users >Authentication - Single Sign On):
To define single sign-on options:
1.Create Remote Desktop bookmark or edit an existing bookmark.
2.Scroll to the Authentication - Single Sign On area of the bookmark configuration page.
3.Specify Username to pass to the terminal server. You can enter a static username or a variable. Enter the <username> variable to pass the username stored in the system's primary authentication server. Or use the following syntax to submit the username for the secondary authentication server: <username@SecondaryServerName> or <username[2]>. The Fetch domain is provided for the admins and end-user created bookmarks. This option helps to fetch the domain name from the remote AD machine.
4.Specify Password if you want to specify a static password or specify Variable Password if you want to use the password stored in the system's primary or secondary authentication server. To use the password from the primary authentication server, enter the <password> variable. Or use the following syntax to submit the password for the secondary authentication server: <Password@SecondaryServerName> or <Password[2]>.
5.Click Save Changes.
Defining Display Options for the Remote Desktop Session
When configuring Remote Desktop bookmark, you can specify how the terminal emulation window should appear to users during their terminal sessions.
To define display settings for the users' sessions:
1.Create a Remote Desktop bookmark or edit an existing bookmark.
2.Scroll to the Screen Settings area of the bookmark configuration page.
3.Select number of bits to indicate color in the Color Depth drop-down list. The default color depth is 24bit.
4.Enter the desktop screen width in the Width box. You can set it to minimum 800 and maximum 1920.
5.Enter the desktop screen height in the Height box. You can set it to minimum 600 and maximum 1080.
6.Enter the screen resolution in the DPI box.
7.Click Save Changes.
Defining Device Connections for the Remote Desktop Session
To define local resources that users can access:
1.Create a Remote Desktop bookmark or edit an existing bookmark.
2.Scroll to the Resource Options area of the bookmark configuration page.
3.Select Enable remote drive for file transfer to connect the user's local drive to the terminal server, enabling the user to copy information from the terminal server to his local client directories.
4.Select Enable Printing to connect the user's local printers to the terminal server, enabling the user to print information from the terminal server to his local printer.
5.Select Disable Audio to disable sound during the remote session. Select Enable audio on console session to play the audio only at the server.
Sound options are supported by Microsoft Remote Desktop Protocol.
File transfer (using the new HTML5/RDP feature) does not work if the Disable Audio option is checked.
6.If you want to allow users to enable performance flags through the bookmarks they create, select from the following options in Allow users to enable performance flags defined below section:
•User can enable wallpaper - to allow users to display a wallpaper background to users.
•User can enable theming - to allow users to set Windows themes in their terminal server windows.
•User can enable font smoothing - to allow users to make text smoother and easier to read. This option only works on Windows Vista computers running RDP clients that are version 6.0 or later.
•User can enable full window drag - to enable users to specify the contents of the Internet Explorer window while they move the windows on their desktops.
•User can enable desktop composition - to allow users to make text smoother and easier to read. This option only works on Windows Vista computers running RDP clients that are version 6.0 or later.
•User can enable menu animations - to enable users to animate the movement of menus.
7.Click Save Changes.
8.For a detailed file transfer procedure, refer to the KB article: File Transfer on Remote Desktop via HTML5 Access.
Defining Application Settings for the Remote Desktop Session
When configuring Remote Desktop bookmark, you can specify that users can only access specific applications on the terminal server.
To define applications that users can access:
1.Create Remote Desktop bookmark or edit an existing bookmark.
2.Scroll to the Remote Program Options area of the bookmark configuration page.
3.Specify the program that you want to launch automatically on connection in the Specify program on connection box.
4.Enter the application name (applicable only for servers running Windows 2008 and later) in the Remote App box.
5.Specify where the application's executable file resides on the terminal server in the Remote App Dir box (visible only when you clear Launch seamless window). For example, you might enter the following directory for the Microsoft Word application: C:\Program Files\Microsoft Office\Office10\WinWord.exe
6.Specify the arguments for the application in the Remote App Args box.
You can use session variables such as <username> and <password> in the Remote App Args box. For example, when specifying an application path, you might want to include the <username> variable to personalize the location. For example: C:\Documents and Settings\<username>\My Documents.
7.Click Save Changes.
Windows requires a special notation for the names of remote applications. The names of remote applications must be prefixed with two vertical bars. For example, if you have created a remote application on your server for notepad.exe and have assigned it the name "notepad", you would set this parameter to: "||notepad".
Defining VNC Bookmarks for HTML5 Access Resource Profile
When you create a HTML5 Access resource profile with VNC session type, the system automatically creates a bookmark that links to the host that you specified in the resource profile. The system enables you to modify this bookmark as well as create additional bookmarks to the same host.
To define bookmarks for HTML5 Access resource profile:
1.In the admin console, select Users > Resource Profiles > HTML5 Access > Resource Profile Name > Bookmarks.
2.Click the appropriate link in the Bookmark column if you want to modify an existing session bookmark. Or, click New Bookmark to create an additional session bookmark.
3.(Optional.) Change the name and description of the session bookmark. (By default, the system populates and names the session bookmark using the resource profile name.)
The following figure depicts Creating an HTML5 Access Resource Profile - Bookmarks Configuration:

4.Allow users to open the bookmark in a new window by configuring the "Bookmark opens new window…" option and specifying how to display the browser address bar and browser toolbar.
5.In the Authentication - Single Sign On section:
•Specify Username to pass to the terminal server. You can enter a static username or a variable. Enter the <username> variable to pass the username stored in the system's primary authentication server. Or use the following syntax to submit the username for the secondary authentication server: <username@SecondaryServerName> or <username[2]>.
•Specify Password if you want to specify a static password or specify Variable Password if you want to use the password stored in the system's primary or secondary authentication server. To use the password from the primary authentication server, enter the <password> variable. Or use the following syntax to submit the password for the secondary authentication server: <Password@SecondaryServerName> or <Password[2]>.
6.In the VNC Settings section:
•Select number of bits to indicate color in the Color Depth drop-down list.
•Select Enable Copy/Paste option to grant copy/paste capability for particular resource.
•Select Track remote cursor locally option to render remote system cursor locally by the viewer.
•From the Encoding drop-down list, select the appropriate method for encoding the remote screen image.
7.Specify the roles to which you want to display the session bookmarks if you are configuring the session bookmark through the resource profile pages, under Roles:
•ALL selected roles - Displays the session bookmark to all of the roles associated with the resource- profile.
•Subset of selected roles - Displays the session bookmark to a subset of the roles associated with he resource profile. Then select roles from the ALL Selected Roles list and click Add to move them to the Subset of selected roles list.
8.Click Save Changes.
When a user accesses a HTML5 VNC bookmark without SSO to access backend resources, the client prompts for credentials before opening the HTML5 session.
Remote Desktop User Experience
When you enable the Remote Desktops via HTML5 Access for a user role, the end user needs to specify the resource that the user wants to access and enter credentials for the resource.
Users can access remote desktop resources using the following methods:
•URLs from other web sites - In most cases, users access session bookmarks directly from the end-user console. If you do not want to require users to sign into the end-user console to find and access Remote Desktop links, you can create URLs on other web sites that point to session bookmarks that you have already created.
•Ivanti Connect Secure browse bar - In addition to enabling users to link to Remote Desktop links through bookmarks and URLs, you can also enable them to access these resources through the system browse bar on Windows systems. Users can access Microsoft terminal services or remote desktop sessions by entering hrdp://hostname in the browse box.
•Server address - By entering the Remote Desktop IP address or hostname, users can launch a remote desktop connection to any accessible server.
Telnet/SSH User Experience
The HTML5 Access feature supports the following applications and protocols:
•Network Protocols - Supported network protocols include Telnet and SSH.
•Terminal Settings - Supported terminal settings include VT100, VT320, and derivatives and screen buffers.
•Security - Supported security mechanisms include Web/client security using SSL and host security (such as SSH if desired).
You can create secure terminal session bookmarks that appear on the welcome page for users mapped to a specific role. A terminal session bookmark defines Terminal Session information for Telnet or SSH sessions that users may launch. These sessions give users access to a variety of networked devices, networking devices, and other legacy applications, that utilize terminal sessions. The system supports SSH versions V1 and V2 and uses the following SSH versions: OpenSSH 5.2, OpenSSH_2.9.9p1, SSH protocols 1.5/2.0, and OpenSSL 0x0090607f.
For detailed Telnet/SSH configuration, refer to Telnet/SSH
Monitoring HTML5 Sessions
The current HTML5 sessions information is provided in Dashboard and the trend graph. This information helps administrator to view the CPU usage and take necessary action to provide better remote access experience for the users. The connection type is logged as HTML5.
To enable HTML5 graph:
1.Select System > Status > Overview.
2.In the Select list of graphs list, enable the HTML5 Connections option. By default, this option is enabled.
The HTML5 Connections graph shows the traffic on the HTML5 RDP, HTML5 SSH, and HTML5 Telnet connections.
3.Select System > Status > Virtual Desktop Sessions.
The Active Virtual Desktops Sessions page lists the active user sessions and the connection types.
4.Select System > Log Monitoring > User Access > Log to view the HTML5 sessions log.
Launching Custom Page via HTML5 Access
An end user can launch either Basic HTML5 session or Advanced HTML5 session. End users can connect to a target server by entering the following in the browser bar:
https://<PCS-FQDN>/dana/html5acc/html5urllaunch.cgi?type=launcher&host=<TargetMachineIP>&port=3389& stype=0&width=600&height=480&dpi=96&security=tls&enable-wallpaper=true&enable-full-windowdrag=true& username=admin&password=pcs123&enable-drive=false&enable-printing=true&disable-audio=true&client-name=<any-string>To allow end users to use RDPLauncher,
1.Navigate to Users > User Roles > Role Name > General > Overview and select the HTML5 Access option.
2.Navigate to Users > User Roles > Role Name > HTML5 Access > Options and do the following:
•Select Enable Remote Desktop Launcher.
•Select necessary resources which user wants to access.
•Select necessary performance flags which user wants to access.
If the user is not logged in to ICS, it will prompt for ICS login and then prompt for target server credentials as shown in the screenshot below. Upon providing necessary details, it will open the HTML5 session.
The following figure depicts Additional Authentication in the Target Server:

The parameter can be validated from the RDP client task manager -> Users > client name.
Parameters that can be configured via query parameters are:
•disable-audio (true/false)
•enable-drive (true/false)
•enable-printing (true/false)
•console (true/false)
•console-audio (true/false)
•enable-wallpaper (true/false)
•enable-theming (true/false)
•enable-font-smoothing (true/false)
•enable-full-window-drag (true/false)
•enable-desktop-composition (true/false)
•enable-menu-animations (true/false)
•color-depth(8/16/24)
•security (rdp, nla, tls and any)
•server-layout(en-us-qwerty, de-de-qwertz,fr-fr-azerty, it-it-qwerty, sv-se-qwerty, failsafe)
•color-scheme (black-white, white-black, gray-black, green-black)
•font-name (courier, monospace etc...)
•font-size
•width
•height
•dpi
•host
•port
•stype (eg: 0=rdp, 1=ssh and 2 = telnet)
•ignore-cert (true)
•client-name