Resource Policies
Resource Policies
A resource policy is a system rule that specifies resources and actions for a particular access feature. A resource is either a server or file that can be accessed through the system, and an action is to "allow" or "deny" a resource or to perform or not perform a function. Each access feature has one or more types of policies, which determine the system's response to a user request or how to enable an access feature. You may also define detailed rules for a resource policy, which enable you to evaluate additional requirements for specific user requests.
You can create the following types of resource policies through the Resource Policies pages:
•Web Resource Policies - The Web resource policies specify the Web resources to which users may or may not browse. They also contain additional specifications such as header caching requirements, servers to which java applets can connect, code-signing certificates that the system should use to sign java applets, resources that the system should and should not rewrite, applications for which the system performs minimal intermediation, and single sign-on options., for a fresh installation, the predefined Web Access Resource Policy "Initial Policy for Local Resources" is in "Deny" state by default.
•File Resource Policies - The file resource policies specify the Windows file resources to which users may or may not browse. They also contain additional specifications such as file resources for which users need to provide additional credentials.
For a fresh installation, the predefined Windows File Access Resource Policy "Initial File Browsing Policy" is in "Deny" state by default.
•Secure Application Manager Resource Policies - The Secure Application Manager resource policies allow or deny access to applications configured to use JSAM or PSAM to make socket connections.
•Terminal Services Policies - The Terminal Services resource policies allow or deny access to the specified Windows servers or Citrix Metaframe servers.
•VPN Tunneling Resource Policies - The VPN Tunneling resource policies allow or deny access to the specified servers and specify IP address pools.
You can also create resource policies as part of the resource profile configuration process. In this case, the resource policies are called "advanced policies."
Resource policies are an integral part of the access management framework, and therefore are available on all Ivanti Connect Secure products. However, you can access only resource policy types that correspond to your licensed features.
Resource Policy Components
A resource policy contains the following information:
•Resources - A collection of resource names (URLs, hostnames, or IP address/netmask combinations) that specifies the resources to which the policy applies. You can specify a resource using a wildcard prefix to match hostnames. The default resource for a policy is star (*), meaning that the policy applies to all related resources.
•Roles - An optional list of user roles to which this policy applies. The default setting is to apply the policy to all roles.
•Action - The action for the system to take when a user requests the resource corresponding to the Resource list. An action may specify to allow or deny a resource or to perform or not perform an action, such as to rewrite Web content or allow Java socket connections.
•Detailed Rules - An optional list of elements that specifies resource details (such as a specific URL, directory path, file, or file type) to which you want to apply a different action or for which you want to evaluate conditions before applying the action. You can define one or more rules and specify the order in which the system evaluates them.
Specifying Resources for a Resource Policy
The system platform's engine that evaluates resource policies requires that the resources listed in a policy's Resources list follow a canonical format. This section describes the canonical formats available for specifying Web, file, and server resources. When a user tries to access a specific resource, the system compares the requested resource to the resources specified in the corresponding policies, starting with the first policy in a policy list. When the engine matches a requested resource to a resource specified in a policy's Resources list, it then evaluates further policy constraints and returns the appropriate action to the appliance (no further policies are evaluated). If no policy applies, then the appliance evaluates the auto-allow bookmarks (if defined); otherwise the default action for the policy is returned.
You may not see the auto-allow option if you are using a new installation, if you use resource profiles rather than resource policies, or if an administrator has hidden the option.
General Notes About the Canonical Formats
Please note the following when using canonical formats:
•If a path component ends with forward-slash_star (/*), then it matches the leaf node and everything below. If the path component ends with forward-slash_ percent (/%), then it matches the leaf node and everything one-level below only. For example:
/intranet/*matches:
/intranet
/intranet/home.html
/intranet/elee/public/index.html
/intranet/% matches:
/intranet
/intranet/home.html
but NOT /intranet/elee/public/index.html
•A resource's hostname and IP address are passed to the policy engine at the same time. If a server in a policy's Resources list is specified as an IP address, then the evaluation is based on the IP address. Otherwise, the engine tries to match the two hostnames. It does not perform a reverse-DNS-lookup to determine the IP.
You cannot specify a hostname for a VPN Tunneling resource policy. You can only specify an IP address.
•If a hostname is not fully qualified in the hosts file, such as "secure" instead of "intranet. ivanti.com", and you are accessing a hostname using the short name, then the engine performs the resource matching against the short name. If, however, the short name is not in the hosts file and the hostname resolution is done by DNS (by adding the domains listed in the Networks configuration page), then the fully qualified domain name (FQDN) is used for resource matching. In other words, for web resource policies a DNS lookup of the short name is performed. The result of the DNS lookup is a FQDN; the engine matches the FQDN with the ones entered in the UI.
Specifying Server Resources
When specifying server resources for Terminal Services or VPN Tunneling resource policies, note the following guidelines.
The canonical format is [protocol://] host [:ports]
The components are:
•Protocol (optional) - Possible case-insensitive values:
•tcp
•udp
•icmp
If the protocol is missing, then all protocols are assumed. If a protocol is specified, then the delimiter "://" is required. No special characters are allowed.
Available only to VPN Tunneling policies. For other access feature resource policies, such as Secure Application Manager it is invalid to specify this component.
•Host (required) - Possible values:
•IP address/Netmask - The IP address needs to be in the format: a.b.c.d
The netmask may be in one of two formats:
•Prefix: High order bits
•IP: a.b.c.d
For example: 10.11.149.2/24 or 10.11.149.2/255.255.255.0
No special characters are allowed.
•DNS Hostname - For example: www.ivanti.com
The following table lists the DNS Hostname Special Characters
|
* |
Matches ALL characters |
|
% |
Matches any character except dot (.) |
|
? |
Matches exactly one character |
You cannot specify a hostname for a VPN Tunneling resource policy. You can only specify an IP address.
•Ports (optional) - Possible values are shown in the following table:
|
* |
Matches ALL ports; no other special characters are allowed |
|
port[,port]* |
A comma-delimited list of single ports. Valid port numbers are [1- 65535]. Do not enter a space between port numbers. You can specify up to 15 ports. |
|
[port1]-[port2] |
A range of ports, from port1 to port2, inclusive. |
You may mix port lists and port ranges, such as: 80,443,8080-8090, except for in VPN Tunneling where mixing of port lists and port ranges is not supported.
If the port is missing, then the default port 80 is assigned for http, 443 for https. For VPN Tunneling, if the port is missing then the default port http is *. If a port is specified, then the delimiter ":" is required. For example:
<username>.danastreet.net:5901-5910
tcp://10.10.149.149:22,23
tcp://10.11.0.10:80
udp://10.11.0.10:*
Resource Policy Evaluation
When the system receives a user request, it evaluates the resource policies corresponding to the type of request. When it processes the policy that corresponds to the requested resource, it applies the specified action to the request. This action is defined on the policy's General tab or Detailed Rules tab. For example, if a user requests a Web page, the system knows to use the Web resource policies. In the case of Web requests, the system always starts with the Web Rewriting policies (Selective Rewriting and Pass through Proxy) to determine whether or not to handle the request. If none of these policies applies (or none is defined), the system then evaluates the Web Access policies until it finds one that pertains to the requested resource.
The system evaluates a set of resource policies for an access feature from the top down, meaning that it starts with the policy numbered one and then continues down the policy list until it finds a matching policy. If you defined detailed rules for the matching policy, the system evaluates the rules from the top down, starting with the rule numbered one and stopping when it finds a matching resource in the rule's Resource list. The following figure illustrates the general steps of policy evaluation:
The following figure depicts the Resource Policy Evaluation Steps:
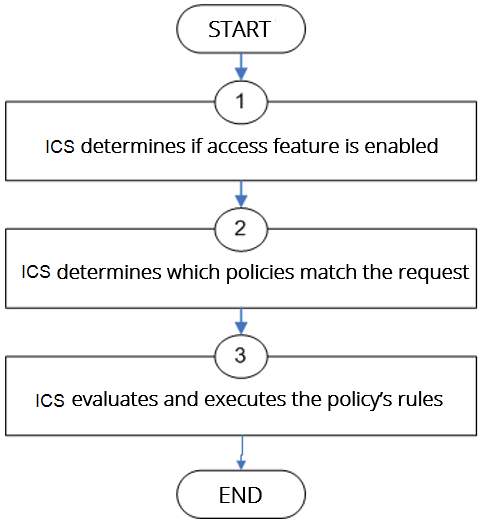
Details regarding each evaluation step:
1.The system receives a user request and evaluates the user's session role to determine if the corresponding access feature is enabled. A user's "session role" is based on either the role or roles to which the user is assigned during the authentication process. The access features enabled for a user are determined by an authentication realm's role mapping configuration.
2.The system determines which policies match the request. The system evaluates the resource policies related to the user request, sequentially processing each policy until finding the one whose resource list and designated roles match the request. (If you configure the system using resource profiles, the system evaluates the advanced policies that you configure as part of the resource profile.)
The Web and file access features have more than one type of policy, so the system first determines the type of request (such as to a Web page or Java applet and then evaluates the policies related to the request. In the case of the Web access feature, the Rewriting policies are evaluated first for every Web request. The remaining access features - Secure Application Manager, Secure Terminal Access-have only one resource policy.
3.The system evaluates and executes the rules specified in the matching policies. You can configure policy rules to do two things:
•Specify resources to which an action applies at a more granular level. For example, if you specify a Web server in the main policy settings for a Web Access resource policy, you can define a detailed rule that specifies a particular path on this server and then change the action for this path.
•Require the user to meet specific conditions written as boolean expressions or custom expressions in order to apply the action.
4.The system stops processing resource policies as soon as the requested resource is found in a policy's Resource list or detailed rule.
If you use automatic (time-based) dynamic policy evaluation or you perform a manual policy evaluation, the system repeats the resource evaluation process described in this section.
Creating Detailed Rules for Resource Policies
A detailed rule is an extension of a resource policy that may specify:
•Additional resource information - such as a specific path, directory, file, or file type - for resources listed on the General tab. Note that you may also specify the same resource list (as on the General tab) for a detailed rule if the only purpose of the detailed rule is to apply conditions to a user request.
•An action different from that specified on the General tab (although the options are the same).
•Conditions that must be true in order for the detailed rule to apply.
In many cases, the base resource policy - that is, the information specified on the General tab of a resource policy - provides sufficient access control for a resource:
If a user belonging to the (defined_roles) tries to access the (defined_resources), DO the specified (resource_action).
You may want to define one or more detailed rules for a policy when you want perform an action based on a combination of other information, which can include:
•A resource's properties - such as its header, content-type, or file type.
•A user's properties - such as the user's username and roles to which the user maps.
•A session's properties - such as the user's source IP or browser type, whether the user is running Host Checker or Cache Cleaner, the time of day, and certificate attributes.
Detailed rules add flexibility to resource access control by enabling you to leverage existing resource and permission information to specify different requirements for different users to whom the base resource policy applies.
Writing a Detailed Rule for Resource Policies
Detailed rules add flexibility to resource access control by enabling you to leverage existing resource and permission information to specify different requirements for different users to whom the base resource policy applies.
To write a detailed rule for a resource policy:
1.On the New Policy page for a resource policy, enter the required resource and role information.
2.In the Action section, select Use Detailed Rules and then click Save Changes.
3.On the Detailed Rules tab, click New Rule.
4.On the Detailed Rule page:
•In the Action section, specify:
•Disable SSO - The system disables automatic SSO authentication for this user role and, instead, prompts the user for sign-in credentials.
•Basic Auth - This option specifies that the system use the Basic Authentication Intermediation method to control SSO behavior.
•Enable Intermediation - Select the credentials to use. If this pull-down menu is blank, no basic authentication SSO settings are defined in the SSO General tab.
•Disable Intermediation - When you select this option, the system does not intermediate the challenge/response sequence.
The system always intermediates requests to Web proxies that require basic authentication, even if you select Disable Intermediation.
Although you are given an option to disable basic authentication intermediation, we do not recommend this option, as it is a very insecure authentication method and, in some cases, can transmit user credentials over the network in clear (unencrypted) text.
•NTLM - This option specifies that the system use the Microsoft NTLM Intermediation method to control SSO behavior.
Select the credentials to use. If this pull-down menu is blank, no NTLM SSO settings are defined in the SSO General tab.
Select the Fallback to NTLM V1 option to try both NTLM V1 and NTLM V2. If you do not select this option, the system falls back only to NTLM V2. An intermediation page appear if SSO fails.
•Kerberos - This option specifies that the system use the Kerberos Intermediation method to control SSO behavior.
Select the credentials to use. If this pull-down menu is blank, no kerberos SSO settings are defined in the SSO General tab.
Select the Fallback to NTLM V2 option to fallback only to NTLM V2 if kerberos fails. If you do not select this option, a Kerberos intermediation page appears if Kerberos SSO fails.
•Constrained Delegation - This option specifies that the system use the constrained delegation intermediation method to control SSO behavior.
Select the credentials to use. If this pull-down menu is blank, no constrained delegation SSO settings are defined in the SSO General tab.
Select the Fallback to Kerberos option fallback to Kerberos if constrained delegation fails. If you select this option, an intermediation page appears if constrained delegation fails. If you do not select this option and constrained delegation fails, an error page appears.
•In the Resources section, specify any of the following (required):
•The same or a partial list of the resources specified on the General tab.
•A specific path or file on the server(s) specified on the General tab, using wildcards when appropriate. For information about how to use wildcards within a Resources list, see the documentation for the corresponding resource policy.
•A file type, preceded by a path if appropriate or just specify */*.file_extension to indicate files with the specified extension within any path on the server(s) specified on the General tab.
•In the Conditions section, specify one or more expressions to evaluate in order to perform the action (optional):
•Boolean expressions: Using system variables, write one or more boolean expressions using the NOT, OR, or AND operators.
•Custom expressions: Using the custom expression syntax, write one or more custom expressions.
You can use the <USER> substitution variable in ACLs for web pages, telnet, files, and SAM. You cannot use the variable in VPN Tunneling ACLs.
When specifying a time condition, the specified time range cannot cross midnight. The workaround is to break the time range into two conditions.
•Click Save Changes.
5.On the Detailed Rules tab, order the rules according to how you want the system to evaluate them. Keep in mind that once the system matches the resource requested by the user to a resource in a rule's Resource list, it performs the specified action and stops processing rules (and other resource policies).
Customizing Resource Policy UI Views
You can limit which resource policies the system displays on any given resource policy page based on user roles. For instance, you can configure the Users > Resource Policies > Web page of the admin console to only display those resource policies that are assigned to the "Sales" user role.
To control which resource policies the system displays:
1.Navigate to Users > Resource Policies >Policy Type.
2.From the Show all policies that apply to list, select All Roles or an individual role.
3.Click Update. The system displays resource policies that are assigned to the selected roles.