ICS Gateway Licensing
Ivanti Connect Secure software and Ivanti Policy Secure software include an Ivanti Licensing and Software Download Center @ https://my.pulsesecure.net, that lets you configure the Ivanti Connect Secure device as a license server to allow administrators to view all configured systems and move those licenses as needed. Other devices on the network lease licenses from the central license server.
Alternatively, you can install and manage licenses directly on each device and eliminate the license server entirely. Your company’s needs and requirements dictate which configuration is best for you.
Obtaining, Entering, and Upgrading Your License Keys
To take full advantage of your device, you must access the Ivanti Secure Licensing and Software Download Center at https://my.pulsesecure.net, provide your licensing hardware ID and authorization code(s) to obtain your license keys, and sign in to the admin console to enter the license keys you receive from Ivanti.
A licensing hardware ID is a unique 16-character code Ivanti uses to identify your particular device when generating license keys. You can find the system’s licensing hardware ID above the menu options in the serial console and at the bottom of the admin console.
An authorization code is a pass key required to generate and activate license keys you or your company have purchased for your device. You receive your authorization code(s) after you purchase your device and associated product and feature licenses. Figure underneath shows the license key generation and activation flow.
Licensing Capacity
The ISA Series is purpose-built for next-generation secure access. With multiple deployment options for physical, virtual or cloud deployments, the ISA series can grow organically and dynamically with an organization’s secure access needs. For more details see, ISA datasheet.
License Types
•Feature License (Example: Advanced HTML5)
•Capacity-Derived Licenses and Client Platform Compatibility
Subscription Licenses
Subscription licenses and renewal licenses (identified by a -R appended to the license name) have a start and end date embedded within them. Customers initially purchase a subscription license that is valid until a specified date. When the license expiration date nears, customers can renew their licenses.
When the license is installed, the start and end date are interpreted relative to the local time and time zone on the machine. The start date begins at 12:00 am and the end date ends at midnight of the end date (12:00 am of the following day). If the start date is in the future, the subscription or renewal license is not activated till the start date. A renewal license is automatically activated only if there is a corresponding expired subscription license.
A subscription license can only be renewed by a corresponding renewal license and a renewal can be activated only by the expiration of a corresponding subscription or renewal license.
Feature License (Example: Advanced HTML5)
Feature license controls the availability of feature. If this license is installed, a particular functionality becomes available for the customer. User count on feature license enables a feature for a fixed number of users. Feature licenses can be either subscription-based or perceptual.
Capacity-Derived Licenses and Client Platform Compatibility
Capacity derived licenses can be leased only to the same platform family. Non-platform or non-family-specific licenses can be leased to any platform.
Cluster Licenses
The license server can lease licenses to both standalone clients and clustered clients. Note the following for leasing licenses to clustered clients:
•Only one cluster member, identified by the Ivanti Connect Secure or Ivanti Policy Secure software, makes lease requests on behalf of all cluster members. This member can query, renew, and increment licenses for other cluster members when the members are connected to the cluster.
•In order to lease from platform or platform-family specific perpetual licenses or to surrender installed licenses, each cluster member participating in license leasing must have the LICENSE-MBR license installed. Otherwise, the LICENSE-MBR license is not required.
When setting up the cluster license information, it is not necessary to enter the cluster configuration at the license server. This information is retrieved dynamically as each client reports its own cluster affiliation to the server and is displayed in the license server admin console.
The initial communication between the clusters to the license server retrieves the reserved counts for all cluster members registered with the license server. Incremental requests are the sum of all members in the cluster that are not at their maximum configured capacity.
|
License Type |
Gateway Licensing Mode | NSA Named User Licensing Mode |
|---|---|---|
|
Platform/Core License |
Install license locally or lease license for license server. |
Register the ICS Gateway with NSA and if the ICS Gateway is using NSA Named User Licensing Mode then the Platform/Core license is not required. |
|
Concurrent User License |
Install license locally or lease license for license server. |
Register ICS Gateway with NSA. |
|
Feature licenses (Adv HTML5 etc) |
Install license locally or lease license for license server. |
Install license locally on ISA-V. |
For additional details, see “Licensing on License Server Cluster (A/P)”.
Using Licenses without a License Server
An admin obtains an authentication code for his entitlement externally via e-mail. The admin must enter the authentication code in the license server download page to validate and fetch license keys. If validation is successful, the admin receives the license keys in return.
To obtain license keys:
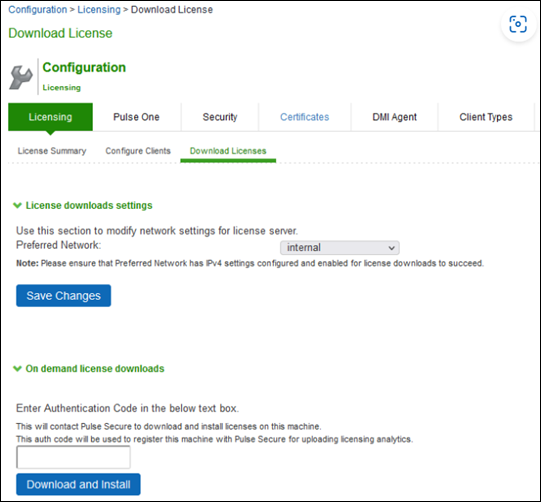
- Go to System > Configuration > Download Licenses.
- Under On demand license downloads, enter the authentication code in the text box.
- Click on Download and Install.
- Now, go to the License Summary tab to view a list of licenses installed.
- To delete one or more licenses, select the corresponding check box(es) and click Delete.
Configuring a Device as a License Server
When using a license server in your environment, you must configure a device as the server and then configure the handshake between each client and that server. This section describes the procedures for setting up a license server.
License Allocations
Before a device can lease licenses from the license server, you must first allocate licenses to that particular device. License allocation information consists of the following:
•License client ID—You must assign a unique ID to each license client to identify that client. The client identifies itself with the license server using the client ID.
•User count license properties:
•Reserved user count (RUC)—The number of user count licenses reserved for this client. A license leased to this client cannot be less than the RUC number.
•Maximum user count (MUC)—The maximum number of user count licenses this client is allowed to request. This number must be greater than or equal to the RUC. Requests for licenses greater than the RUC are granted only if the license server has additional licenses available at the time of the request.
•Incremental lease quantum (ILQ)—Clients can request an increase or decrease to its user count lease only in multiples of this number. The ILQ must be at least 25 unless the difference between the MUC and the RUC is less than 25. The ILQ must also be at least 10% of the difference between the MUC and the RUC. This restriction eases excessive protocol traffic.
•Expiration date—The date when the client configuration expires. When the client configuration expires, the server no longer accepts lease requests from the client. You can use this, for example, to define a two-year service to a customer.
As you allocate licenses, the license server does not allow the sum total of the reserved user count to exceed the total license count installed on the license server.
The following outlines the steps to configure a device as a license server. These steps assume that you have already performed the license key generation and activation steps.
After you download or receive your license keys by using email:
- In the admin console of the license server, choose System > Configuration > Licensing > Licensing Summary.
- Click on the license agreement link. Read the license agreement and, if you agree to the terms, continue to the next step.
- Enter your license key(s) and click Add.
- Click the Configure Clients tab.
- Select the Enable Licensing server check box.
- (optional) Click Advanced Settings and enter the following values:
- Click Save Changes.
- In the admin console of the license server, choose System > Configuration > Licensing > Configure Clients.
- Click New Client.
- Enter the Client ID. The ID is defined on the client device under System > Configuration > Licensing > Configure Server.
- Enter the client password and confirm it. The password is defined on the client device under System > Configuration > Licensing > Configure Server.
- (optional) Enter the client configuration expiration date.
- Select the client’s platform from the list. The list includes the latest ICS hardware devices like PSA 7000 / ISA 8000.
- Select the product type to be configured to (ICS or IPS).
- For each feature you want to lease to this client, enter:
- Reserved Count— the number of licenses to reserve for this client. The reserve count must be less than the available amount displayed.
- Incremental Count— the incremental number of licenses to grant when the client requests more licenses. If the number of licenses on the client plus this incremental value is greater than the maximum count, no additional licenses are granted.
- Maximum Count— the maximum number of licenses a client can receive for this feature. This value must be equal to or greater than the reserved count.
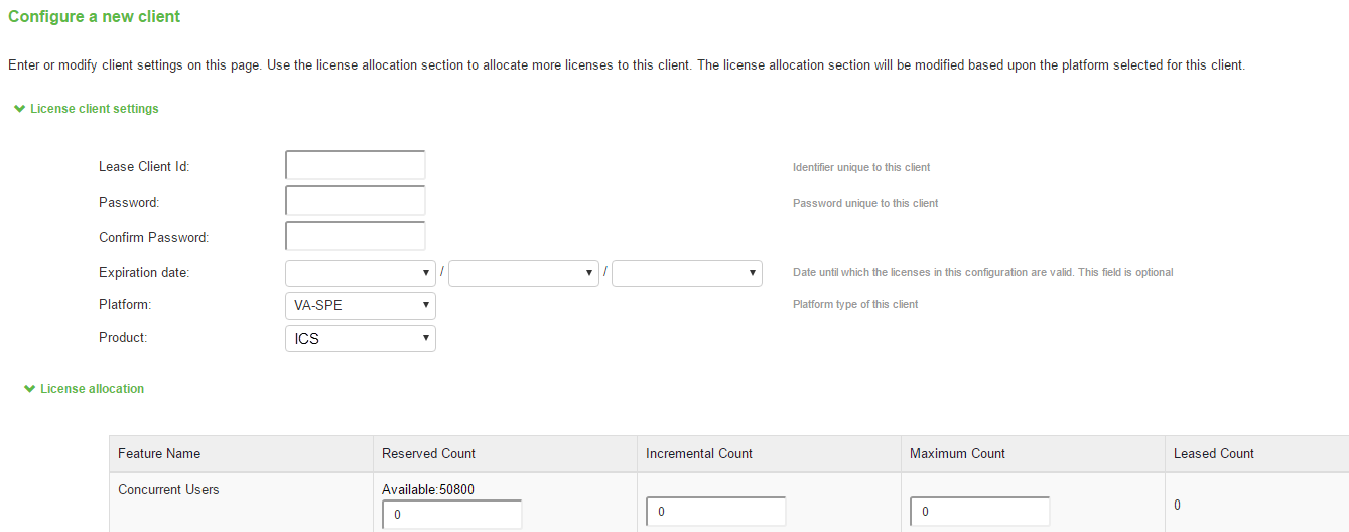
Available counts are updated as you configure the client. For example, see the following figure.
- Click Save Changes.
•Incremental Lease Duration
•Lease Renewal Interval
An example of the summary section after you configure your clients is shown in the following figure.
The following figure depicts a Configured License Server with No Clients.
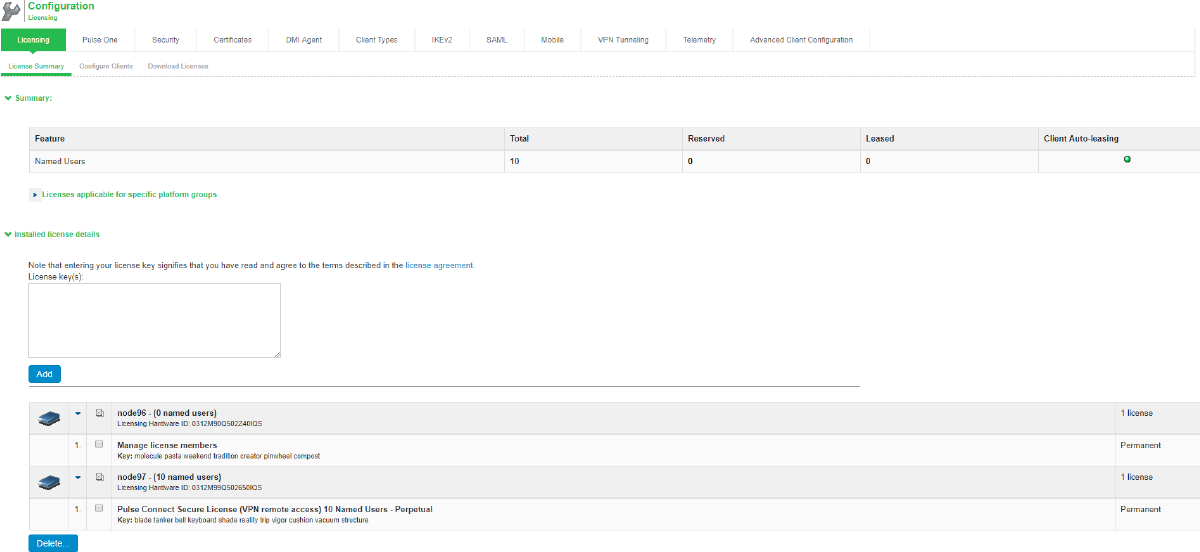
The License clients table displays the client information you entered. If the client is a member of a cluster, the cluster name is also displayed after the client contacts the server.
The following figure depicts the Available Counts are Updated as Clients are Configured.
Configuring a Device as a License Client
Clients are configured to communicate with a particular license server. The client then requests the licenses (over HTTPS) that are allocated to it. An optional LICENSE-MBR license must be installed when clients need to access capacity from non-subscription licenses or if an administrator wants to surrender a client's licenses to the license server. If you are not using a license server, all your devices are still configured as license clients. However, the steps to set up communication with the license server are not needed.
You can configure an ICS/IPS VM as a license client. As a prerequisite, you need ICS 9.1R13.1 License Server and above releases. You can also use 22.x and above releases for leasing licenses to clients.
Prerequisite
Install ICS-SVC or IPS-SVC and the ISA-CORE license to lease licenses to 22.x clients.
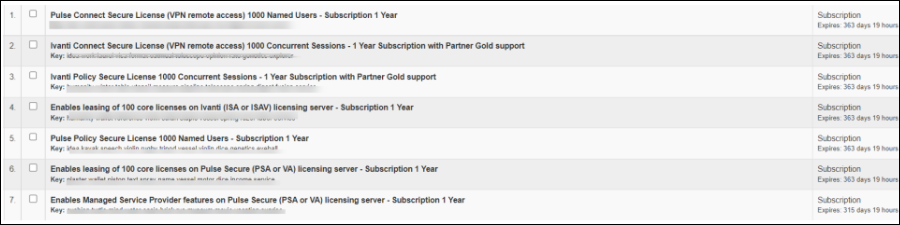
Following are sample SKUs:
• ICS-SVC-GLD-1000U-1YR-Ivanti Connect Secure License (VPN remote Access)1000 Concurrent Sessions
• IPS-SVC-GLD-1000U-1YR-Ivanti Policy Secure License 1000 Concurrent Sessions
• ISA-CORE-100C-1YR - Enables leasing of 100 core license on Ivanti (ISA or ISA-V) licensing Server
Install License on License Server
- In the admin console of the license server, choose System > Configuration > Licensing > Licensing Summary.
- Click on the license agreement link. Read the license agreement and, if you agree to the terms, continue to the next step.
- Enter your license key(s) and click Add.
- Click the Configure Clients tab.
-
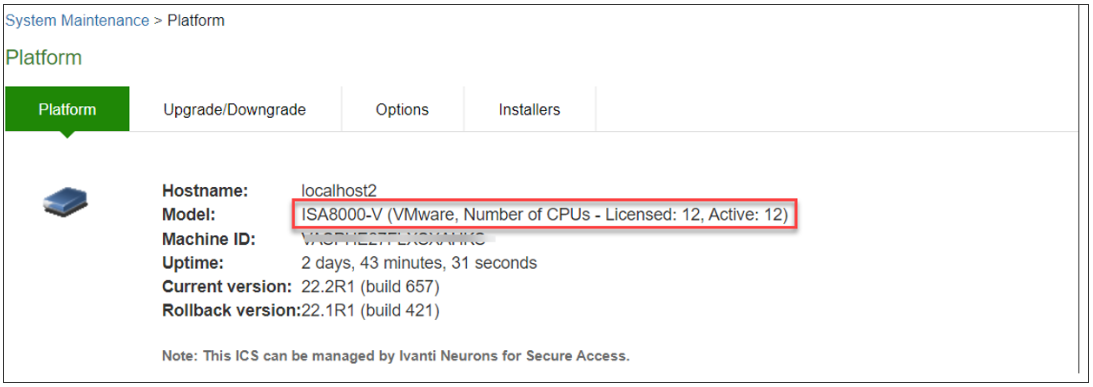
After successful leasing of cores, Platform Model is updated. The following figure depicts the Platform page on License Client after leasing Cores for ISA8000-V.
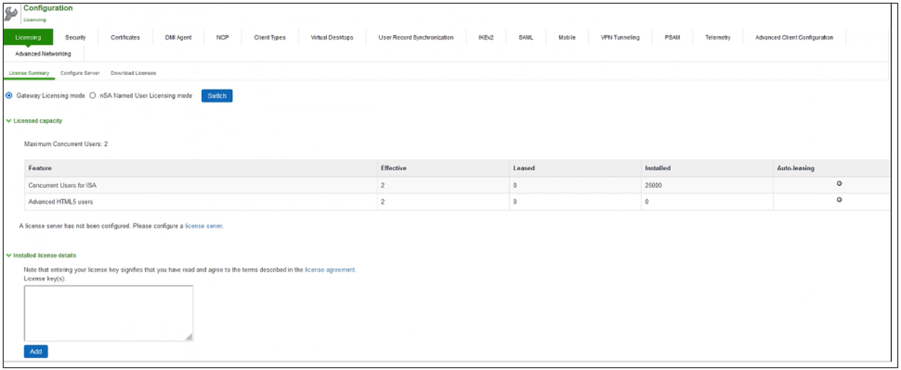
The following figure depicts the Configured License Server with no core licenses installed.
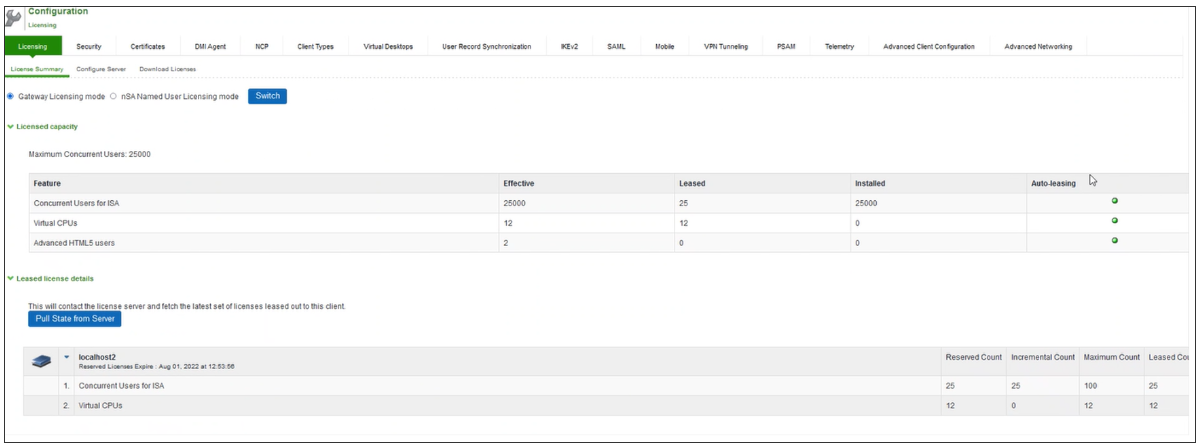
The following figure depicts the License Summary Page - Core Leased Information for ISA-8000V.
To configure an ICS/IPS VM as a License Client on License Server:
- In the admin console of the license server, choose System > Configuration > Licensing > Configure Clients.
- Click New Client.
- Enter the Client ID. The ID is defined on the client Gateway under System > Configuration > Licensing > Configure Server.
- Enter the client password and confirm it. The password is defined on the client Gateway under System > Configuration > Licensing > Configure Server.
- (optional) Enter the client configuration Expiration date.
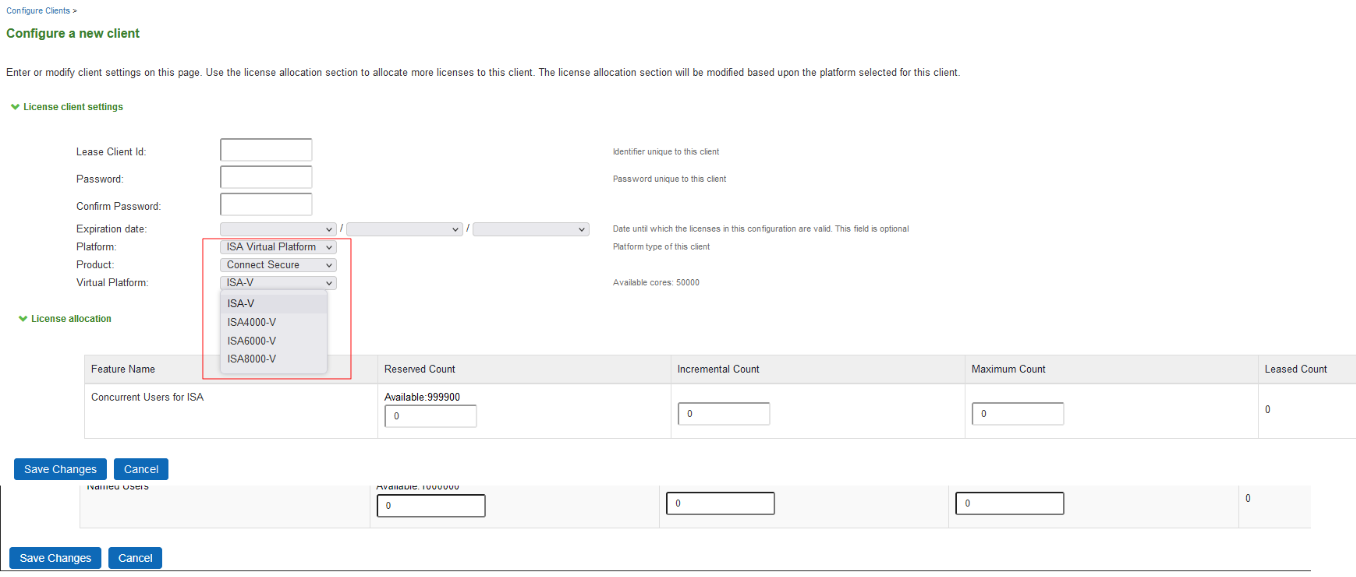
- Select the client’s platform as ISA Virtual Platform.
- Select the product type to be configured to Connect Secure.
- Select the Virtual Platform from the drop-down list, example: ISA-V. Virtual Platform can be one of ISA4000-V, ISA6000-V, and ISA8000-V based on requirement
-
For each feature you want to lease to this client, enter:
- Reserved Count— the number of licenses to reserve for this client. The reserve count must be less than the available amount displayed.
- Incremental Count— the incremental number of licenses to grant when the client requests more licenses. If the number of licenses on the client plus this incremental value is greater than the maximum count, no additional licenses are granted.
- Maximum Count— the maximum number of licenses a client can receive for this feature. This value must be equal to or greater than the reserved count.
- Available counts are updated as you configure the client.
- Click Save Changes. The License clients table displays the client information you entered.
Backing Up and Restoring License Server
License server can be deployed only in an Active-Passive mode, but cloud environments do not support Active-Passive cluster. Hence, license server has to be deployed in a Standalone mode.
Assumption:
Primary Virtual License Server (VLS) is deployed with the following:
•Licenses are installed using valid authorization codes.
•License clients are configured with the host name of the license server, and leasing is working.
An administrator should have the disaster recovery plan and must follow the below steps:
- Export binary system and user configurations from the primary VLS.
- Deploy a fresh secondary VLS.
- Import the system configuration (except network settings and licenses) and user configuration (without downloading the licenses) to secondary VLS.
- When the primary VLS goes down, immediately replace it with the secondary VLS.
Backing Up Configurations
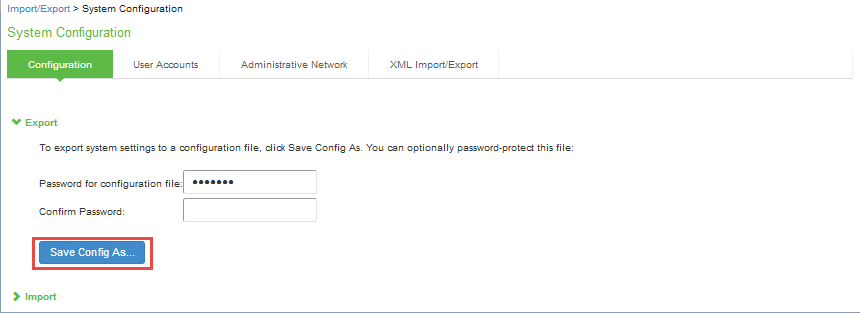
To back up the binary system configurations:
- In the primary VLS, navigate to Maintenance > Import/Export > Import/Export Configuration.
- In the Export section, click Save Config As to export binary system configuration to a file.
- You can optionally password-protect this file.
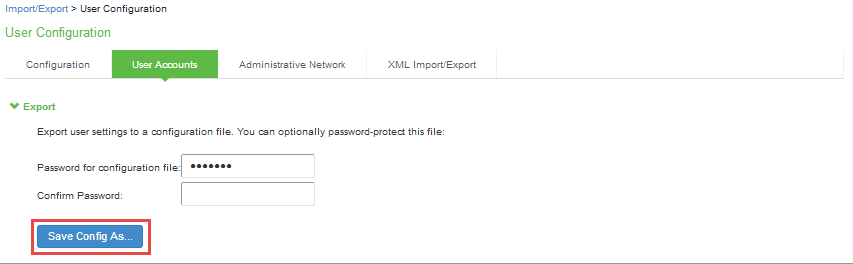
To back up the user configurations:
- In the primary VLS, navigate to Maintenance > Import/Export > Import/Export Users.
- In the Export section, click Save Config As to export users’ configuration to a file.
- You can optionally password-protect this file.
Restoring Configurations
The following procedure assumes that you have already performed the license key generation and activation steps.
After you download or receive your license keys by using email:
- In the admin console, choose System > Configuration > Licensing > Licensing Summary.
- Click on the license agreement link. Under Installed License Details, read the license agreement and, if you agree to the terms, continue to the next step.
- Enter your license key(s) and click Add.
- Click Save Changes.
To configure this device as a license client:
- In the admin console, choose System > Configuration > Licensing > Configure Server.
- Enter the name of the license server. You can specify the IP address or hostname.
- Enter a unique ID for this client. This ID is used to communicate and verify this client with the license server.
- Enter and confirm a password for this client. You will need to enter this password on the license server when adding clients.
- Select the network to communicate with the license server from the Preferred Network menu.
- If the preferred network is configured correctly and enabled, it is used. Otherwise, the internal network is used.
- Select the Verify SSL Certificate check box if you want the client to verify the server’s SSL certificate when establishing communication with it.
IDs can contain alphanumeric characters. There is no restriction on the number of characters.
You will need to enter this ID on the license server when adding clients.
If this client is part of a cluster, you can change configuration information for this node or any node within the same cluster by selecting the node name from the pull-down menu. You can also select Enter cluster to update general cluster configuration information.
Automatic Downloading, Surrendering and Recalling Licenses
Administrators are given the option to automatically download license keys from the Licensing and Software Download Center at https://my.pulsesecure.net. This feature is applicable for all license keys (subscription-based, capacity-based, and so forth.) Communication is done via https.
The automated download process uses the following schedule for contacting the Licensing and Software Download Center:
•Once every 3 months if there are no expiring licenses.
•Once a month if a license is expiring within the next 3 months
•Once a week if a license is expiring within the next 2 weeks
•Once a day if a license grace period is expiring within the next week
Downloading Licenses
To configure the device for automated query and downloading of license keys from the Licensing and Software Download Center at https://my.pulsesecure.net:
- In the admin console, choose System > Configuration > Licensing > Download Licenses.
- Select the preferred network to communicate with the Licensing and Software Download Center at https://my.pulsesecure.net.
- Select Enabled if you want to automate the downloading of license keys.
- Under On Demand License Downloads, enter the authentication code in the text box to contact Ivanti to download and install licenses on the machine.
- Click Save Changes.
You can, at any time, click Download and Install to immediately query the Licensing and Software Download Center at https://my.pulsesecure.net and download the updated license keys.
Surrendering and Recalling Licenses
Surrendering and recalling licenses can be done only at the license client. You can surrender only perpetual licenses.
To surrender user count licenses:
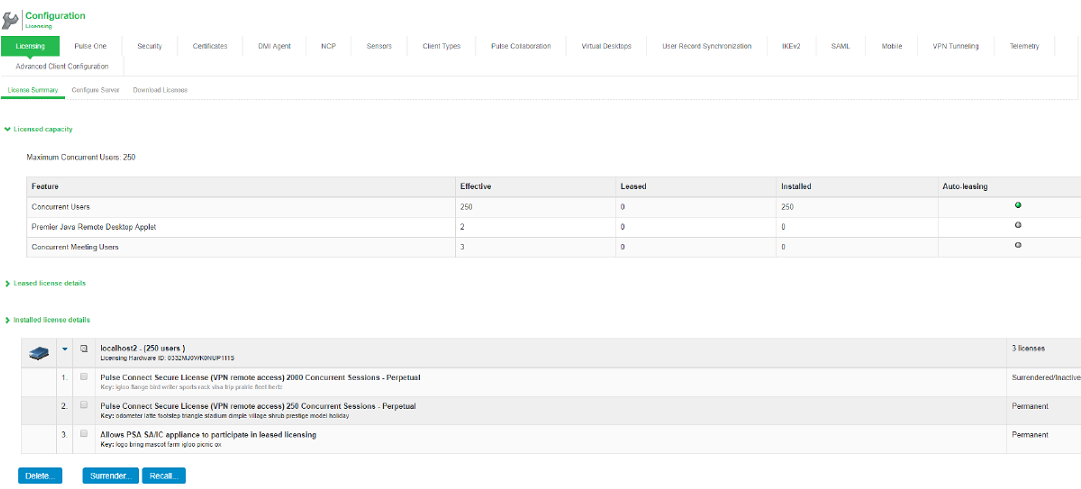
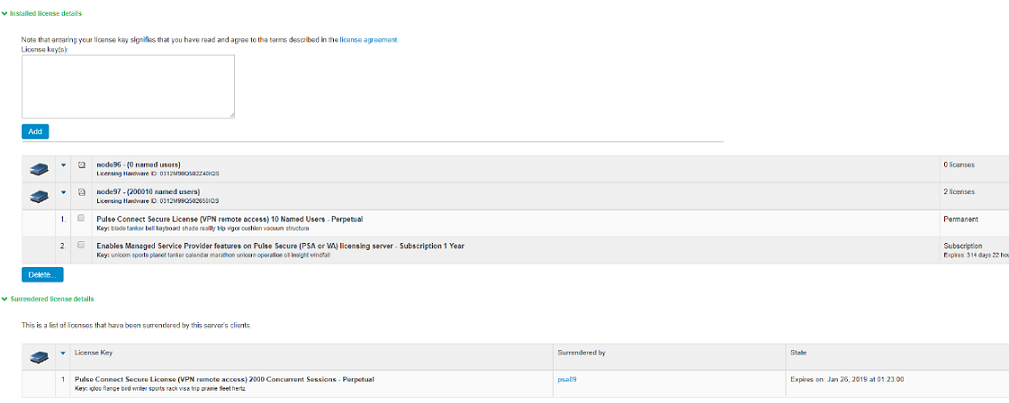
1.In the admin console, choose System > Configuration > Licensing > License Summary.
2.Under Installed License Details, select the check box next to the license you want to surrender and click Surrender.
The Installed License Details table displays the license as being surrendered along with the date it was surrendered. When the client has successfully communicated the surrender status to the server, the License Summary page on the license server displays the surrendered license and the client that surrendered the license. The next two figures show the license details page on a license client and license server.
To recall user count licenses:
- In the admin console, choose System > Configuration > Licensing > License Summary.
- Under Installed License Details, select the check box next to the license you want to recall and click Recall.
Configuring an ICS Virtual Appliance as a Virtual License Server
ICS License Server software is supported on ICS hardware devices only, and has VMWare-based Virtual License Server (VLS) and Cloud based License Server capabilities. The VLS facilitates a license server to run on a virtual machine and provide the same functionality as the hardware-based license server. A VLS leases licenses only to Ivanti hardware and ISA-Vs.
The VLS sends heartbeats every 8 hours to the Pulse Cloud Licensing Service. If it is not able to connect to Pulse Cloud Licensing Service for 24 days, then licensing functionality is disabled. ICS will log this information under Event Logs.
The Configure Clients page appears only after installing or downloading license server license for VLS.
Booting an ICS Virtual Machine in VLS Mode
To boot a virtual machine in the VLS mode:
- Select the Boot option.
- During boot of a virtual machine, the following new console query is added to boot machine as a license server:
- Upon entering y, the virtual machine boots as a license server.
- The virtual machine boots in VLS mode. After virtual machine comes up, only license server related UI items are exposed.
Do you agree to the terms of the license agreement (y/n/r)?.
Entering ‘y’ indicates that you have read and agreed to the terms described in the license agreement.
Do you want to enable Virtual License Server (y/n)?
Enter 'y' to boot as License Server.
Obtaining License Keys
A VLS admin obtains an authentication code for his entitlement externally via e-mail. The admin must enter the authentication code in the license server download page to validate and fetch license keys. If validation is successful, the admin receives the license keys in return.
To obtain license keys:
- Go to System > Configuration > Download Licenses.
- Under On demand license downloads, enter the authentication code in the text box.
-
Click Download and Install.
-
Now, go to the License Summary tab to view a list of licenses installed.
- To delete one or more licenses, select the corresponding check box(es) and click Delete.
Activating and Deactivating Emergency Mode
The emergency mode feature allows you to temporarily enable a system for a large number of users.
In emergency mode, you must first install an In Case of Emergency (ICE) license using the standard system license installation procedure. Then, when the emergency occurs, you can easily activate emergency mode through the system’s web console. When your emergency has passed, you should then deactivate the emergency mode.